命令行编译和打包
本文介绍在不打开 IDE 的情况下,直接通过命令行完成 CI130X、CI13LC等三代芯片及以上系列SDK 的编译、合成分区、固件打包与烧录,分为 Linux 与 Windows 两套环境。
1. Linux
1.1 编译
1.1.1 Linux 编译环境配置
1)登陆 AI 开发平台 https://aiplatform.chipintelli.com/attachment ,进入 开发资料 页面,搜索 riscv-nuclei-elf-gcc-9.2.0-linux 并下载。
2)将下载的文件拷贝到 Linux 环境中,解压;然后放到一个指定的可以访问的目录下,如 /opt/local/usr/riscv-nuclei-elf-gcc。
3)将 /opt/local/usr/riscv-nuclei-elf-gcc 加入到系统环境变量中。
vi ~/.bashrc
将 /opt/local/usr/riscv-nuclei-elf-gcc 或 /opt/local/usr/riscv-nuclei-elf-gcc/bin 写入到 ~/.bashrc 文件对应的位置,保存并退出。然后执行如下命令:
source ~/.bashrc
1.1.2 Linux 编译指令及方法
假如 SDK 的路径为 /opt/local/sdk/CI130X_SDK_ALG_V3.2.12。
1.1.2.1 lua 配置
Linux 一般默认是自带 lua 的,如果没有,则将 SDK 中的 /opt/local/sdk/CI130X_SDK_ALG_V3.2.12/tools/build-tools 拷贝到一个固定目录,如 /opt/local/tools/build-tools。
然后再将 /opt/local/tools/build-tools 加入到系统环境变量中。
1.1.2.2 进入编译目录进行编译
打开命令行窗口:
cd /opt/local/sdk/CI130X_SDK_ALG_V3.2.12/projects/offline_asr_alg_pro_sample/project_file
make clean
make
注意:如果需要提高编译速度,可以使用 make 命令的 -j 选项设置多线程并行编译:
make -j6
1.1.2.3 任意目录下指定编译路径进行编译
在任意目录中打开命令行窗口:
make clean -C /opt/local/sdk/CI130X_SDK_ALG_V3.2.12/projects/offline_asr_alg_pro_sample/project_file
make -C /opt/local/sdk/CI130X_SDK_ALG_V3.2.12/projects/offline_asr_alg_pro_sample/project_file
或者:
make -j6 -C /opt/local/sdk/CI130X_SDK_ALG_V3.2.12/projects/offline_asr_alg_pro_sample/project_file
1.2. 合成分区
可以使用帮助信息查看参数指令:
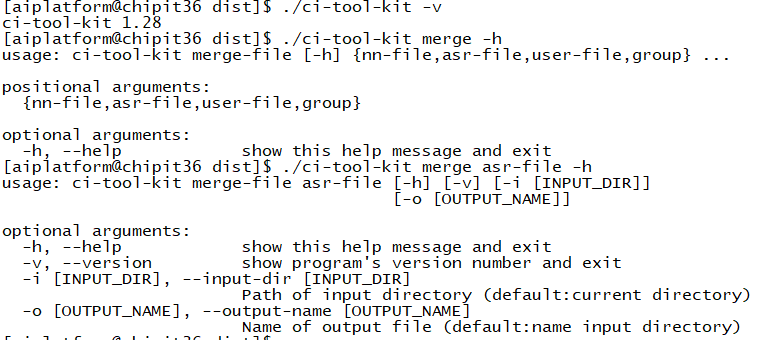
如需要合并 asr 分区,可执行:
/opt/local/sdk/CI130X_SDK_ALG_V3.2.12/ci-tool-kit merge asr-file -i asr
1.3 打包
1.3.1 ci-tool-kit 版本 1.28 以上
查看版本指令:
/opt/local/sdk/CI130X_SDK_ALG_V3.2.12/tools/ci-tool-kit -v
1.3.2 打包核心指令
1.3.2.1 OTA 版
../../../tools/ci-tool-kit mf -f v1\
    --user-code ../firmware/ota_code/ota_code.bin --user-code-size $OTA_SIZE\
    --user-code2 ../firmware/user_code/user_code.bin --user-code2-size $CODE_SIZE\
    --asr-file ../firmware/asr/asr.bin --asr-size $ASR_SIZE\
    --nn-file ../firmware/dnn/dnn.bin --nn-size $DNN_SIZE\
    --voice-file ../firmware/voice/voice.bin --voice-size $VOICE_SIZE\
    --user-file ../firmware/user_file/user_file.bin --user-file-size $USER_FILE_SIZE\
    --rom-size $ROM_SIZE\
    --chip-name $CHIP_NAME\
    --output-path ../firmware\
    --boot-file ../../../tools/boot-file-v4.bin
OTA 参考脚本:
“firmware_pack_ota_v4.sh“代码如下:
case $CHIP_NAME in
    CI1301) ROM_SIZE=$((1*1024*1024))
    ;;
    CI1302) ROM_SIZE=$((2*1024*1024))
    ;;
    CI1303) ROM_SIZE=$((4*1024*1024))
    ;;
    CI1306) ROM_SIZE=$((4*1024*1024))
    ;;
    *)
    echo -e "\033[31mERROR: Please set environment variable: CHIP_NAME\033[0m"
    exit
    ;;
esac

# 计算各文件大小
ASR_SIZE=`ls -l "../firmware/asr/asr.bin" | awk '{print $5}'`
OTA_SIZE=`ls -l "../firmware/ota_code/ota_code.bin" | awk '{print $5}'`
CODE_SIZE=`ls -l "../firmware/user_code/user_code.bin" | awk '{print $5}'`
DNN_SIZE=`ls -l "../firmware/dnn/dnn.bin" | awk '{print $5}'`
VOICE_SIZE=`ls -l "../firmware/voice/voice.bin" | awk '{print $5}'`
USER_FILE_SIZE=`ls -l "../firmware/user_file/user_file.bin" | awk '{print $5}'`

# 对齐到4096字节
ASR_SIZE=$((($ASR_SIZE+4095)/4096*4096))
OTA_SIZE=$((($OTA_SIZE+4095)/4096*4096))
CODE_SIZE=$((($CODE_SIZE+4095)/4096*4096))
DNN_SIZE=$((($DNN_SIZE+4095)/4096*4096))
VOICE_SIZE=$((($VOICE_SIZE+4095)/4096*4096))
USER_FILE_SIZE=$((($USER_FILE_SIZE+4095)/4096*4096))

# 打印大小信息
echo ASR SIZE:$ASR_SIZE
echo CODE SIZE:$CODE_SIZE
echo NN SIZE:$DNN_SIZE
echo VOICE SIZE:$VOICE_SIZE
echo USER FILE SIZE:$USER_FILE_SIZE

# 生成固件
../../../tools/ci-tool-kit mf -f v1\
    --user-code ../firmware/ota_code/ota_code.bin --user-code-size $OTA_SIZE\
    --user-code2 ../firmware/user_code/user_code.bin --user-code2-size $CODE_SIZE\
    --asr-file ../firmware/asr/asr.bin --asr-size $ASR_SIZE\
    --nn-file ../firmware/dnn/dnn.bin --nn-size $DNN_SIZE\
    --voice-file ../firmware/voice/voice.bin --voice-size $VOICE_SIZE\
    --user-file ../firmware/user_file/user_file.bin --user-file-size $USER_FILE_SIZE\
    --rom-size $ROM_SIZE\
    --chip-name $CHIP_NAME\
    --output-path ../firmware\
    --boot-file ../../../tools/boot-file-v4.bin

echo make firmware finished!
1.3.2.2 非 ota 版
../../../tools/ci-tool-kit mf -f v2\
    --user-code ../firmware/user_code/user_code.bin --user-code-size $CODE_SIZE\
    --asr-file ../firmware/asr/asr.bin --asr-size $ASR_SIZE\
    --nn-file ../firmware/dnn/dnn.bin --nn-size $DNN_SIZE\
    --voice-file ../firmware/voice/voice.bin --voice-size $VOICE_SIZE\
    --user-file ../firmware/user_file/user_file.bin --user-file-size $USER_FILE_SIZE\
    --rom-size $ROM_SIZE\
    --chip-name $CHIP_NAME\
    --output-path ../firmware
非 OTA 参考脚本:
“firmware_pack_no_ata.sh”代码如下:
case $CHIP_NAME in
    CI1301) ROM_SIZE=$((1*1024*1024))
    ;;
    CI1302) ROM_SIZE=$((2*1024*1024))
    ;;
    CI1303) ROM_SIZE=$((4*1024*1024))
    ;;
    CI1306) ROM_SIZE=$((4*1024*1024))
    ;;
    *)
    echo -e "\033[31mERROR: Please set environment variable: CHIP_NAME\033[0m"
    exit
    ;;
esac

ASR_SIZE=`ls -l "../firmware/asr/asr.bin" | awk '{print $5}'`
CODE_SIZE=`ls -l "../firmware/user_code/user_code.bin" | awk '{print $5}'`
DNN_SIZE=`ls -l "../firmware/dnn/dnn.bin" | awk '{print $5}'`
VOICE_SIZE=`ls -l "../firmware/voice/voice.bin" | awk '{print $5}'`
USER_FILE_SIZE=`ls -l "../firmware/user_file/user_file.bin" | awk '{print $5}'`

ASR_SIZE=$((($ASR_SIZE+4095)/4096*4096))
CODE_SIZE=$((($CODE_SIZE+4095)/4096*4096))
DNN_SIZE=$((($DNN_SIZE+4095)/4096*4096))
VOICE_SIZE=$((($VOICE_SIZE+4095)/4096*4096))
USER_FILE_SIZE=$((($USER_FILE_SIZE+4095)/4096*4096))

echo ASR SIZE:$ASR_SIZE
echo CODE SIZE:$CODE_SIZE
echo NN SIZE:$DNN_SIZE
echo VOICE SIZE:$VOICE_SIZE
echo USER FILE SIZE:$USER_FILE_SIZE
../../../tools/ci-tool-kit mf -f v2\
    --user-code ../firmware/user_code/user_code.bin --user-code-size $CODE_SIZE\
    --asr-file ../firmware/asr/asr.bin --asr-size $ASR_SIZE\
    --nn-file ../firmware/dnn/dnn.bin --nn-size $DNN_SIZE\
    --voice-file ../firmware/voice/voice.bin --voice-size $VOICE_SIZE\
    --user-file ../firmware/user_file/user_file.bin --user-file-size $USER_FILE_SIZE\
    --rom-size $ROM_SIZE\
    --chip-name $CHIP_NAME\
    --output-path ../firmware

echo make firmware finished!
1.4 编译+打包
指令:
make firmware CHIP_NAME=CI1302
在实际使用时,需要把 CI1302 修改为实际使用的芯片型号。
需要在 utils/common_firmware.mk 的最后调用 utils/common_tail.mk,并保证所有路径和宏都正确。
OTA:
可以在 utils/firmware_pack.sh 中调用 ci-tool-kit 时,传入 ota boot file 的路径参数:--boot-file ..//boot-file-*.bin。
1.5 ci-tool-kit 帮助信息
执行命令:
./ci-tool-kit -h
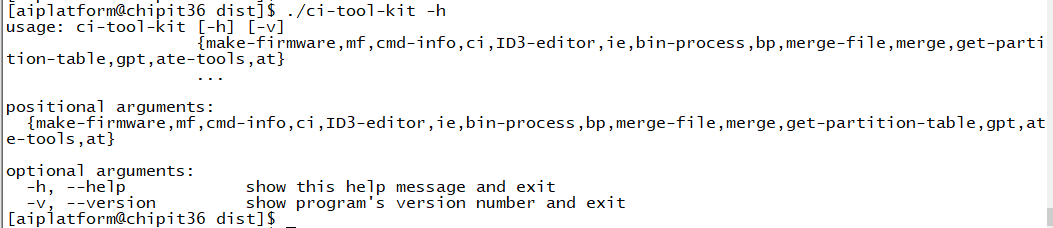
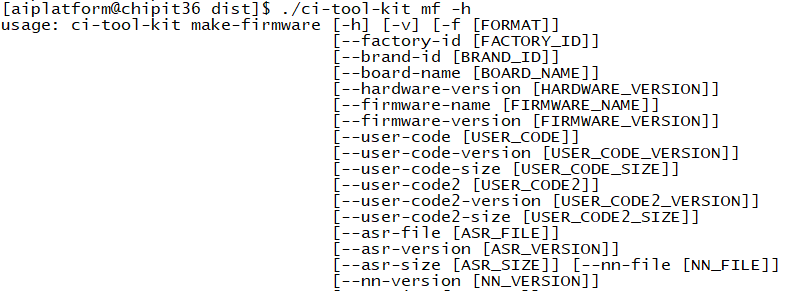
如果需要查看某个具体功能有哪些参数可配置,以做固件为例,可执行如下命令:
./ci-tool-kit mf -h
1.6 烧录
1.6.1 烧录工具
烧录工具:ci_serial_tool_cli_linux_V4.0.zip
1.6.2 版本信息查看命令
./linux_update_tool -v

1.6.3 帮助信息
./linux_update_tool --help
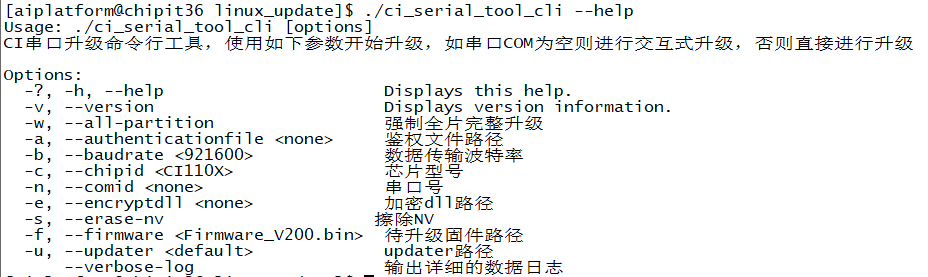
1.6.4 工具调用示例
./ci_serial_tool_cli -n /dev/ttyUSB0 -c CI1306 -b 921600 -w -f fw.bin
注:Linux 下需要注意工具和串口的权限,可以使用 chmod 命令修改权限:
chmod 777 ci_serial_tool_cli
sudo chmod 777 /dev/ttyUSB0
2. Windows
2.1 编译
2.1.1 Windows 编译环境配置
1)登陆 AI 开发平台 https://aiplatform.chipintelli.com/attachment ,进入 开发资料 页面,搜索 riscv-nuclei-elf-gcc-9.2.0-windows 并下载。
2)将下载的文件拷贝到 Windows 环境中,解压;然后放到一个指定的可以访问的目录下,如 D:\gcc\riscv-nuclei-elf-gcc。
3)将 D:\gcc\riscv-nuclei-elf-gcc 加入到系统环境变量中。
右键点击 我的电脑 > 属性 > 高级系统设置 > 高级 > 环境变量:
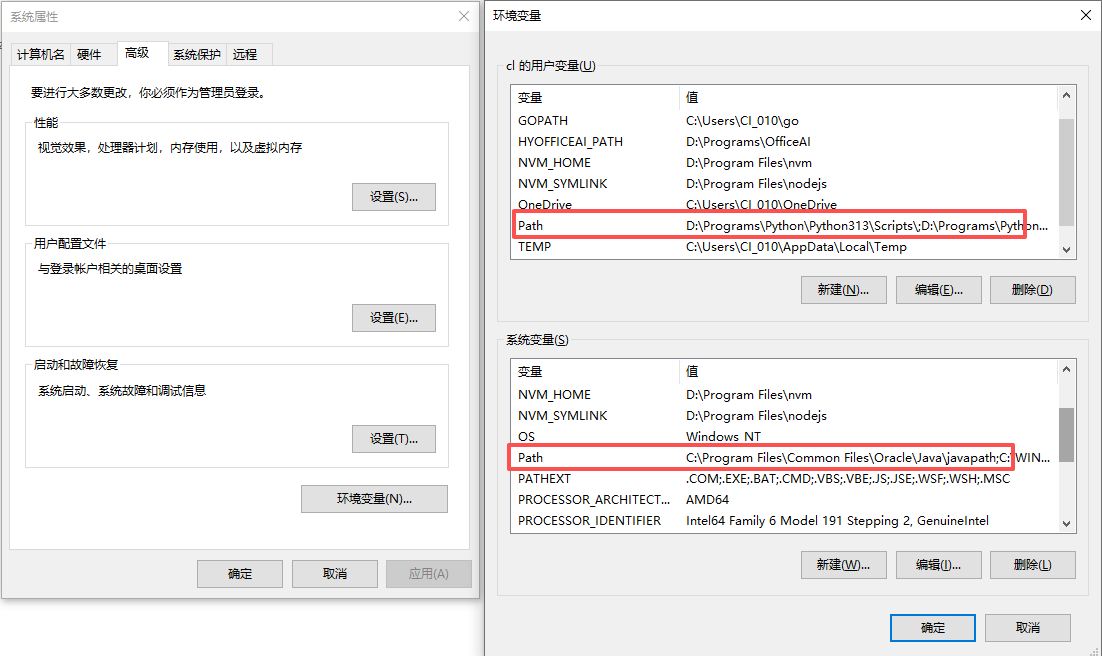
配置完成后逐级点击确认即可。
2.1.2 Windows 编译指令及方法
假如 SDK 的路径为 D:\temp\CI130X_SDK_ALG_V3.2.12。
2.1.2.1 lua 配置
将 SDK 中的 tools/build-tools 拷贝到一个固定目录,然后再将其加入到系统环境变量中。
2.1.2.2 进入编译目录进行编译
打开命令行窗口:
cd D:\temp\CI130X_SDK_ALG_V3.2.12\projects\offline_asr_alg_pro_sample\project_file
make clean
make
注意:如果需要提高编译速度,可以使用 make 命令的 -j 选项设置多线程并行编译:
make -j6
2.1.2.3 任意目录下指定编译路径进行编译
在任意目录中打开命令行窗口:
make clean -C D:\temp\CI130X_SDK_ALG_V3.2.12\projects\offline_asr_alg_pro_sample\project_file
make -C D:\temp\CI130X_SDK_ALG_V3.2.12\projects\offline_asr_alg_pro_sample\project_file
或者:
make -j6 -C D:\temp\CI130X_SDK_ALG_V3.2.12\projects\offline_asr_alg_pro_sample\project_file
2.2 合成分区
可以使用帮助信息查看参数指令:
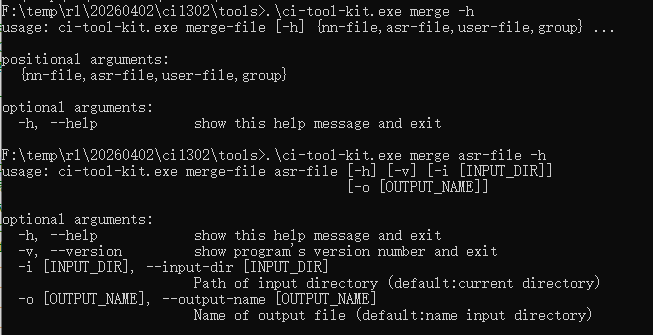
如需要合并 asr 分区,可执行:
D:\temp\CI130X_SDK_ALG_V3.2.12\tools\ci-tool-kit.exe merge asr-file -i asr
2.3 打包
2.3.1 ci-tool-kit 版本 1.28 以上
命令行中的查看版本指令:
D:\temp\CI130X_SDK_ALG_V3.2.12\tools\ci-tool-kit.exe -v
2.3.2 打包核心指令
2.3.2.1 ota 版
..\..\..\tools\ci-tool-kit.exe mf -f v1 --user-code ..\firmware\user_code\user_code.bin --user-code-size !CODE_SIZE! --user-code2 ..\firmware\user_code\user_code.bin --user-code2-size !CODE_SIZE! --asr-file ..\firmware\asr\asr.bin --asr-size !ASR_SIZE! --nn-file ..\firmware\dnn\dnn.bin --nn-size !DNN_SIZE! --voice-file ..\firmware\voice\voice.bin --voice-size !VOICE_SIZE! --user-file ..\firmware\user_file\user_file.bin --user-file-size !USER_FILE_SIZE! --rom-size !ROM_SIZE! --chip-name %CHIP_NAME% --output-path ..\firmware --boot-file ..\..\..\tools\bootfile.bin
ota 参考脚本:
“pack_ota_v4.bat”代码如下:
@echo off
setlocal EnableDelayedExpansion

:: ==========================================
:: 1. 设置 CHIP_NAME 并判断 ROM_SIZE
:: ==========================================
:: 注意:在 bat 中,通常通过 set CHIP_NAME=CI1301 来设置,或者取消下面的注释手动设置
set CHIP_NAME=CI1302

if "%CHIP_NAME%"=="CI1301" set ROM_SIZE=1048576
if "%CHIP_NAME%"=="CI1302" set ROM_SIZE=2097152
if "%CHIP_NAME%"=="CI1303" set ROM_SIZE=4194304
if "%CHIP_NAME%"=="CI1306" set ROM_SIZE=4194304

if "%ROM_SIZE%"=="" (
    echo.
    echo ERROR: Please set environment variable: CHIP_NAME
    exit /b 1
)

:: ==========================================
:: 2. 定义获取文件大小并对齐的函数
:: ==========================================
:: 批处理无法直接像 awk 那样方便地处理命令输出,这里使用 %%~zI 获取文件大小
:: 对齐算法:(Size + 4095) / 4096 * 4096

set ALIGN=4096

call :GetAlignedSize "..\firmware\asr\asr.bin" ASR_SIZE
call :GetAlignedSize "..\firmware\ota_code\ota_code.bin" OTA_SIZE
call :GetAlignedSize "..\firmware\user_code\user_code.bin" CODE_SIZE
call :GetAlignedSize "..\firmware\dnn\dnn.bin" DNN_SIZE
call :GetAlignedSize "..\firmware\voice\voice.bin" VOICE_SIZE
call :GetAlignedSize "..\firmware\user_file\user_file.bin" USER_FILE_SIZE

:: ==========================================
:: 3. 打印大小信息
:: ==========================================
echo ASR SIZE:!ASR_SIZE!
echo OTA_SIZE:!OTA_SIZE!
echo CODE SIZE:!CODE_SIZE!
echo NN SIZE:!DNN_SIZE!
echo VOICE SIZE:!VOICE_SIZE!
echo USER FILE SIZE:!USER_FILE_SIZE!

:: ==========================================
:: 4. 生成固件
:: ==========================================
:: 注意:Windows 下路径分隔符建议使用 \,虽然 / 通常也能工作

..\..\..\tools\ci-tool-kit.exe mf -f v1  --user-code ..\firmware\ota_code\ota_code.bin --user-code-size !OTA_SIZE! --user-code2 ..\firmware\user_code\user_code.bin --user-code2-size !CODE_SIZE! --asr-file ..\firmware\asr\asr.bin --asr-size !ASR_SIZE! --nn-file ..\firmware\dnn\dnn.bin --nn-size !DNN_SIZE! --voice-file ..\firmware\voice\voice.bin --voice-size !VOICE_SIZE! --user-file ..\firmware\user_file\user_file.bin --user-file-size !USER_FILE_SIZE! --rom-size !ROM_SIZE!  --chip-name %CHIP_NAME%  --output-path ..\firmware --boot-file ..\..\..\tools\bootfile.bin

echo make firmware finished!
exit /b 0

:: ==========================================
:: 函数区域
:: ==========================================
:GetAlignedSize
:: 参数1: 文件路径
:: 参数2: 返回变量名
    set "file=%~1"
    set "varName=%~2"

    if not exist "%file%" (
        echo ERROR: File not found: %file%
        set %varName%=0
        goto :eof
    )

    :: 获取文件大小 %%~zI
    for %%I in ("%file%") do set "size=%%~zI"

    :: 计算对齐 (size + 4095) / 4096 * 4096
    :: 注意:set /a 支持直接数学运算
    set /a "aligned=((size + %ALIGN% - 1) / %ALIGN%) * %ALIGN%"

    :: 将结果赋值给调用者的变量名
    set "%varName%=!aligned!"
goto :eof
2.3.2.2 非 ota 版
..\..\..\tools\ci-tool-kit.exe mf -f v2 --user-code ..\firmware\user_code\user_code.bin --user-code-size !CODE_SIZE! --asr-file ..\firmware\asr\asr.bin --asr-size !ASR_SIZE! --nn-file ..\firmware\dnn\dnn.bin --nn-size !DNN_SIZE! --voice-file ..\firmware\voice\voice.bin --voice-size !VOICE_SIZE! --user-file ..\firmware\user_file\user_file.bin --user-file-size !USER_FILE_SIZE! --rom-size !ROM_SIZE! --chip-name %CHIP_NAME% --output-path ..\firmware
非 ota 参考脚本:
“pack.bat”代码如下:
@echo off
setlocal EnableDelayedExpansion

:: ==========================================
:: 1. 设置 CHIP_NAME 并判断 ROM_SIZE
:: ==========================================
:: 注意:在 bat 中,通常通过 set CHIP_NAME=CI1301 来设置,或者取消下面的注释手动设置
set CHIP_NAME=CI1302

if "%CHIP_NAME%"=="CI1301" set ROM_SIZE=1048576
if "%CHIP_NAME%"=="CI1302" set ROM_SIZE=2097152
if "%CHIP_NAME%"=="CI1303" set ROM_SIZE=4194304
if "%CHIP_NAME%"=="CI1306" set ROM_SIZE=4194304

if "%ROM_SIZE%"=="" (
    echo.
    echo ERROR: Please set environment variable: CHIP_NAME
    exit /b 1
)

:: ==========================================
:: 2. 定义获取文件大小并对齐的函数
:: ==========================================
:: 批处理无法直接像 awk 那样方便地处理命令输出,这里使用 %%~zI 获取文件大小
:: 对齐算法:(Size + 4095) / 4096 * 4096

set ALIGN=4096

call :GetAlignedSize "..\firmware\asr\asr.bin" ASR_SIZE
call :GetAlignedSize "..\firmware\user_code\user_code.bin" CODE_SIZE
call :GetAlignedSize "..\firmware\dnn\dnn.bin" DNN_SIZE
call :GetAlignedSize "..\firmware\voice\voice.bin" VOICE_SIZE
call :GetAlignedSize "..\firmware\user_file\user_file.bin" USER_FILE_SIZE

:: ==========================================
:: 3. 打印大小信息
:: ==========================================
echo ASR SIZE:!ASR_SIZE!
::echo OTA_SIZE:!OTA_SIZE!
echo CODE SIZE:!CODE_SIZE!
echo NN SIZE:!DNN_SIZE!
echo VOICE SIZE:!VOICE_SIZE!
echo USER FILE SIZE:!USER_FILE_SIZE!

:: ==========================================
:: 4. 生成固件
:: ==========================================
:: 注意:Windows 下路径分隔符建议使用 \,虽然 / 通常也能工作

..\..\..\tools\ci-tool-kit.exe mf -f v1  --user-code ..\firmware\user_code\user_code.bin --user-code-size !CODE_SIZE! --asr-file ..\firmware\asr\asr.bin --asr-size !ASR_SIZE! --nn-file ..\firmware\dnn\dnn.bin --nn-size !DNN_SIZE! --voice-file ..\firmware\voice\voice.bin --voice-size !VOICE_SIZE! --user-file ..\firmware\user_file\user_file.bin --user-file-size !USER_FILE_SIZE! --rom-size !ROM_SIZE!  --chip-name %CHIP_NAME%  --output-path ..\firmware

echo make firmware finished!
exit /b 0

:: ==========================================
:: 函数区域
:: ==========================================
:GetAlignedSize
:: 参数1: 文件路径
:: 参数2: 返回变量名
    set "file=%~1"
    set "varName=%~2"

    if not exist "%file%" (
        echo ERROR: File not found: %file%
        set %varName%=0
        goto :eof
    )

    :: 获取文件大小 %%~zI
    for %%I in ("%file%") do set "size=%%~zI"

    :: 计算对齐 (size + 4095) / 4096 * 4096
    :: 注意:set /a 支持直接数学运算
    set /a "aligned=((size + %ALIGN% - 1) / %ALIGN%) * %ALIGN%"

    :: 将结果赋值给调用者的变量名
    set "%varName%=!aligned!"
goto :eof
2.4 编译+打包
指令:
make firmware CHIP_NAME=CI1302
在实际使用时,需要把 CI1302 修改为实际使用的芯片型号。
需要在 utils/common_firmware.mk 的最后调用 utils/common_tail.mk,并保证所有路径和宏都正确。
OTA:
可以在 utils/firmware_pack.sh 中调用 ci-tool-kit 时,传入 ota boot file 的路径参数:--boot-file ..//boot-file-*.bin。
2.5 ci-tool-kit 帮助信息
执行命令:
.\ci-tool-kit.exe -h
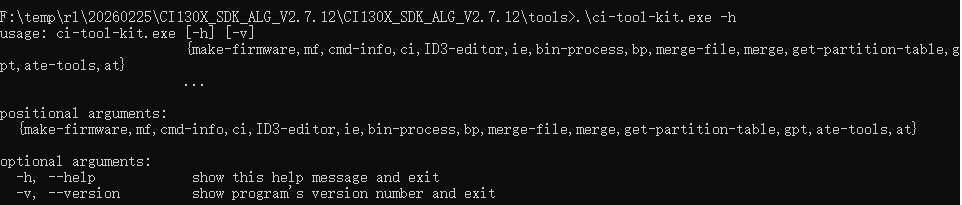
如果需要查看某个具体功能有哪些参数可配置,以做固件为例,可执行如下命令:
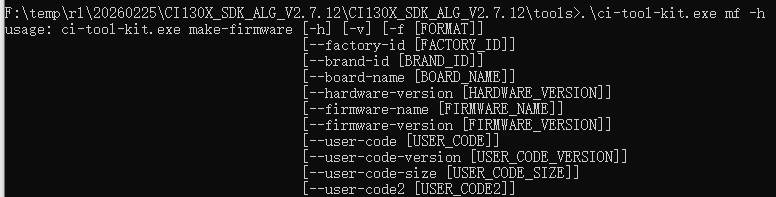
.\ci-tool-kit.exe mf -h