Installation and use of compiled software
1. Overview
- This is the CI230X Software Development Kit (SDK) environment installation and use manual, which is designed to facilitate developers to quickly develop code.
2. Software download
- Official website Visual Studio Code To download VSCodeUserSetup, you must have VSCodeUserSetup-x64-1.60.0.exe or above.
3. Software installation
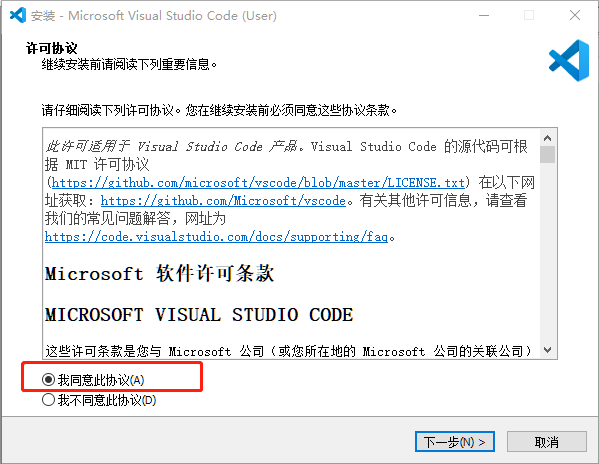
- Double click to install VSCodeUserSetup-x64-1.60.0.exe, select the agreement agreement, and then go to the next step
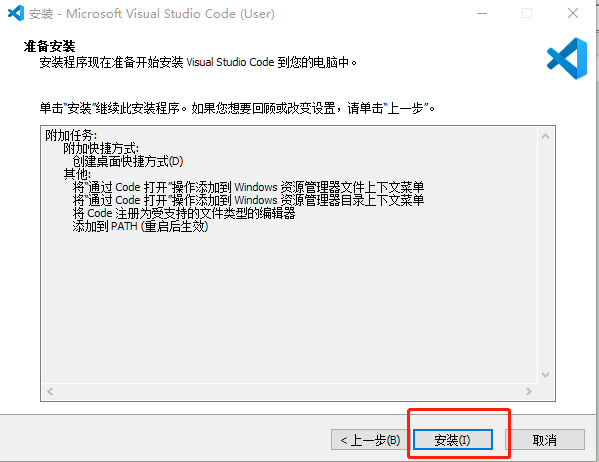
- Check the following configuration and click Next
- Point mounting
- Wait for the installation to complete.
3.1 Method of opening the project
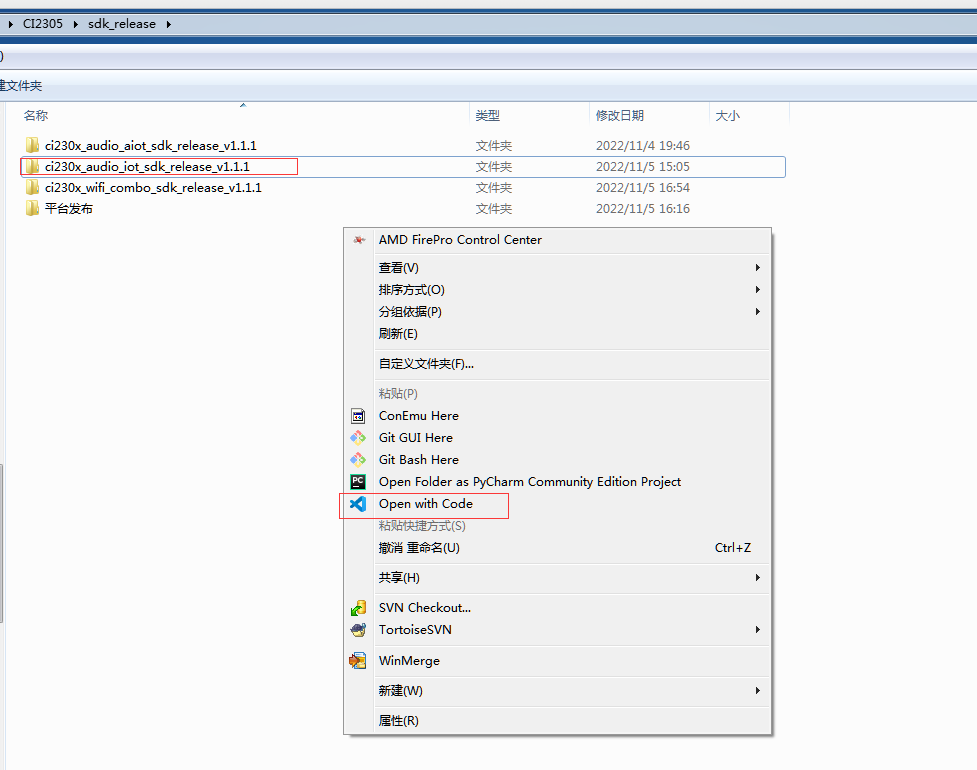
Method 1: Enter CI230X_ SDK folder (the directory where the. vscode folder is located). Right click “Open via Code” in the blank space:
Method 2 : Select C2130X_ SDK folder (the upper level of the. vscode folder), right-click Open via Code:
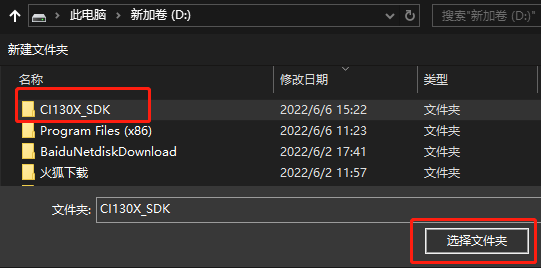
Method 3: First open the vscode software, as shown in Figure 3-6, through the menu bar ->File ->Open Folder, and then select C2130X as shown in Figure 3-7_ SDK folder (one level above the. vscode folder)
4. CI230X voice SDK compilation steps
4.1 Shortcut key of mode 1
- Press the shortcut keys Ctrl+Shift+B, and select compile or clean in the pop-up window below.
4.2 Method 2 Click icon
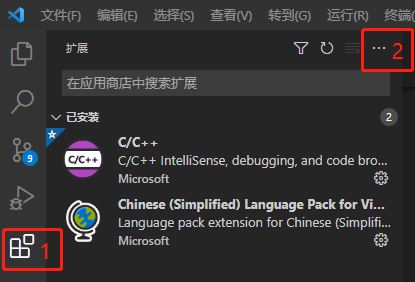
- First install the plug-in, click the software store icon on the left as shown in the figure below, and then click the three ellipsis icons on the upper right corner
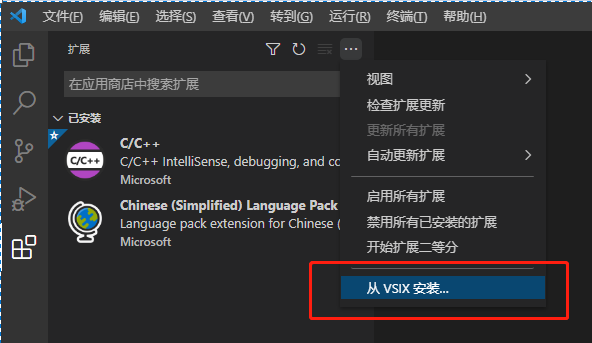
- Select “Install from VSIX” or “Installed from VSIX” from the options shown by clicking the ellipsis
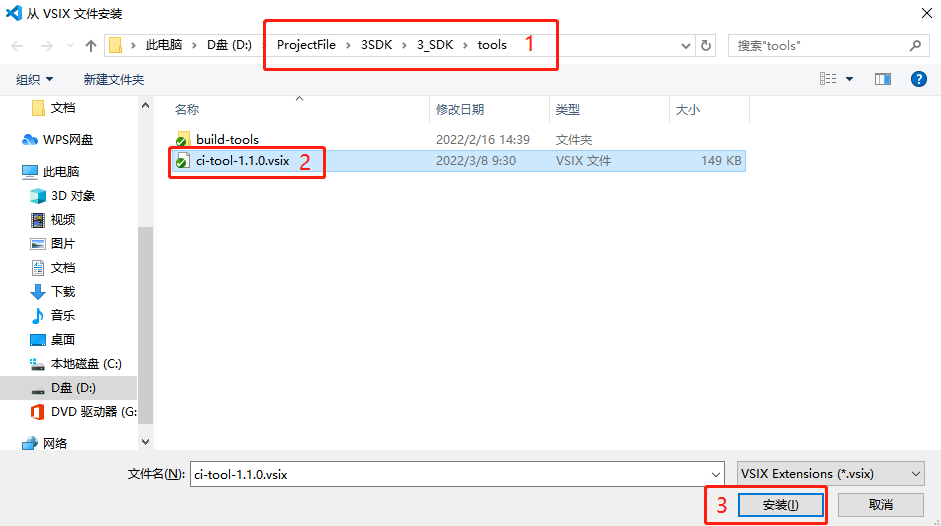
- Find the SDK/tools/ci-tool-1.1.0.vsix installation and wait for the installation to complete. The following compilation icon will appear in the upper left corner.
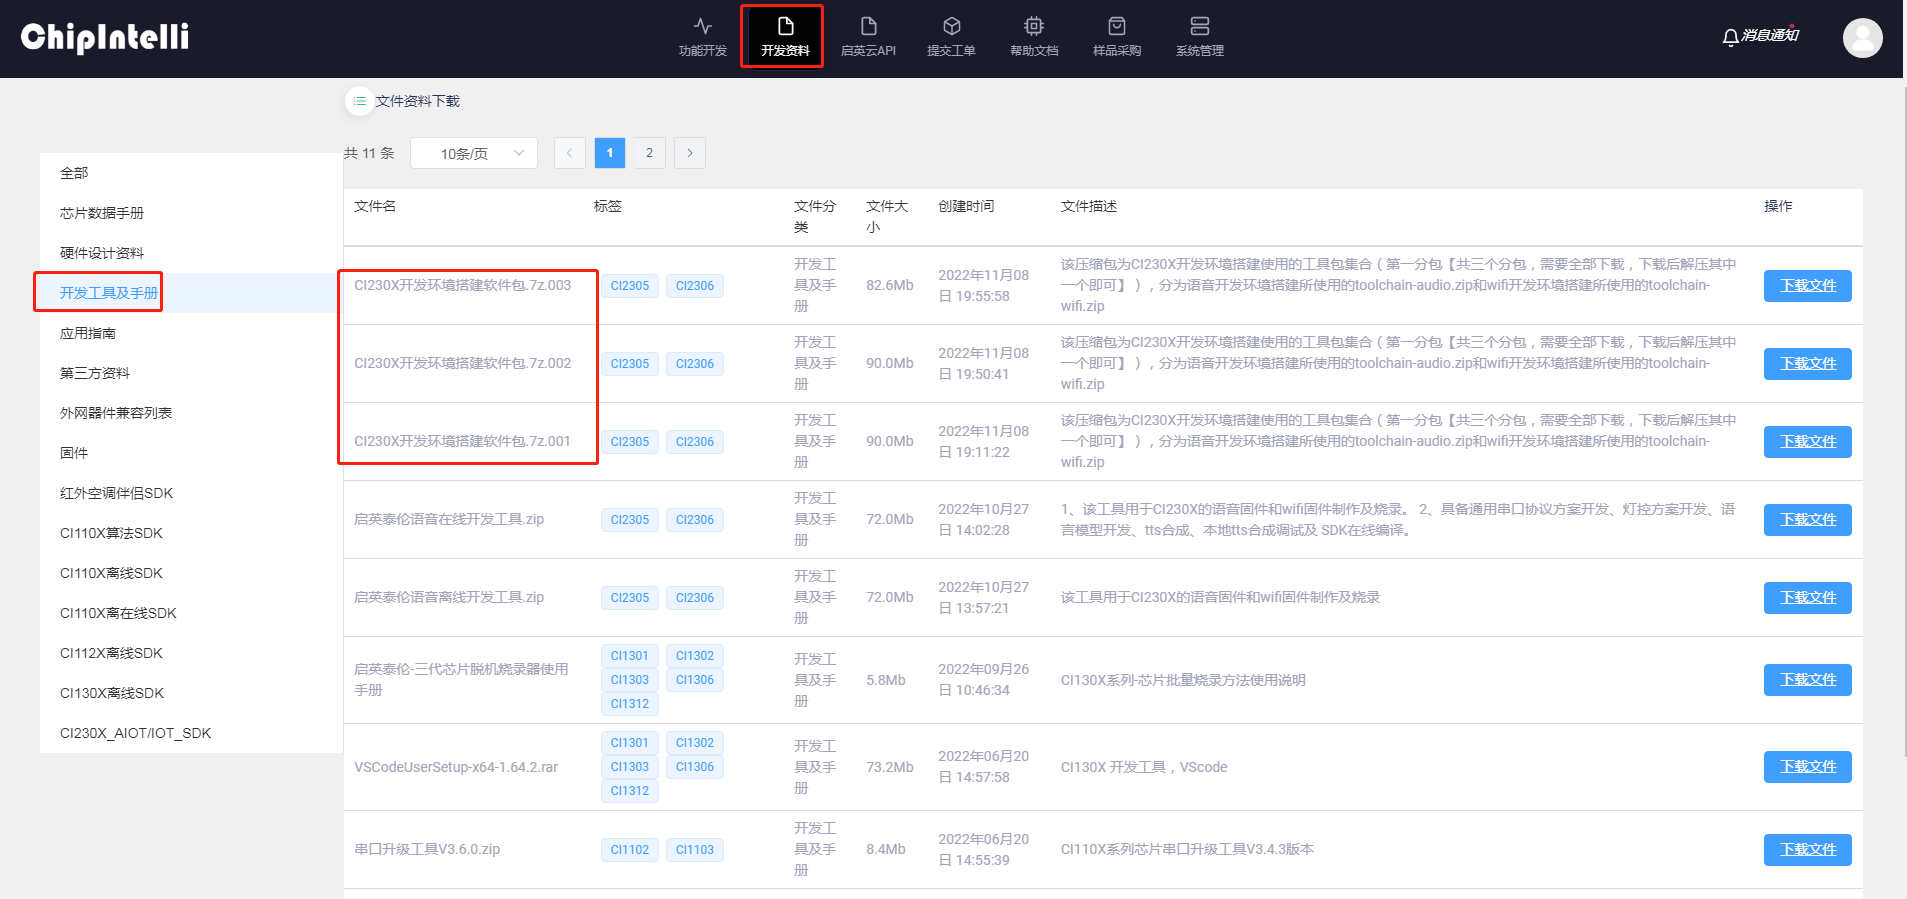
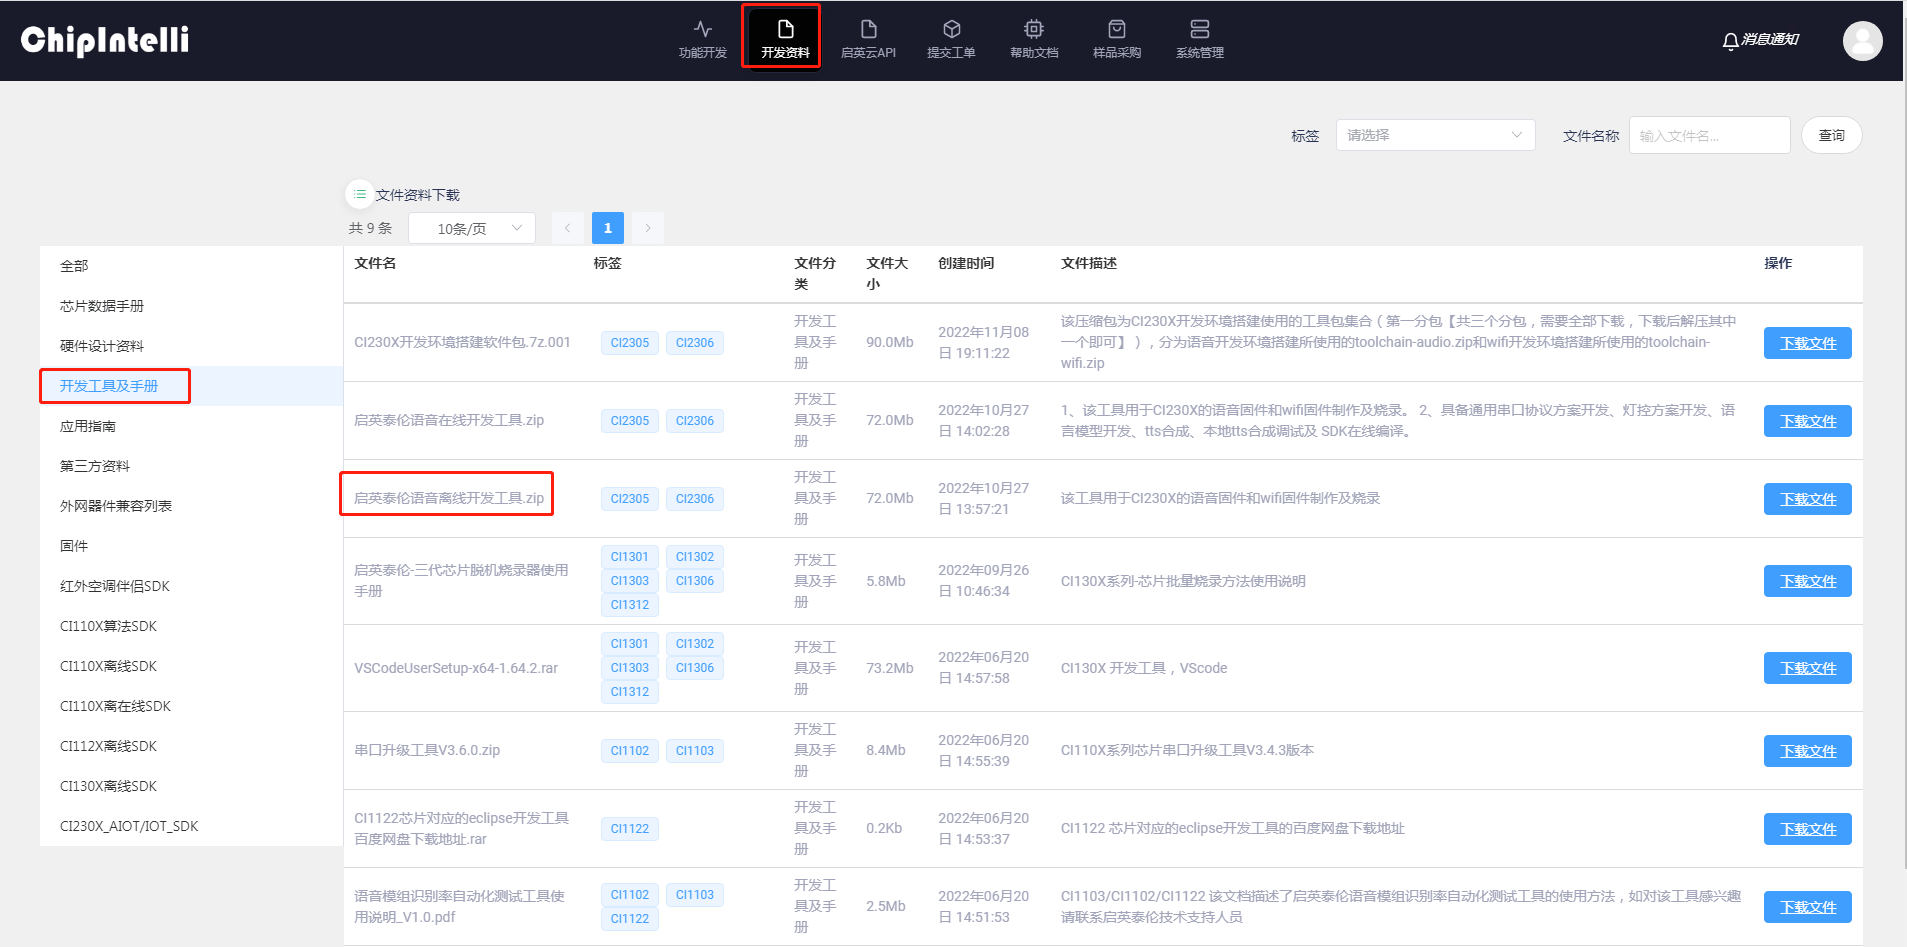
- Please go to Chipintelli’s official website firstly Chipintelli Speech AI Development Platform Download the development environment building software package. The software package includes the voice part and the wifi part. The tool package contains three parts. Please fully download and unzip them to get toolchain audio and toolchain wifi
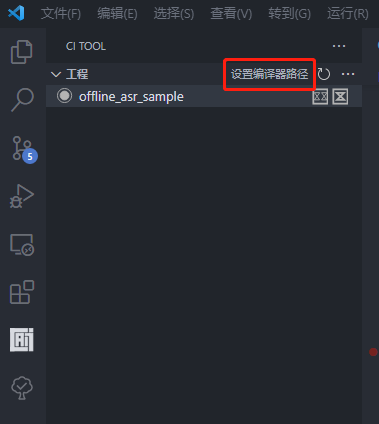
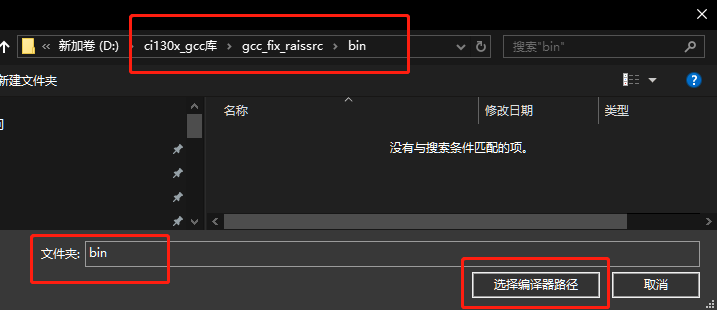
- Set the gcc compilation tool chain and decompress the ci230x_ gcc library. rar to any directory, click the project figure below to set the compiler path.
- select compiler path:
- Click the AI icon in the figure below, and you can see all project names in the option box in the upper left corner
- Right click the project name to be compiled. The options and functions are described as follows:
1: “Generate” : compile
2: “Clean” : Clear
3: “Set as Active Project” : The shortcut key compilation method compiles the active project by default
4: “Set burning serial port number” : Enter the serial port number, such as com3, which is not case sensitive. Please ensure that the input is correct and not occupied.
5: “Composition partition bin file”: Call the composition partition bin file.bat and run composition on the command line in the vscode software output window
6: “Start the package upgrade tool” : Start the serial port upgrade tool. exe
7: “Burn user code” : Burn user_ code.bin
5. Method of adding source files to the CI230X voice SDK
Description
If users add new source code files in the SDK of CI230X, they must find the project file SDK projects cias_ aiot_ audio\project_ file\source_ File.prj, refer to the following example to add files to the project compilation.
5.1 Add. h header file
- Find the location of the//header file path. Note, and fill in the relative path of the. h header file with reference to the example
//header file path.
include-path: driver/ci130x_ chip_ driver/inc
include-path: driver/boards
5.2 Adding. c Source Files
- Find the location of the//source files. Note, and fill in the relative path of the. c source file with reference to the example
//source files.
source-file: driver/ci130x_ chip_ driver/src/ci130x_ core_ eclic.c
source-file: driver/ci130x_ chip_ driver/src/ci130x_ core_ timer.c
5.3 Add. a library file
- Fill in the relative path of the. a library file by referring to the example
library-file: libs/libnewlib_ port.a
library-file: libs/libasr.a
6. CI230X voice part SDK firmware burning
Please first go to Chipintelli AI developer platform Chipintelli Speech AI Development Platform Download voice development tool from the database: Chipintelli voice offline development tool The wifi firmware and voice firmware of zip and CI230X will be produced and burned through this tool.
6.1 Step 1 Package and Upgrade Firmware
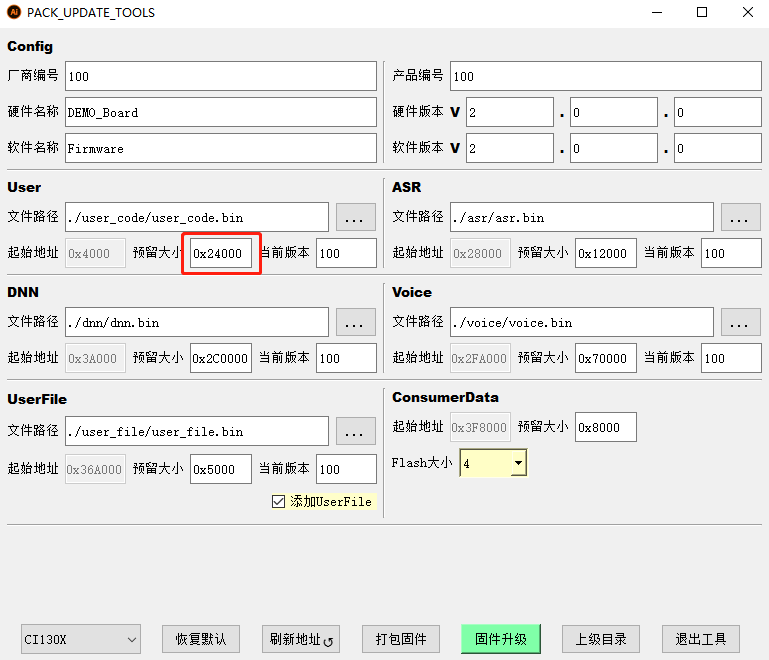
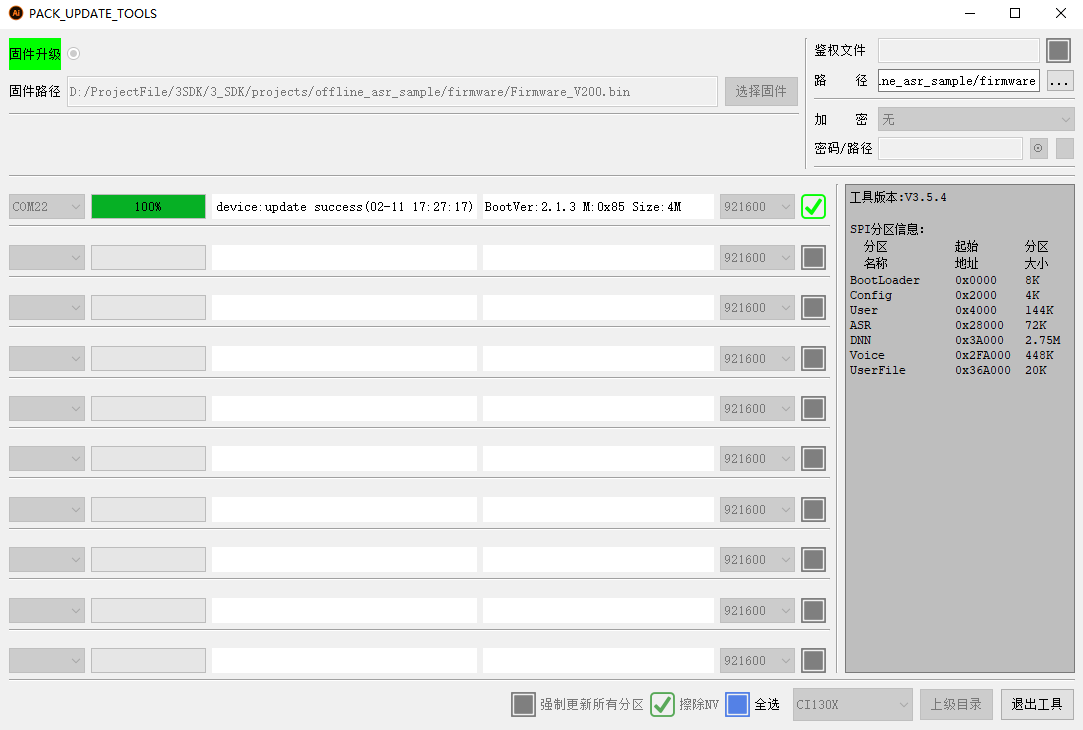
- Start the package upgrade tool, enter the firmware package interface, select Chip ->Import Firmware Partition File ->Calculate Partition File Address Automatically ->Package Firmware. If the firmware generation is too large, change the flash size, as shown in the figure:
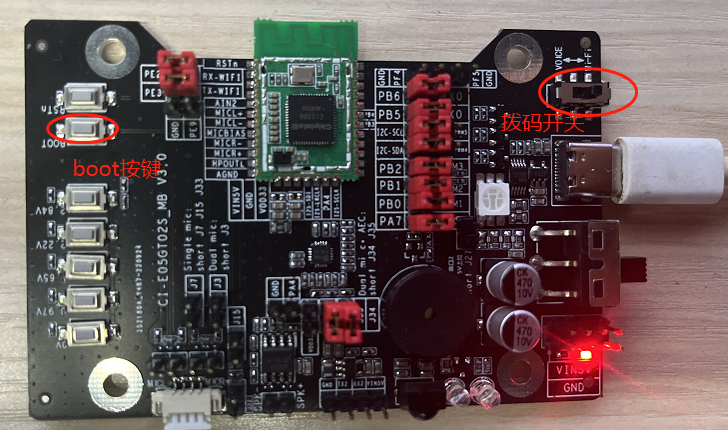
- Click Firmware Upgrade to burn the composite firmware (if you use our development board CI-E05G02S_MB, you need to turn the dial switch to VOICE to burn. Refer to Figure 10-2 for the development board diagram)
6.2 Step 2 Burn the use code
-
For applications that only modify the use code partition during debugging, they can be directly burned in the vscode compiler without repackaging and upgrading the firmware. The upgrade method is as follows:
-
Right click the project name, select Burn use code (or press Ctrl+F11), and perform hardware reset according to the following prompts:
- The upgrade completion interface is as follows:
7. FAQs about the CI230X voice SDK
7.1 Failed to upgrade use code
- The reason is that the current burning use_ code. The bin size exceeds the size reserved for the user partition in the firmware. To solve this problem, use the firmware packaging and upgrading tool to repackage the firmware and increase the use partition to a reasonable value. Refer to Section 6.1.
8. Building of CI230X WIFI SDK compilation and development environment
8.1. Python 3 Installation:
-
Double click the Python 3 installation package to install it by default. The directory can be defined as eg; D:\works\TOOLS\LNxxxx_ tool;
-
PATH environment variable setting: open the environment variable editor, edit the user or system environment variable PATH, and add the corresponding python3 installation PATH, as shown in the figure
-
Enter the python 3 installation path and copy python Exe and rename it python3.exe
- Confirm whether the installation of python is successful: python3 – version (re open the command line terminal to use the command). The version information will be displayed if the installation is successful, as shown in the figure
8.2. ARM GCC tool chain installation
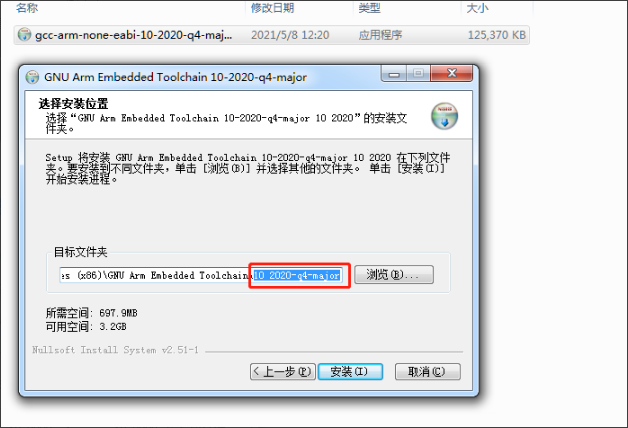
- Install gcc-arm-none-eabi-10-2020-q4-major-win32.exe to the specified directory; (Note: the installation path must not start with a number, and there should be no space in the installation path, otherwise an error will be reported when compiling and packaging), as shown in the figure
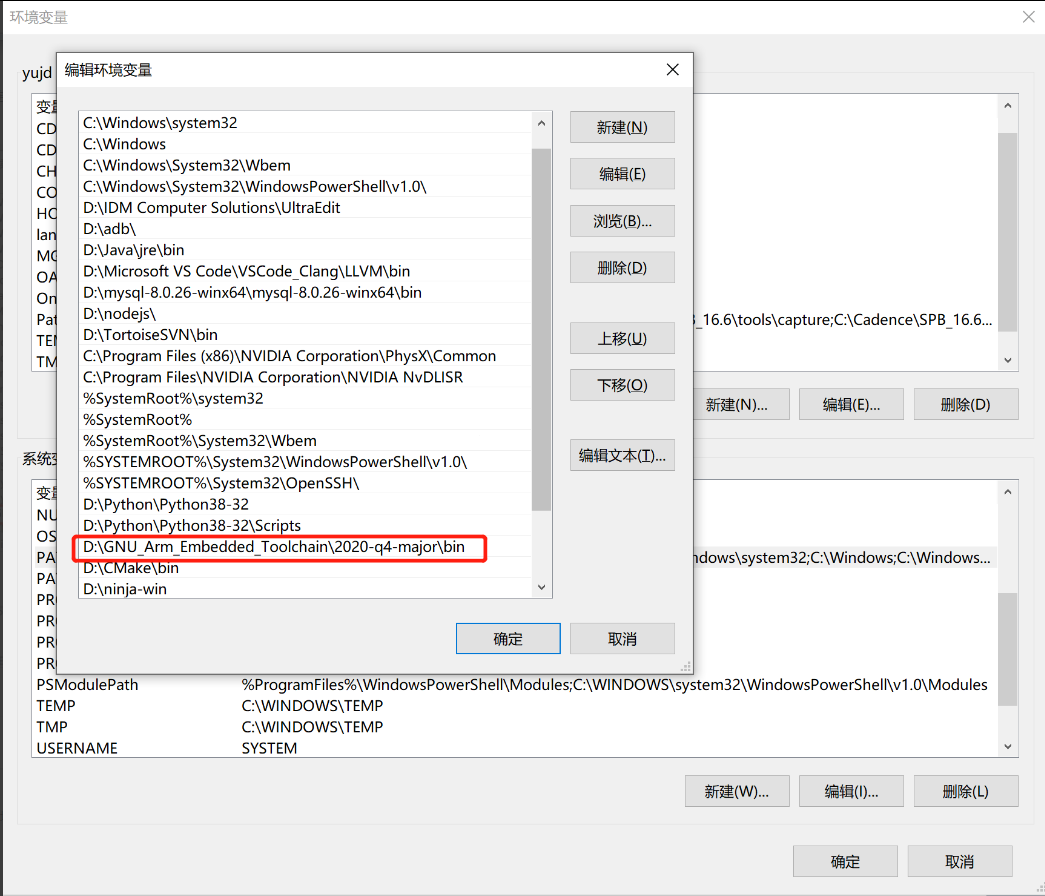
- Add a tool chain to the system environment variable PATH, as shown in the figure
- Add an environment variable name: CROSS_ TOOLCHAIN_ ROOT, variable value: D: GNU_ Arm_ Embedded_ Toolchain 2020-q4-major, as shown in the figure
- Confirm whether the arm none eabi gcc tool chain is successfully installed: arm none eabi gcc – version (re open the command line terminal to use the command). The version information will be displayed if the installation is successful, as shown in the figure
8.3. ARM GCC tool chain installation
- Install cmake-3.17.2win64-x64.msi to the specified directory
- Add the Cmake installation path to the environment variable, as shown in the figure
- Confirm whether the installation of Cmake is successful: cmake – version (reopen the command line terminal to use the command). The version information will be displayed if the installation is successful, as shown in the figure
8.4. Ninja installation
-
Unzip the EXE file of the installation package to the specified directory: xxx xxx inja win. No installation is required.
-
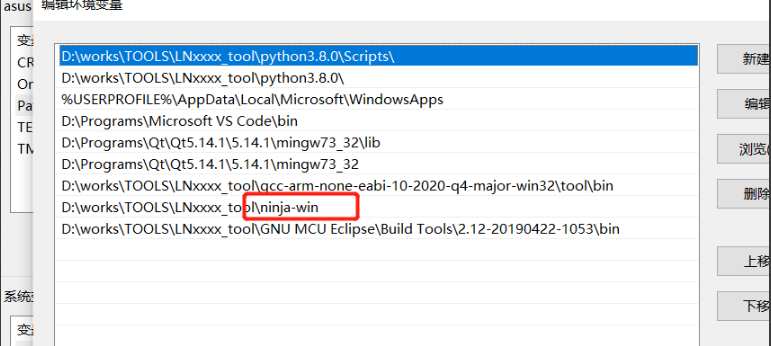
Add the Ninja installation path to the environment variable, as shown in the figure
- Confirm whether the installation of Ninja is successful: Ninja – version (re open the command line terminal to use the command). The version information will be displayed if the installation is successful, as shown in the figure
9. CI230X WIFI SDK compilation steps (Note: when importing WIFI SDK, try not to make the import path too long, otherwise it is easy to compile and report errors)
-
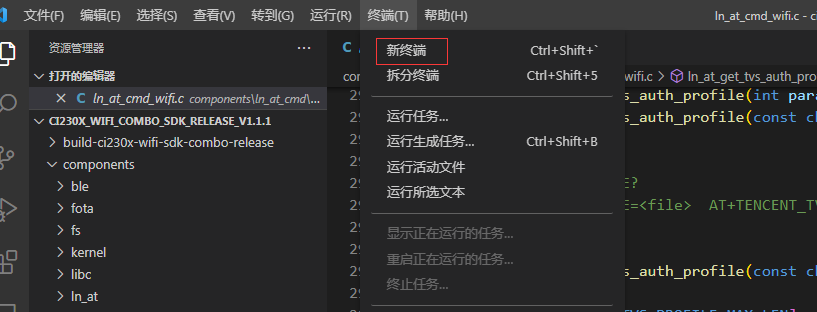
Create a new terminal in vscode, and then start to execute the compilation instructions. Refer to the following compilation instructions. The compilation results are shown in the figure
-
Clear result: python3 start_ build. py clean
- Compilation project: python3 start_ build. py build
- Clear and compile in one: python3 start_ build. py rebuild
10. CI230X WIFI partial SDK firmware burning
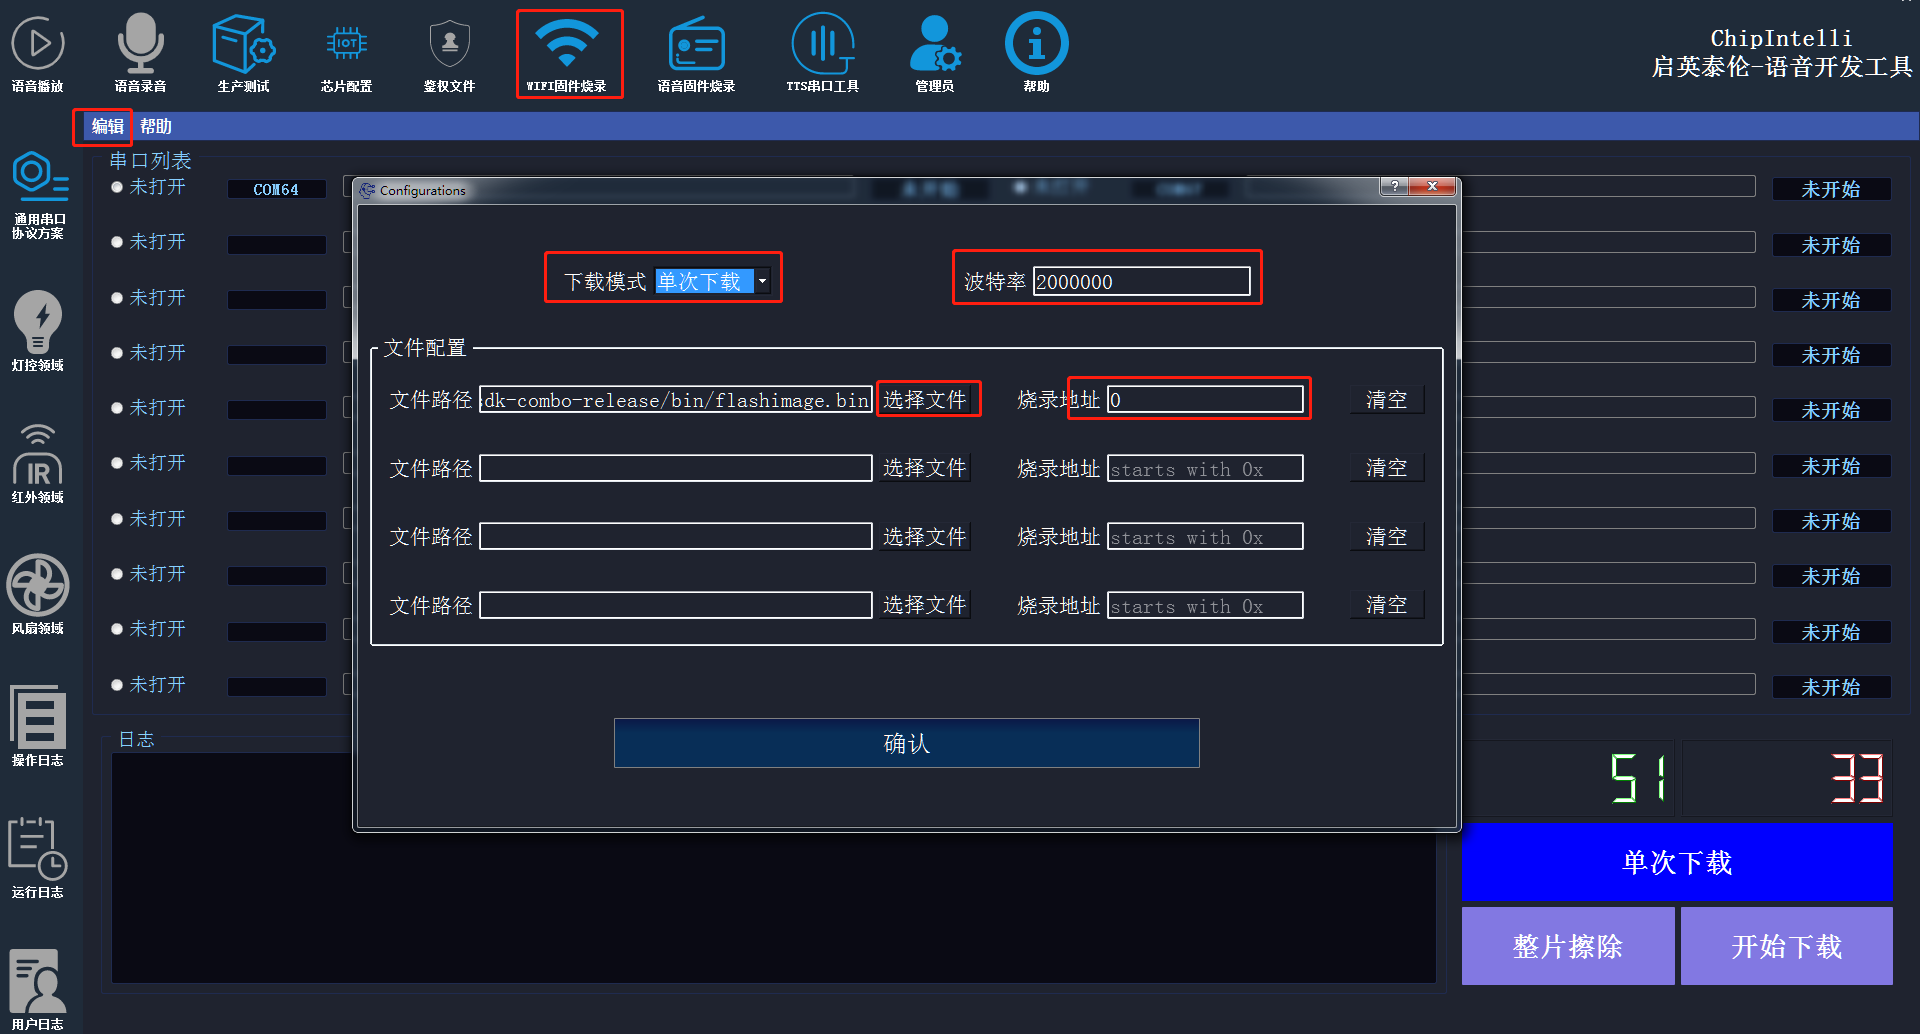
- Enter the wifi burning interface, and click Edit (select firmware, set the burning address (starting from 0x00 by default), and set the baud rate (generally 2Mbits/s), as shown in the figure
-
Let the device enter the burning mode (press and hold the BOOT button, restart the device, and release the boot button after restarting)
-
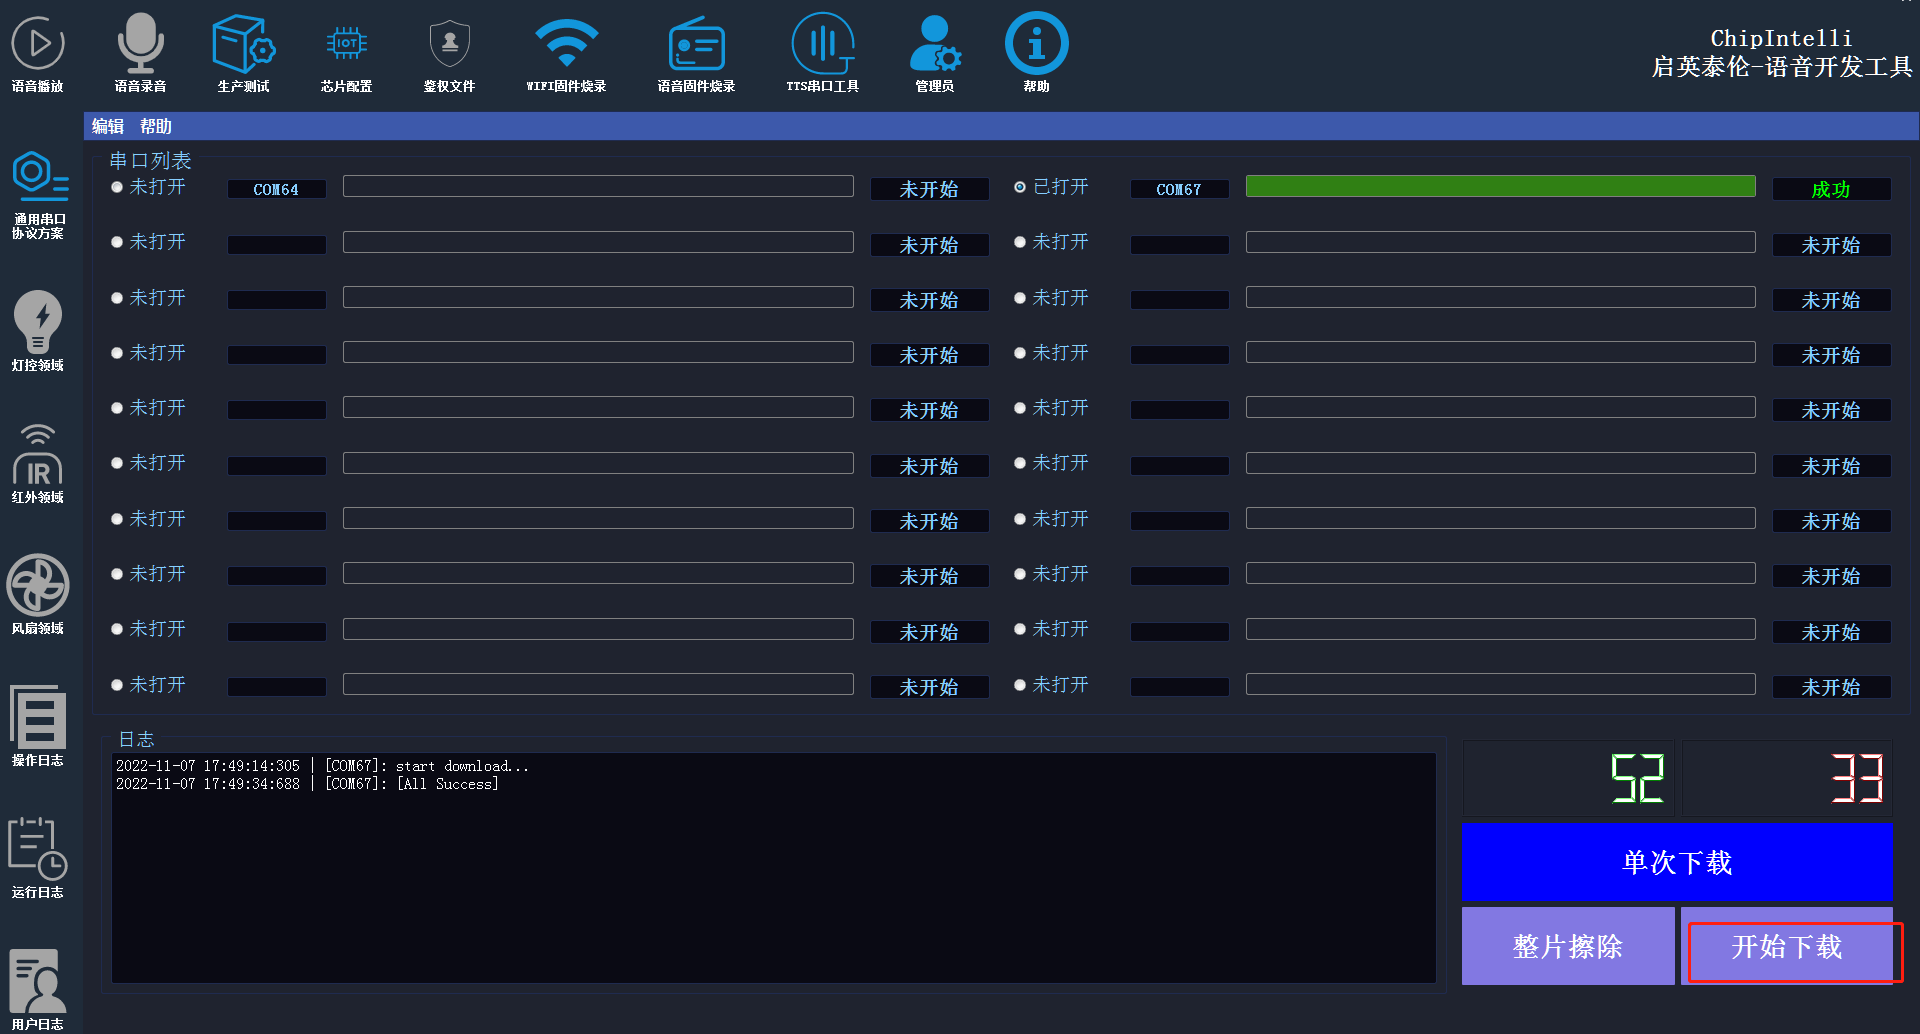
After the device restarts, click the Start Download icon to download. The dial switch of the development board needs to be turned to the wifi side
