AI Platform Product Development Process Guidance
If you are using Chipintelli AI Speech Development Platform, please see the following product development process guidance.
Getting Started
1. Get Started
If you are the first time to develop with intelligent voice products, go to: ☞Automatic Speech Recognition(ASR) Principles;
If you are familiar with intelligent voice technology, log into the AI speech development platform and watch the ☞Principles of Automatic Speech Recognition on the Edge to gain insights into Chipintelli’s voice chip.
For experienced AI voice developers, go to ☞User Guide for Chipintelli AI Speech Development Platform. The platform provides comprehensive information and resources for product development. The platform is free to use. After registration, you can start your product development journey.
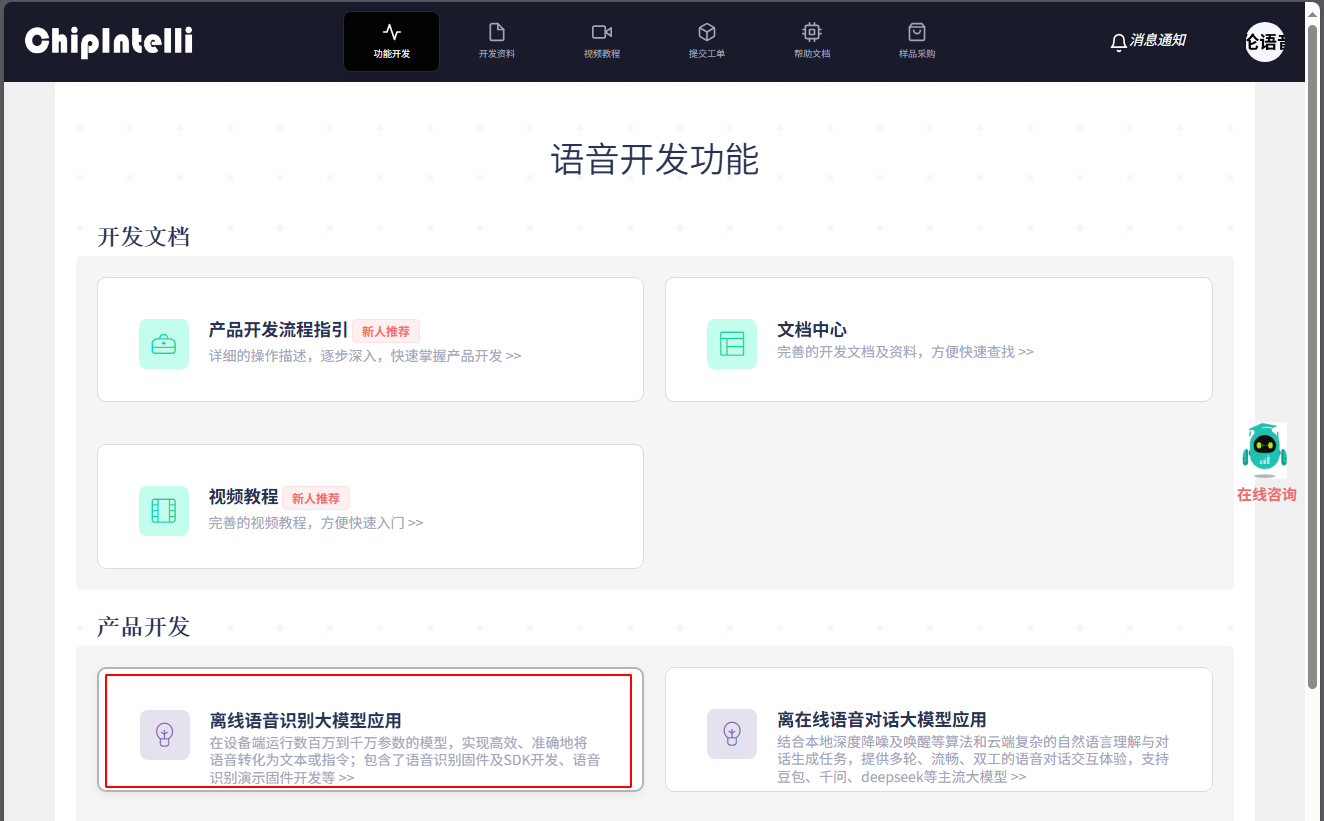
2. Acquiring Evaluation Kit
If you are new to use our chip, it is advised to select our ready-to-use evaluation kit for development. This kit includes instructions, software SDK, firmware, and tools to facilitate development. If you don’t have a evaluation kit, go to ☞Hardware Selection Guide. Follow the instructions in ☞Sample and Bulk Purchase to purchase the necessary components.
If you have an evaluation kit but don’t know how it works, go to ☞Fundamentals of Product Development section to learn more about product development.
3. Getting Started with Development Board
Prepare your development board, connect it to the power supply, and when you hear the welcome voice prompt, you can start your journey of intelligent voice interaction.
If you still want to make your own demo firmware after the experience, please refer to the following advanced chapter.
Advanced
1. Development Environment Preparation
If you do not have a evaluation kit at present, please obtain the evaluation kit in accordance with the contents of the above Article ☞Acquiring evaluation kit.If you already have our evaluation kit, please continue reading.
1.1 Build a Programmable Development Environment
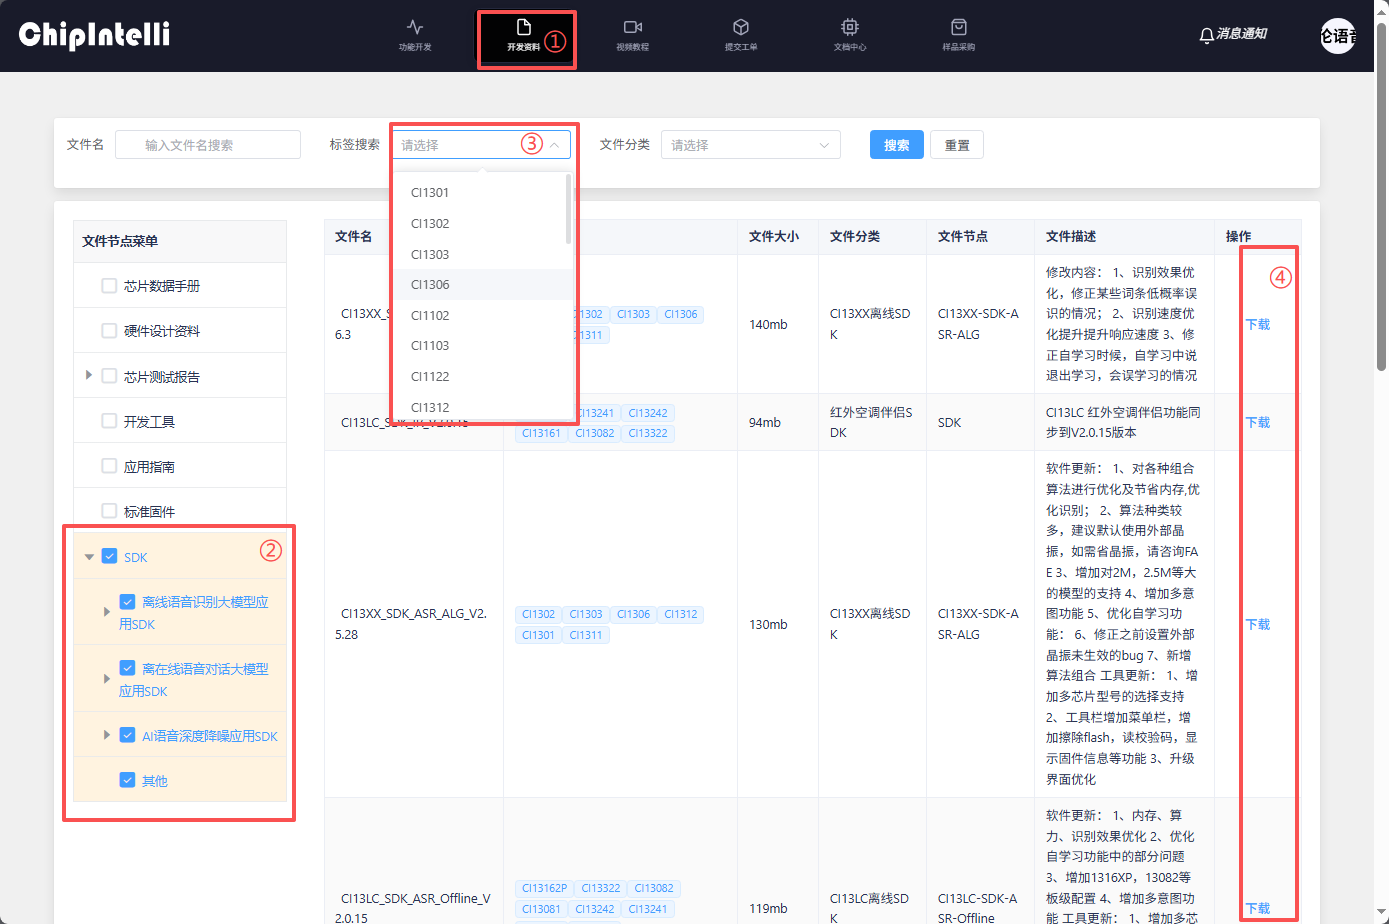
Enter the 【☞AI Speech Development Platform】. Click on “Resources” and Search “SDK” in the FileName. Then, select and download the SDK according to the chip model series you are using. After downloading, extract the files and follow the instructions in 【☞IDE Setup and Usage】 to set up the programmable development environment.
1.2 Evaluation Kit Assembly
After receiving the evaluation kit, please refer to the following steps to assemble and confirm the function of the evaluation kit:
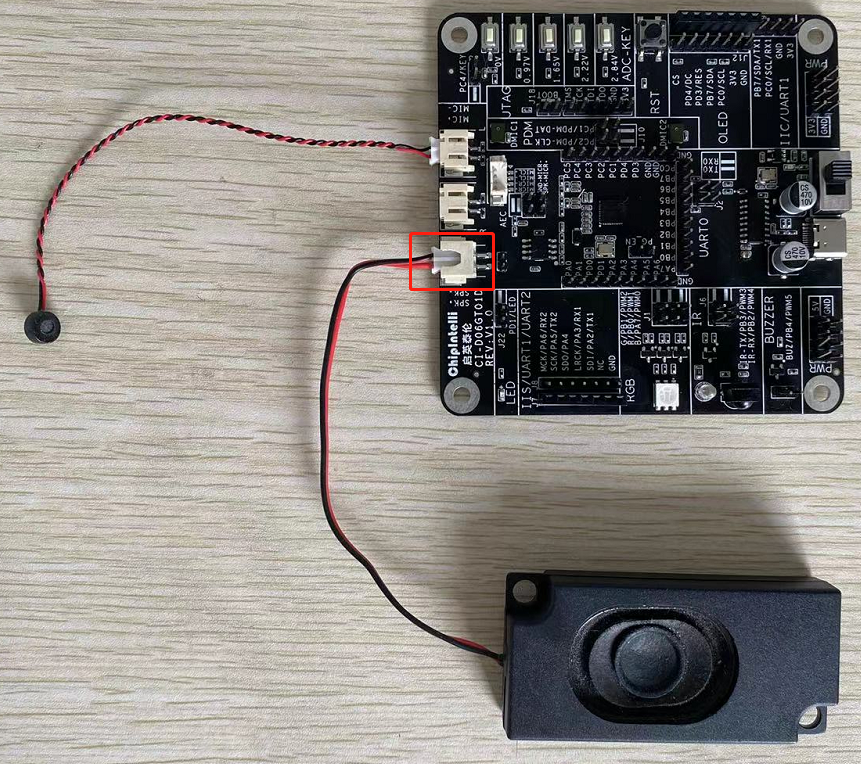
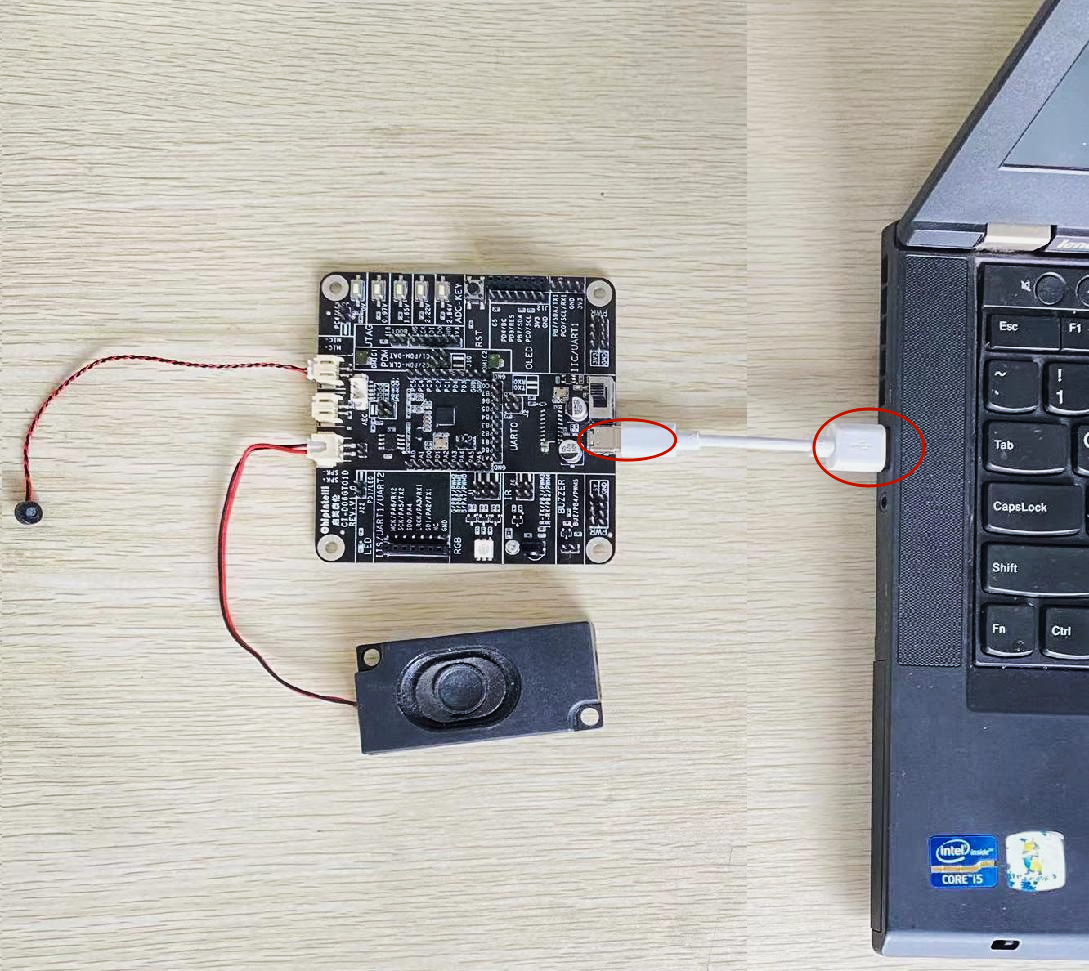
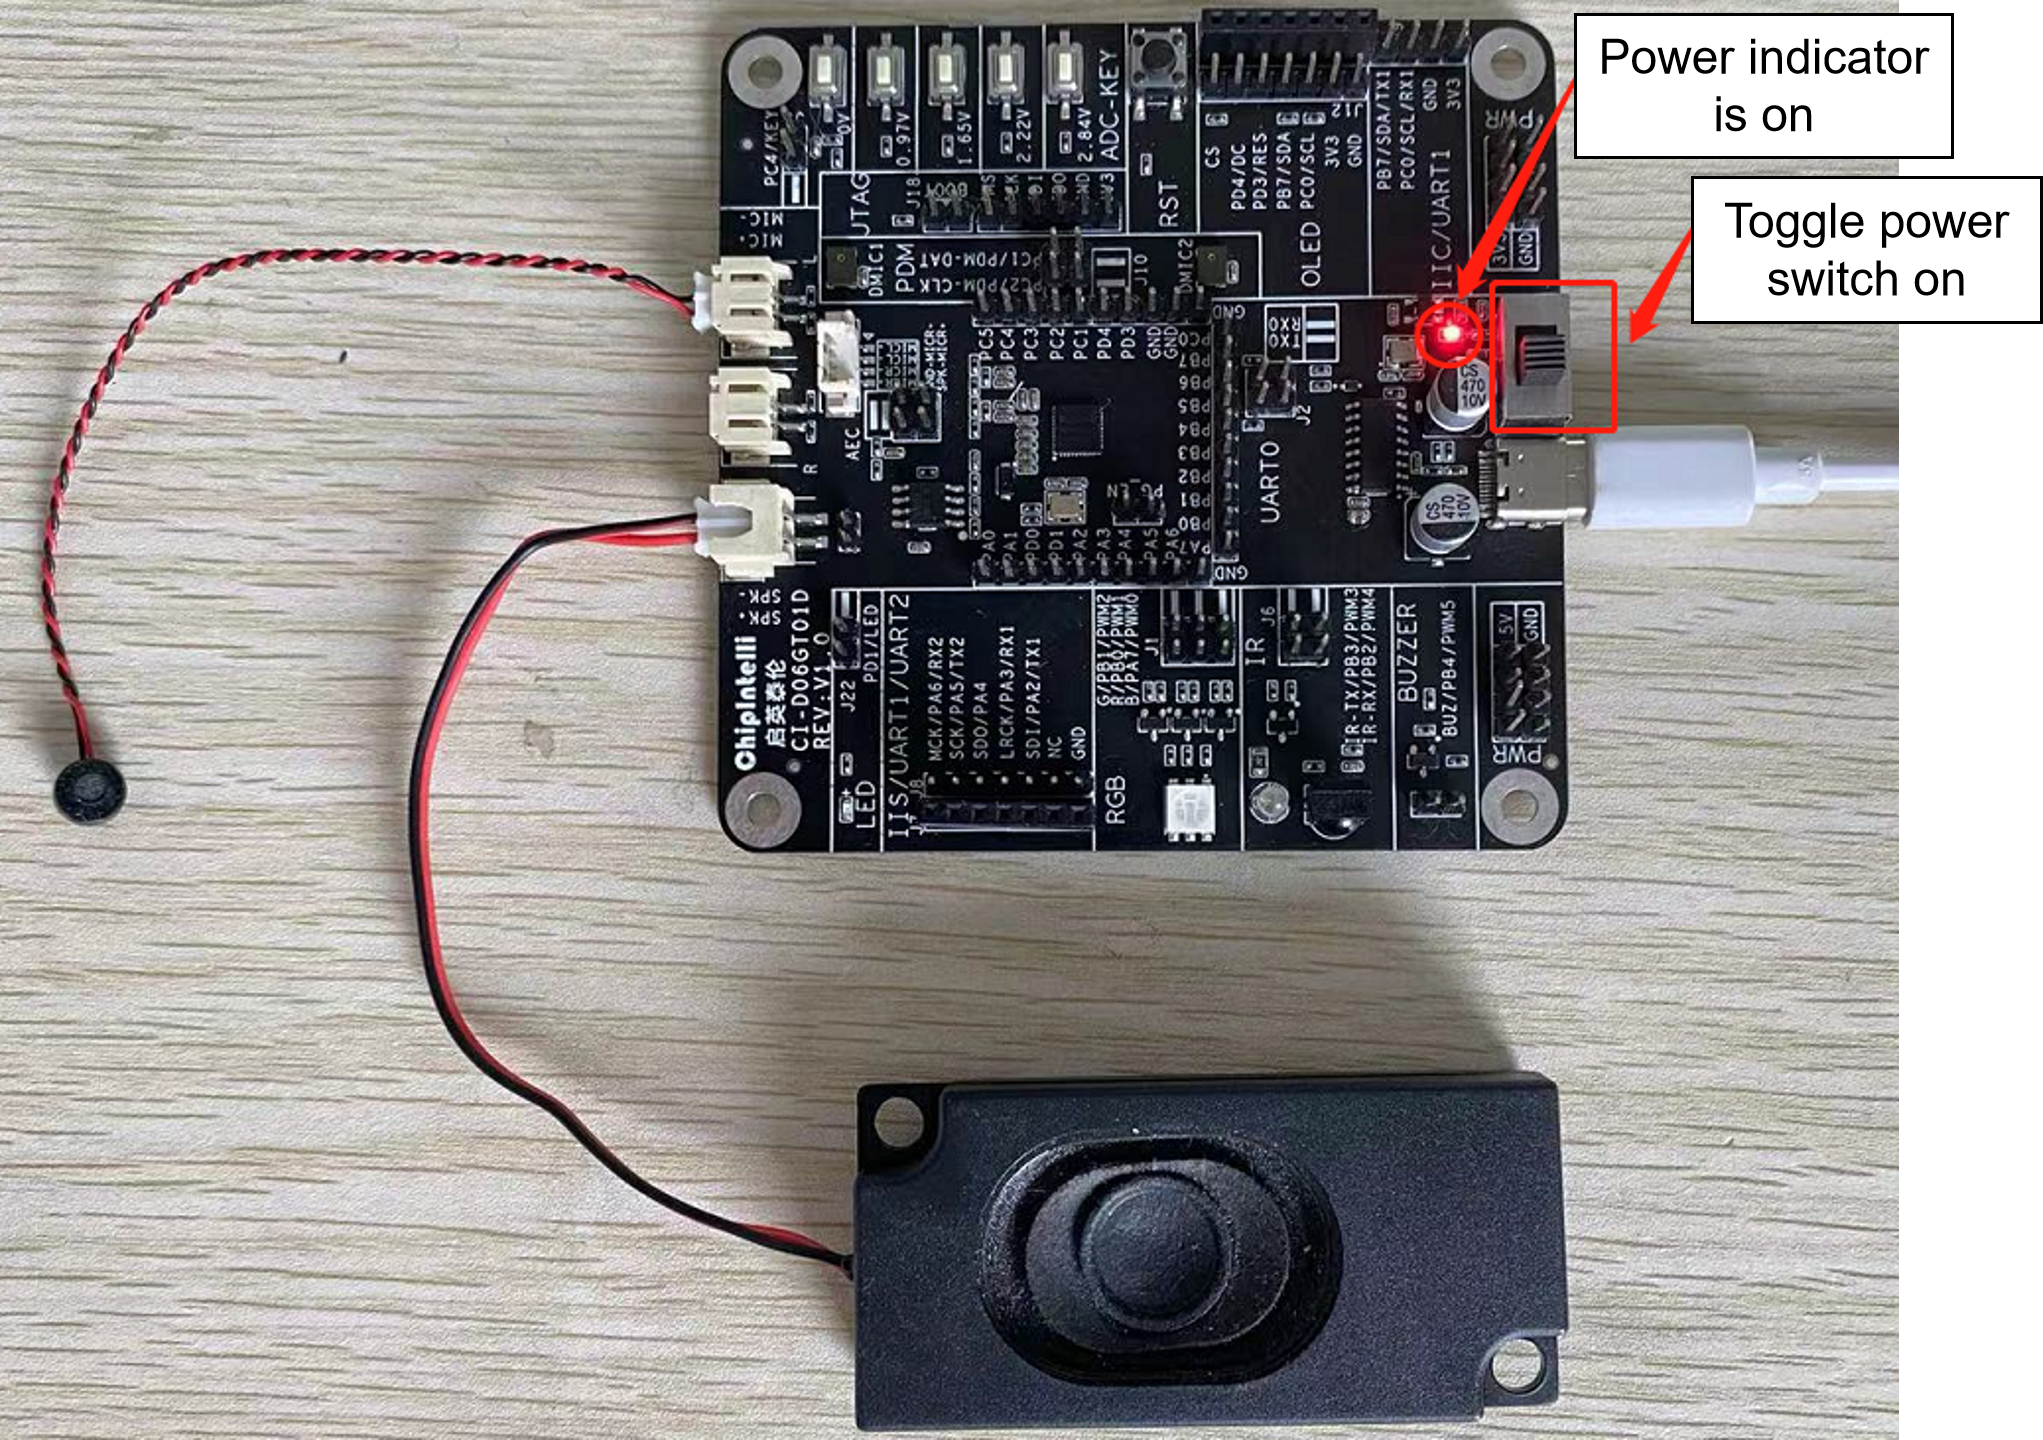
Confirmation steps for CI130X series CI-D06GT01D evaluation kit:
-
Insert the microphone into the socket as shown in the figure; (Pay attention to the polar patterns of the microphone, the red line corresponds to the MIC+ of the plate, and the black line corresponds to the MIC- of the plate)

-
Insert the speaker into the corresponding slot;
-
Connect the type-c end of the data cable to the module as shown in the figure, and connect the other end to the USB interface of the computer;
-
Toggle the power switch. Once the power indicator lights up, you will hear a voice prompt from the speaker, “Welcome to use Smart Fan. Please say “Hello Jenny” to wake up me”. By default the voice prompt is on. Use “Turn on voice” to turn on the voice prompt, and use “Turn off voice” to turn off the voice prompt;
- The user calls the “Hello Jenny” at the normal speech speed, and will hear the speaker announcing “what can I do for you”, so that you can confirm that the module is working normally.
2. Product Firmware Online Development
After set up development environment development environment, and assemble evaluation kit evaluation kit and confirm the basic functions of the kit, this chapter will then take you to learn more about the online development, flashing and testing of voice firmware. Now you can officially start to explore the fun of voice development.
2.1 Rapid Development of Product Firmware
This feature allows developers to automatically generate voice firmware within ten minutes, enabling faster product deployment.
-
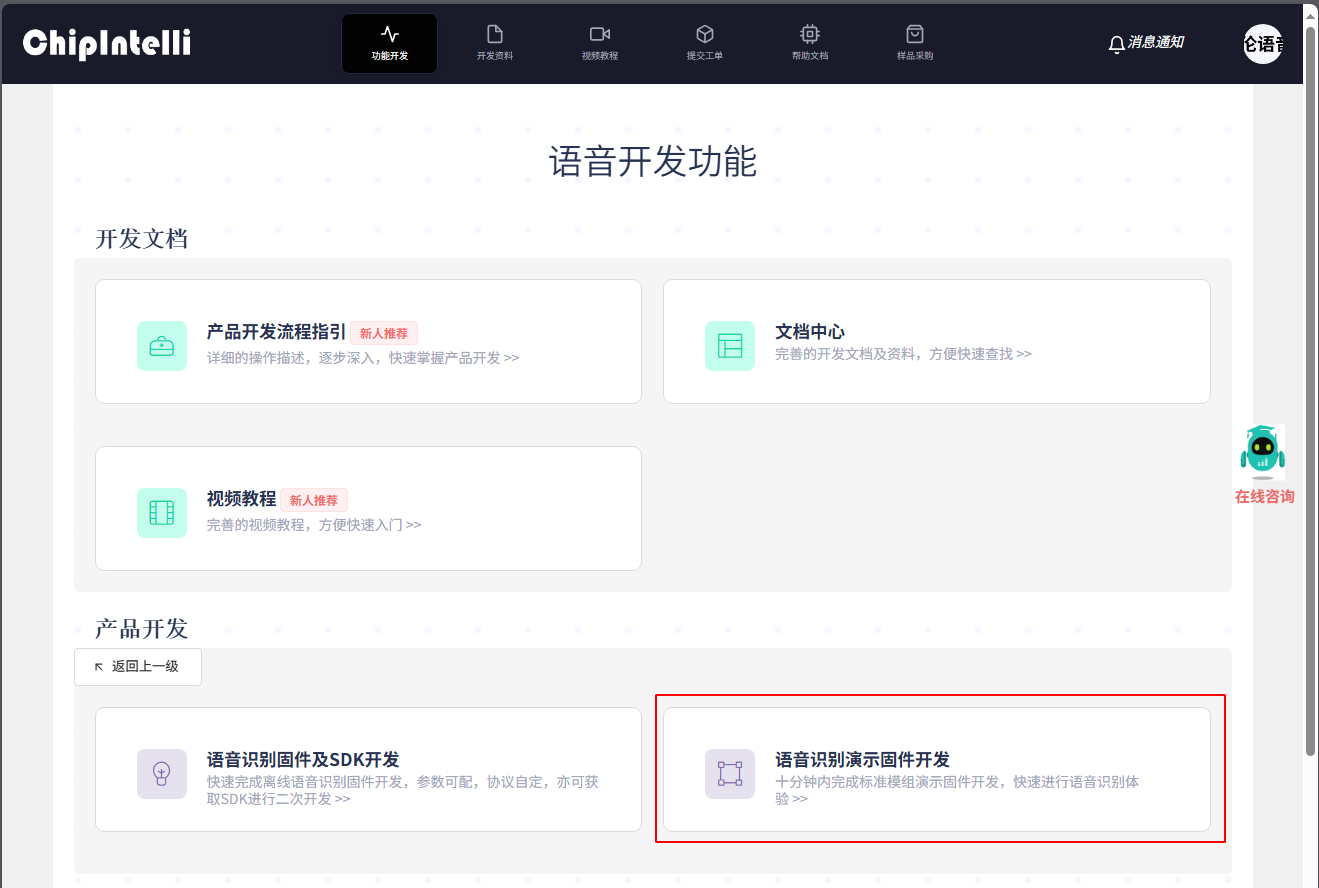
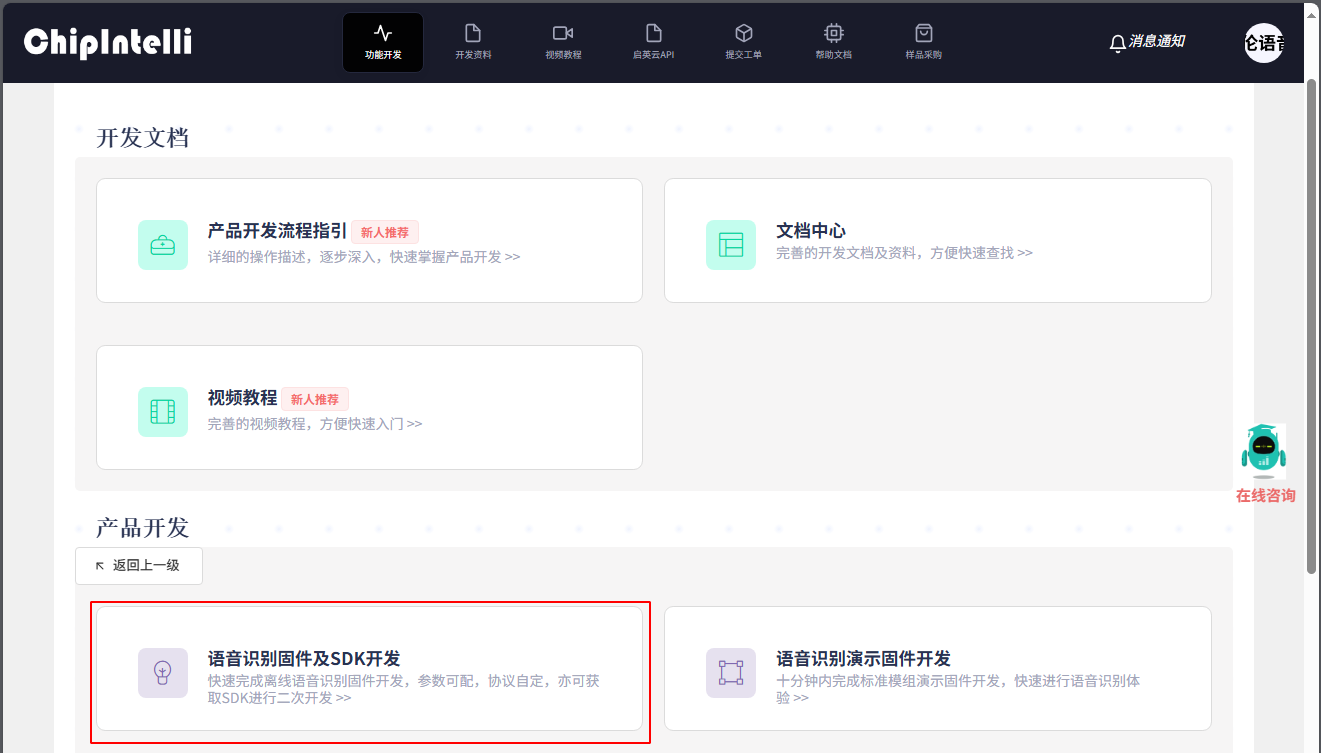
Enter the “Function Development” page of the AI Speech Development Platform;
-
Click the “Demo Firmware Rapid Development” section under the “Function Development” page to enter the firmware rapid production process page;
-
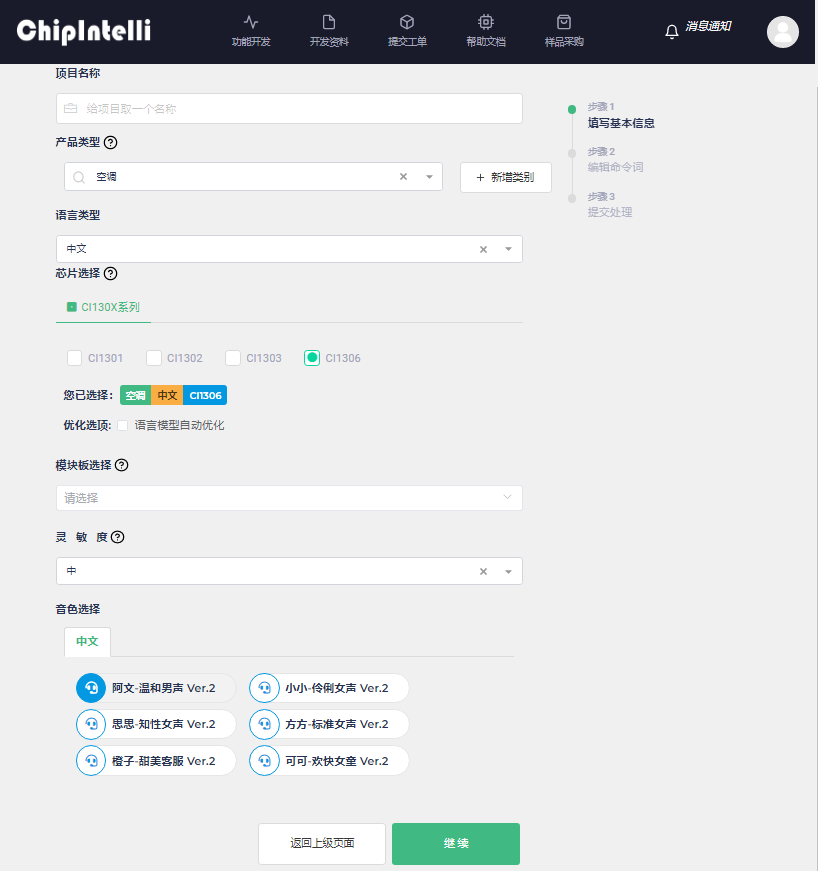
Click “New Project” to enter the rapid development process of project product firmware. An example is shown below:

-
Fill in “project name, product type, language type, chip selection, optimization options, board-level configuration, sensitivity, timbre” and other information according to the specific product to be developed, and then click “Next” (if you have any questions, view comments(?) ). The “optimization” option is the automatic optimization of the language model, which aims to improve the product recognition performance and optimize the confidential parameters of command words and wake-up words (currently, only single wake-up word is supported. If you submit multiple wake-up words, the system will only optimize the first wake-up word, and other wake-up word systems will be treated as command words for optimization). Because the automatic optimization is relatively time-consuming, If you have selected the automatic optimization function when submitting, please wait patiently for the completion of model optimization. An example is shown below:
-
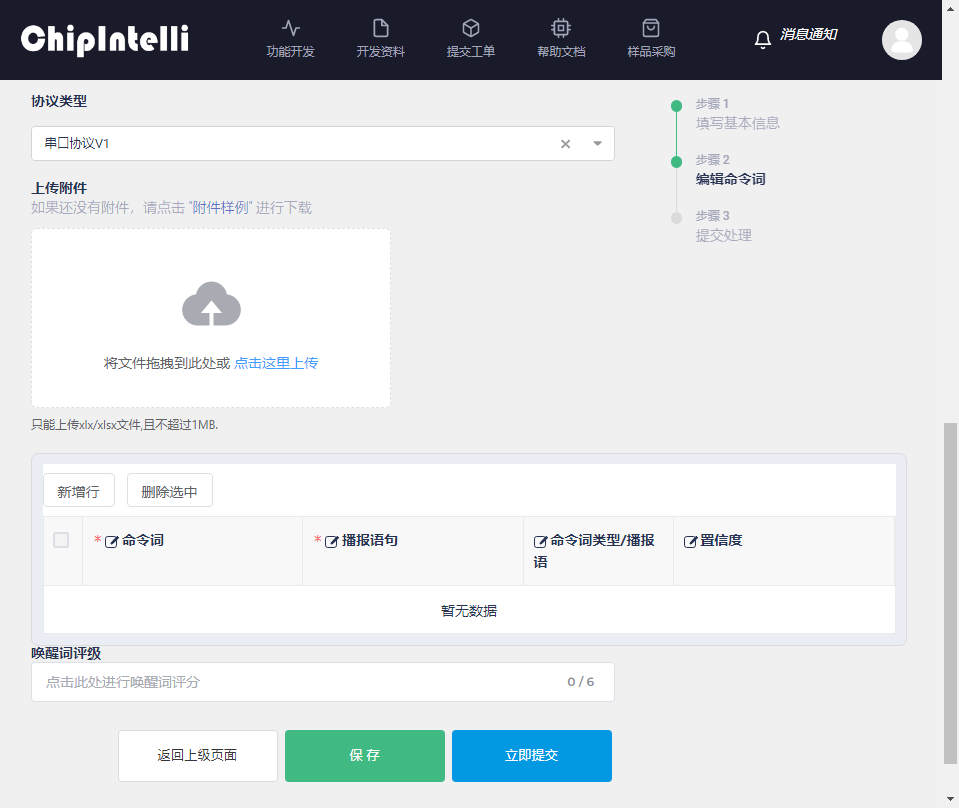
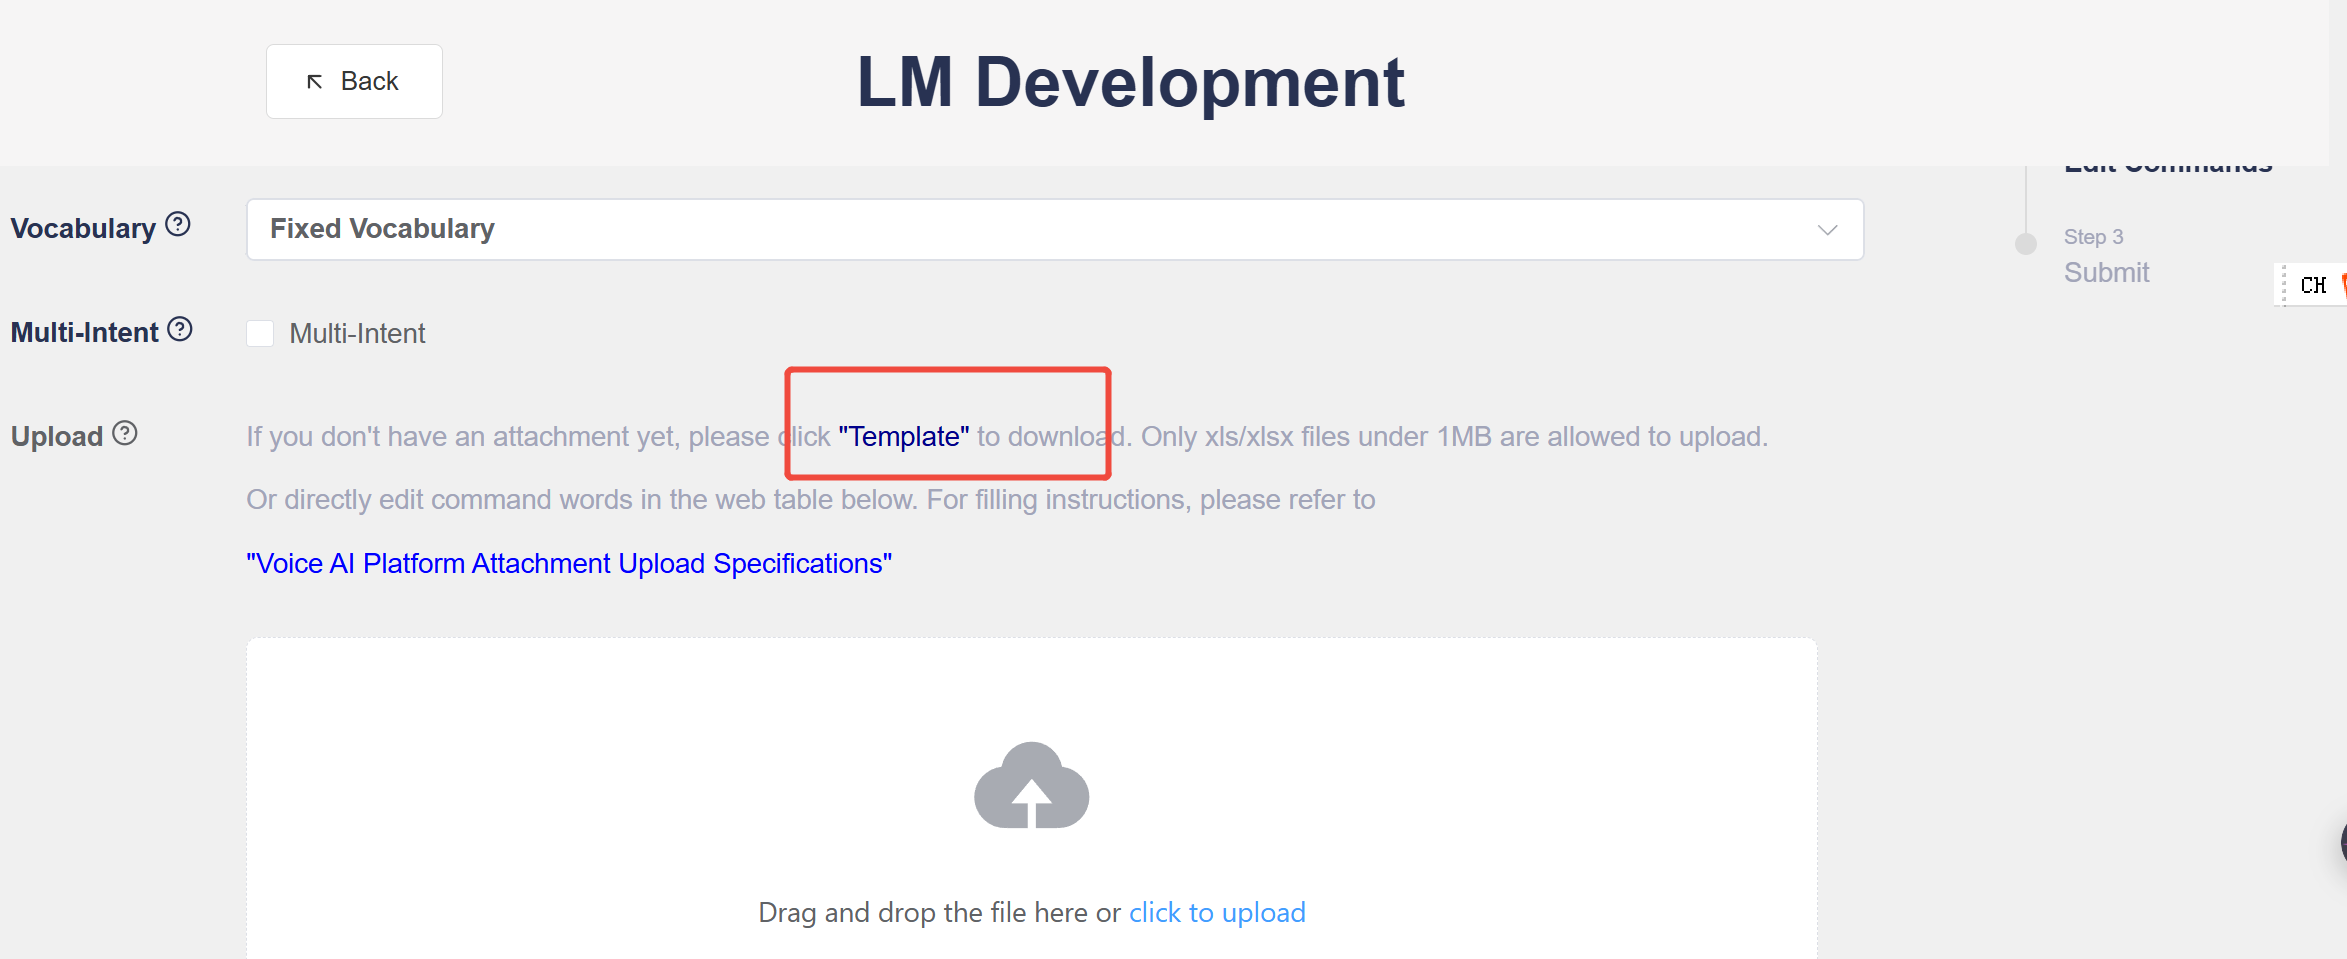
Selecting “Protocol Type” means selecting the serial communication protocol. Currently, there are two options: “Serial Protocol V1” and “User defined” hexadecimal protocol by default. New user experience recommends selecting the default “☞Serial Protocol V1”. An example is shown below:
-
There are two ways to edit command words according to prompts.
-
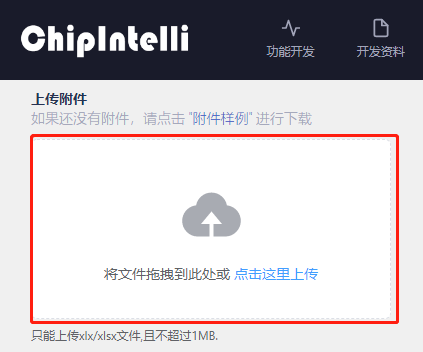
Method 1: The platform will recommend command word templates for downloading and editing according to the product type. After editing, click “Click here to upload” on the web page to display command words and other information in the data area. The specific operation steps are as follows:
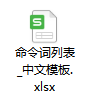
① Click “Sample Attachment Download” to download an Excel file;
② Open the downloaded Excel table;
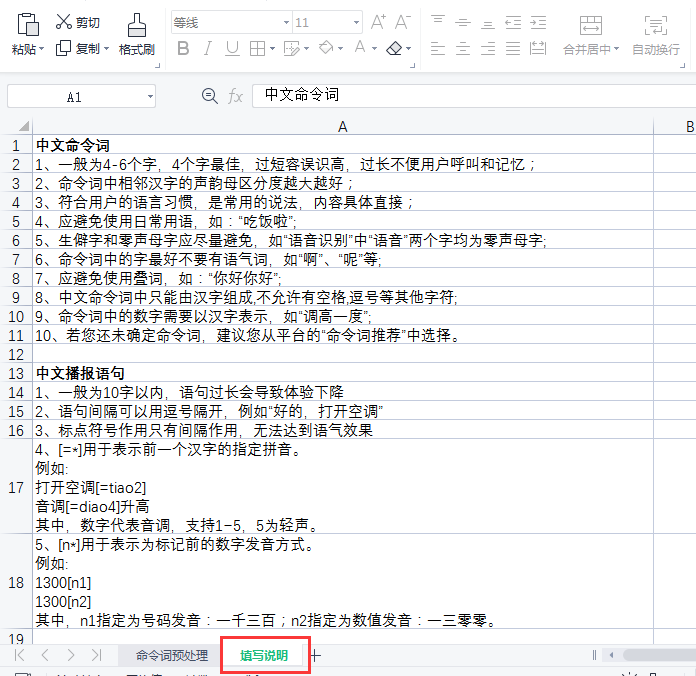
③ Fill in the “Command word preprocessing” according to the “filling instructions” in the table;
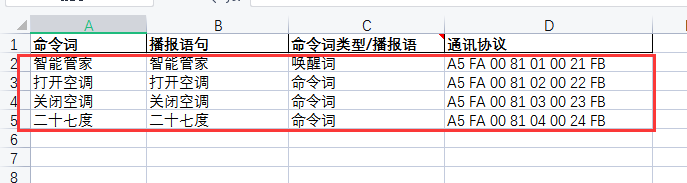
④ The following is an example of the “command word preprocessing” filled in (taking air conditioning products as an example);
⑤ Then upload the form file to the web page;
⑥ After the upload is successful, the form name will be displayed, and the preview of the form content will be displayed below. Modification and adjustment are supported;
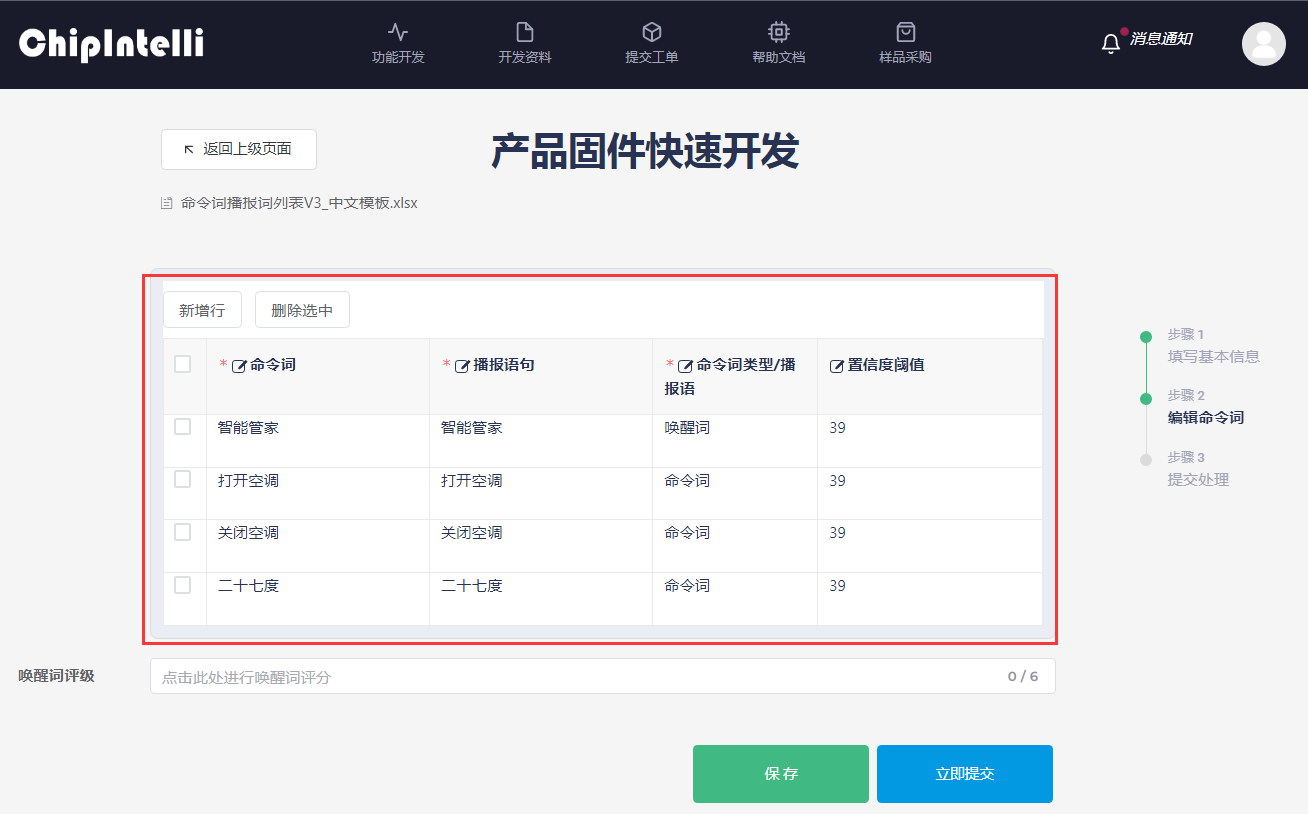
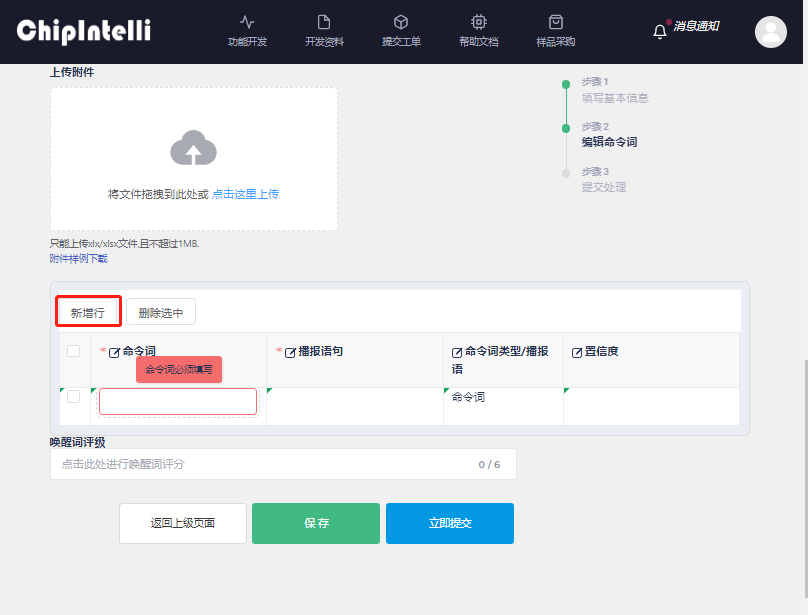
- Method 2: Real time editing and adding command words, wake-up words and other information in the “new line” of the webpage; The specific operation steps are as follows:
① Click “Add Line”;
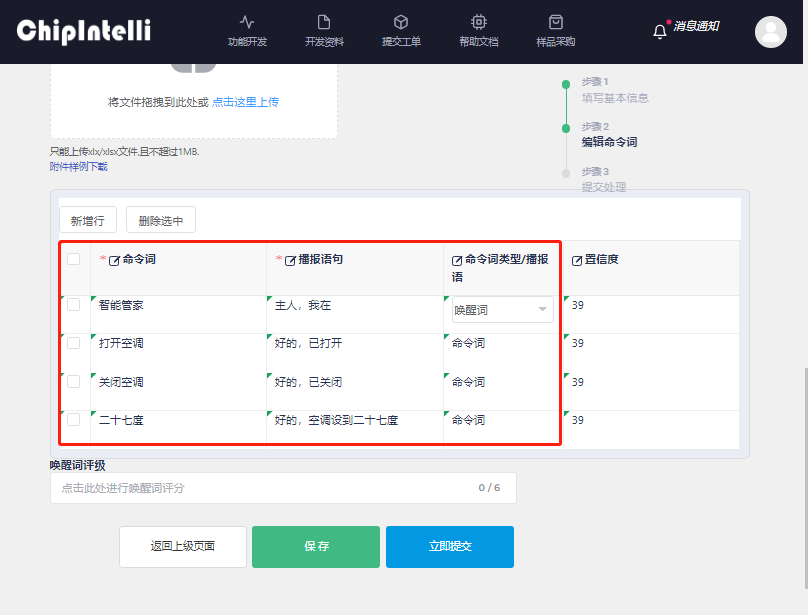
② Edit and fill in wake-up words, command words and voice prompts in the new lines in the edit box below, as shown in the following figure:
-
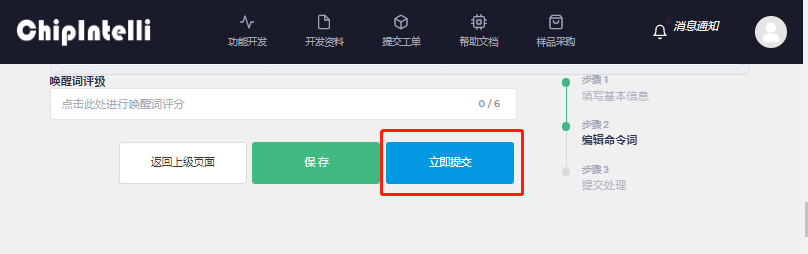
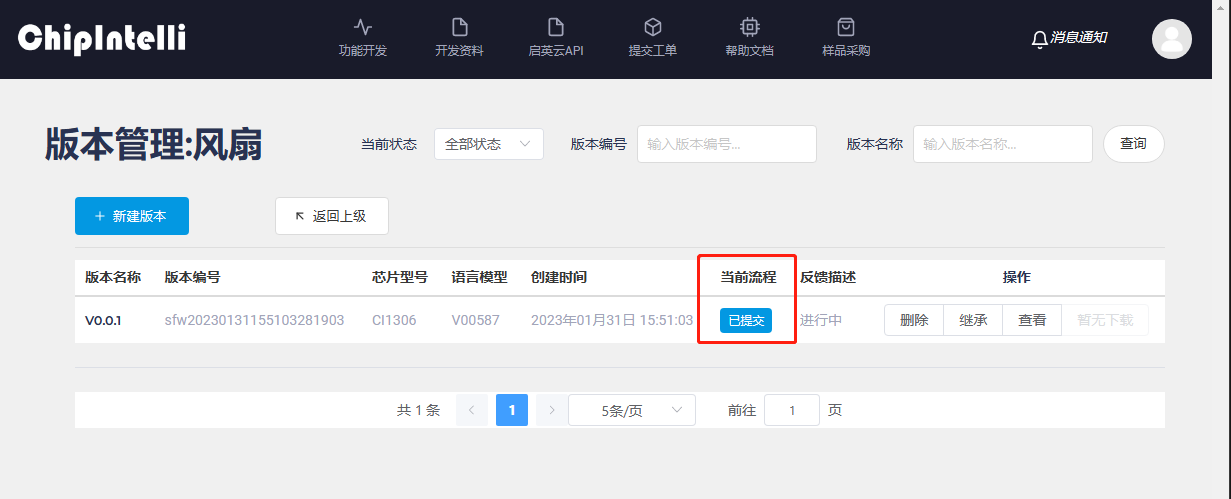
When all information on the page is completed or uploaded, click “Submit Now”;
-
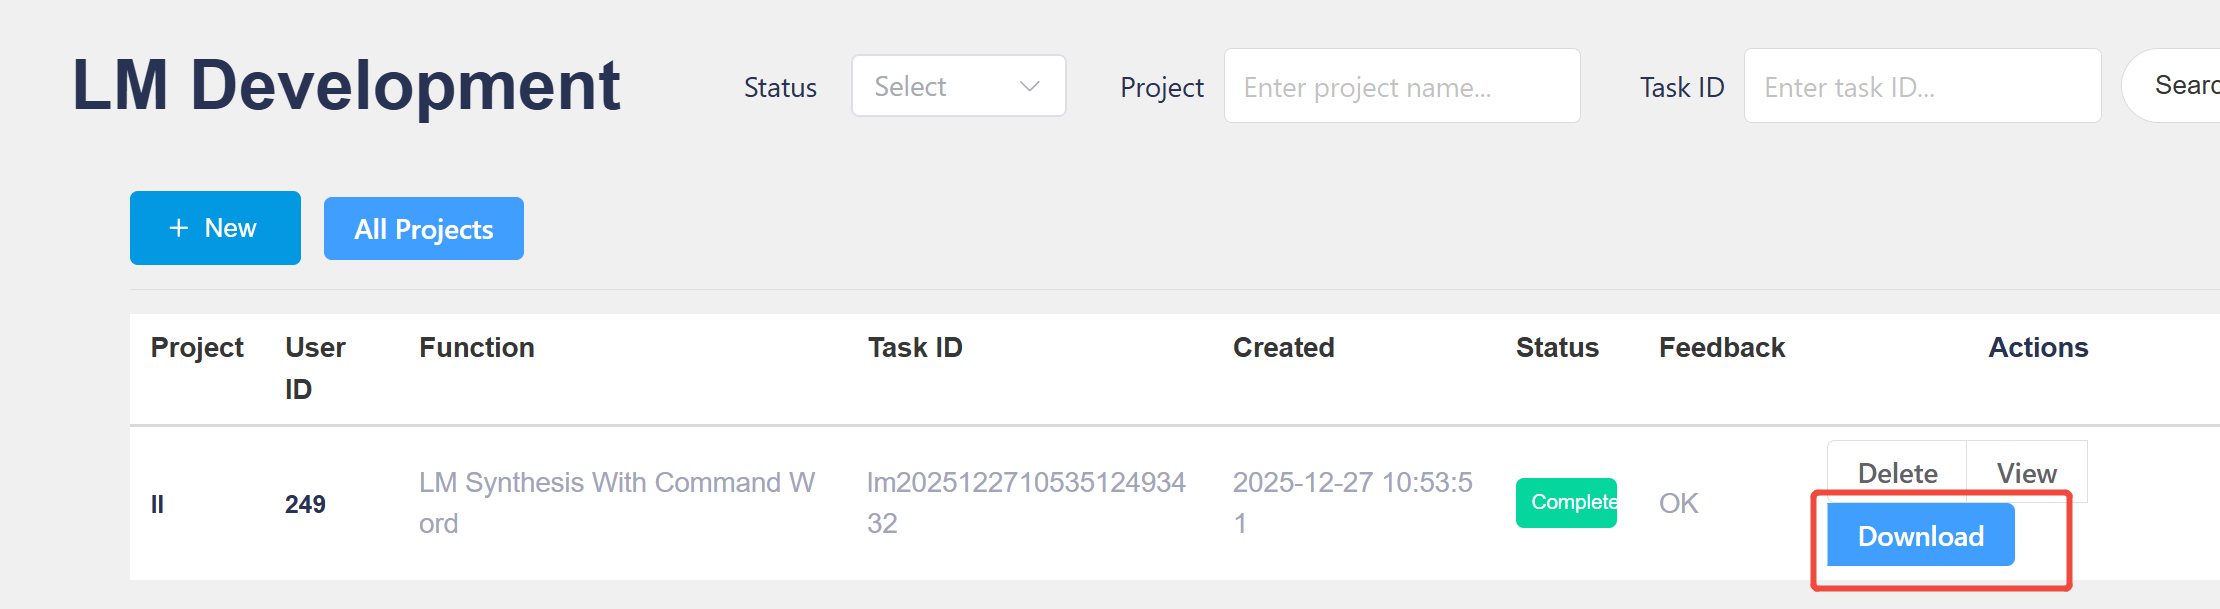
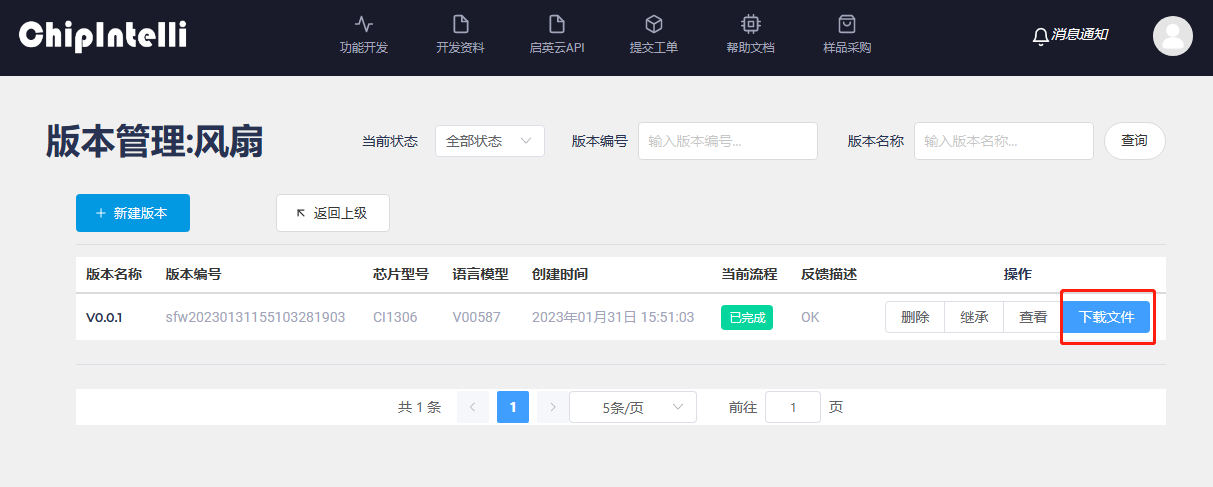
Wait a moment, and click “Download File” when you see that “Current Process” is displayed as “Completed”;
-
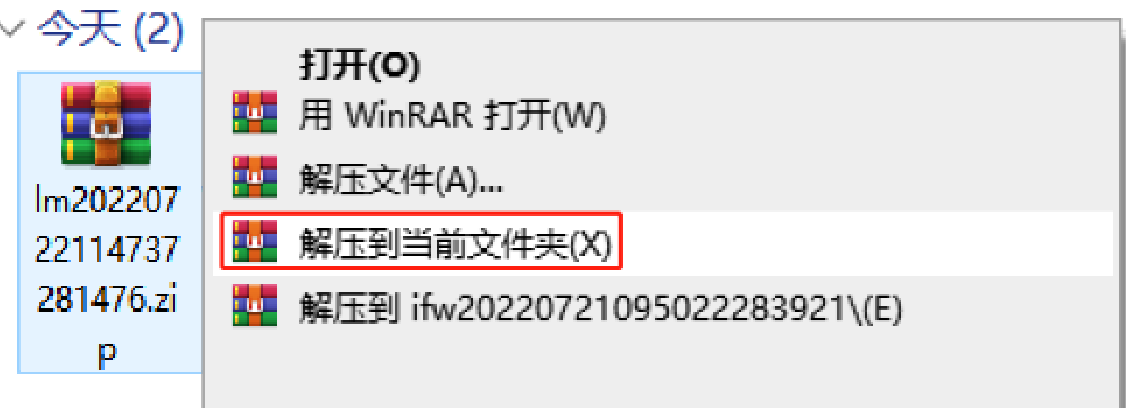
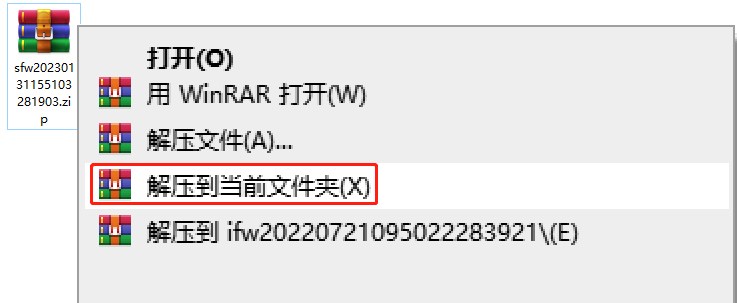
Decompress the downloaded compressed package file;
-
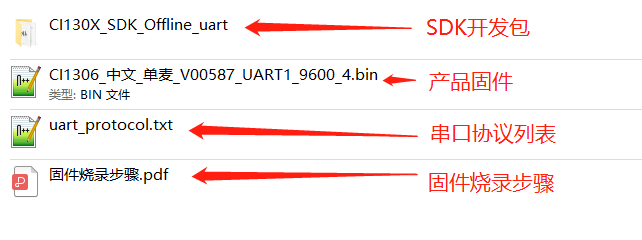
The extracted file contains “XXX. bin” product firmware, UART protocol list and Firmware flashing Steps document, as shown in the following figure. Please open the Firmware flashing Steps document; flash the firmware to the development board according to its steps to experience and test the speech recognition effect.

2.2 Product Firmware and SDK In-depth Development
Note: If you want to use this function, please contact our sales person to register as “enterprise user”.
The purpose of this section is to quickly complete the firmware development and SDK generation of mainstream product solutions such as serial port transmission and self-learning, and the main parameters can be configured, the protocol can be customized, and the SDK can also be downloaded for further development.
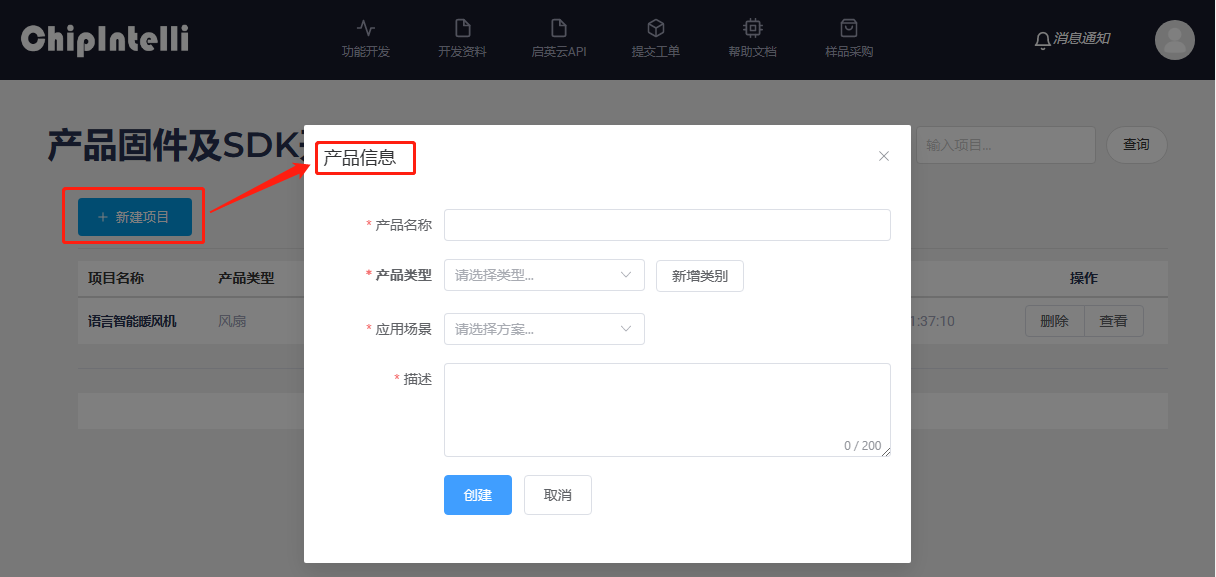
- Next, let’s take electronic fan “single microphone offline firmware with customized protocol” as an example, and enter the “development” page of the AI Platform.
- Click [Product firmware and SDK in-depth development] to enter the development process.
- Click [+ New Project] to fill in the “Product Information”. When the developer fills in and selects the product name, type and description to be developed, the [Application Scenario] selection needs to select the “Single Microphone Offline Serial Port Transparent Transmission Solution_SDK_X.X.X” “, and then click” Create “.
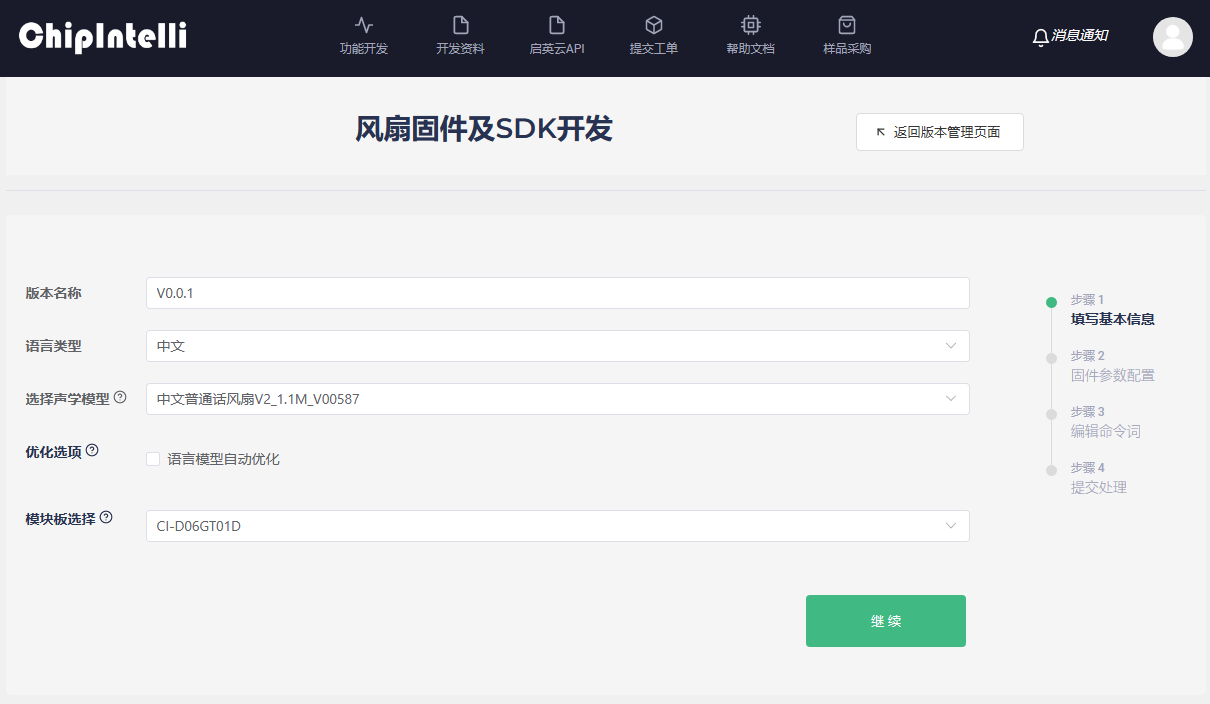
- Then create the version of the project, first create the first version, [version information] recommended to fill in “V0.0.1”; [language type] here we select “Chinese”; [Acoustic model] The product type can be entered here to select the latest version of “Chinese Mandarin Fan V2 _1.1M _V00587” (if there is no acoustic model of this product type, the acoustic model with general version can be selected); [Optimization option] is not a required option. The experience effect of the first firmware production can not be selected. If this function is selected, the system will automatically optimize the wake-up words and command words. The recognition experience effect after optimization is better, but the optimization time is relatively long. According to the current busy level of the system, the optimization time generally ranges from 20 to 120 minutes. Please wait patiently for the optimization to be completed; [Module board selection] Select the module board model used for development in the user’s hand; click “Continue” after completion.
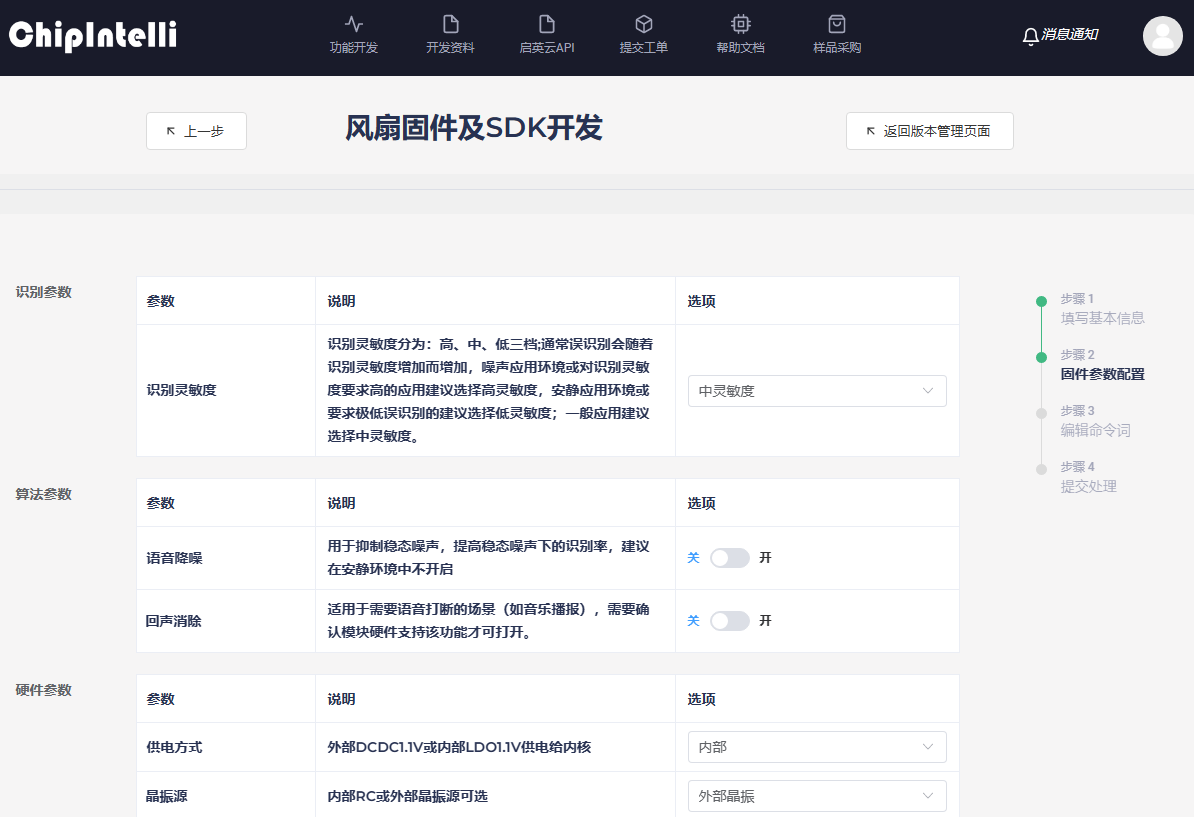
- Enter the “Firmware Parameter Configuration” page, and select and fill in the contents of this page according to the actual situation of the project, including [Speech Recognition Parameter], [Algorithm Parameter], [Hardware Parameter], “Function Parameter”, [Print Serial Port Configuration], [Communication Serial Port Configuration] and [Power Amplifier Configuration]. Each parameter on this page is described in detail. After filling, click “Continue”.
- Next is the “Edit Command Words” page. [Timbre Selection] is to select the timbre of the broadcast sound fed back after recognition. It is recommended to use the timbre with Ver.2. [Speech Speed] and [Volume] can be adjusted, and [Broadcast Sound Audition] can also be performed. [Broadcast Configuration] also needs to be filled in according to the instructions on the page; [Upload attachment] is the Excel form file of the command words, broadcast words or agreements filled in by the user. It is necessary to download the attachment sample and fill it in. If it is filled in correctly, it will be uploaded to this page. The page form will be displayed in real time and support page fine-tuning. [SDK download] is a check option. After checking, the SDK development package of the corresponding firmware will be obtained; [Self-learning function] is off by default, which can be viewed in ☞Video.
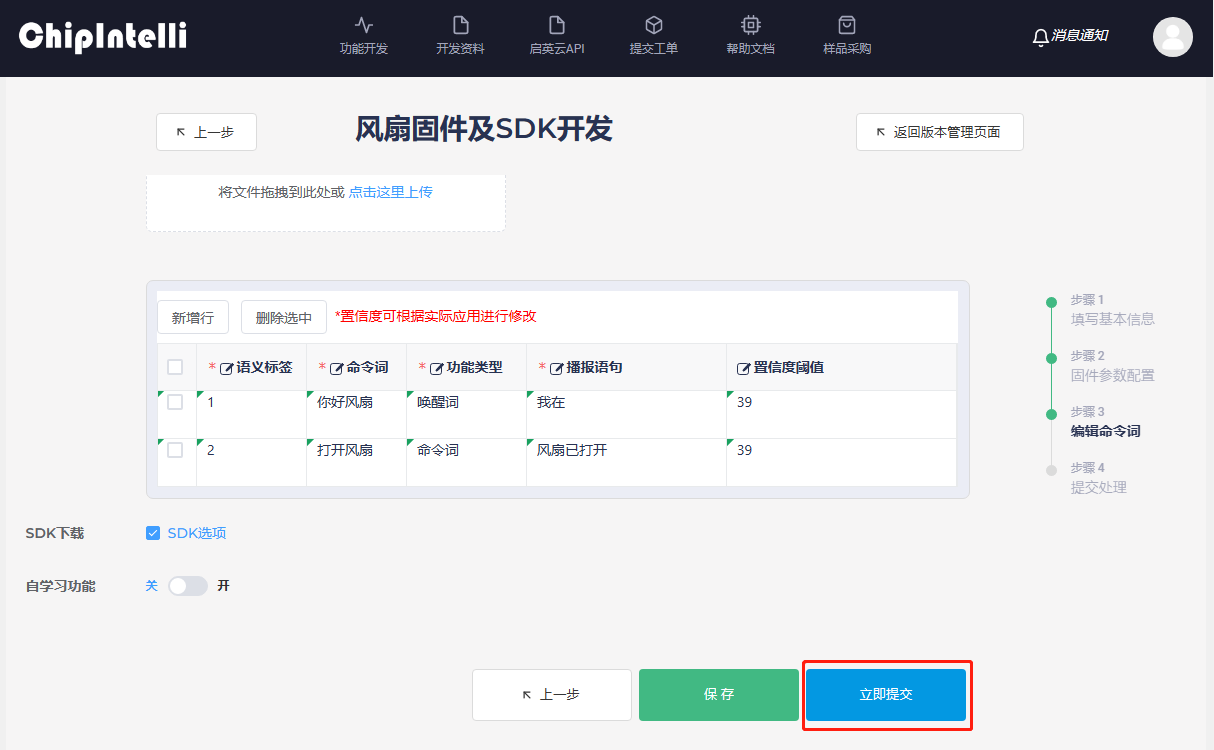
- After submission, [Current Process] on the version management page displays “Submitted.”.
- After a few minutes, you will see that [Current Process] changes from “Submitted” to “Completed” after automatic refresh, and then you can click the “Download” button to download the firmware and SDK.
- The downloaded compressed file needs to be decompressed.
- The file after decompression contains an SDK software development kit, product firmware, a UART protocol list and a firmware flashing step manual;
-
The user can proceed to the flashing step and experience test of the “Product Firmware” according to the decompressed Firmware flashing Steps.pdf document;
-
Finally, developers with embedded development capabilities can also use the extracted “SDK development kit” combined with the content of the “☞ Chipintelli Documentation Center-Software Development ” section to program and develop the product.
3. Develop Firmware Components
After the user completes Chapter 1 “Development Environment Preparation” and Chapter 2 “Online Product Firmware Development”, this chapter will take you to develop firmware components. The firmware corresponding to our chip is mainly composed of four components: “language model, acoustic model, voice prompts and user code”; Next, we will make each component step by step to synthesize the firmware we want.
3.1 Acquisition of Language Model and Acoustic Model
The language model and acoustic model for making firmware are generated and acquired together. The detailed steps are as follows:
-
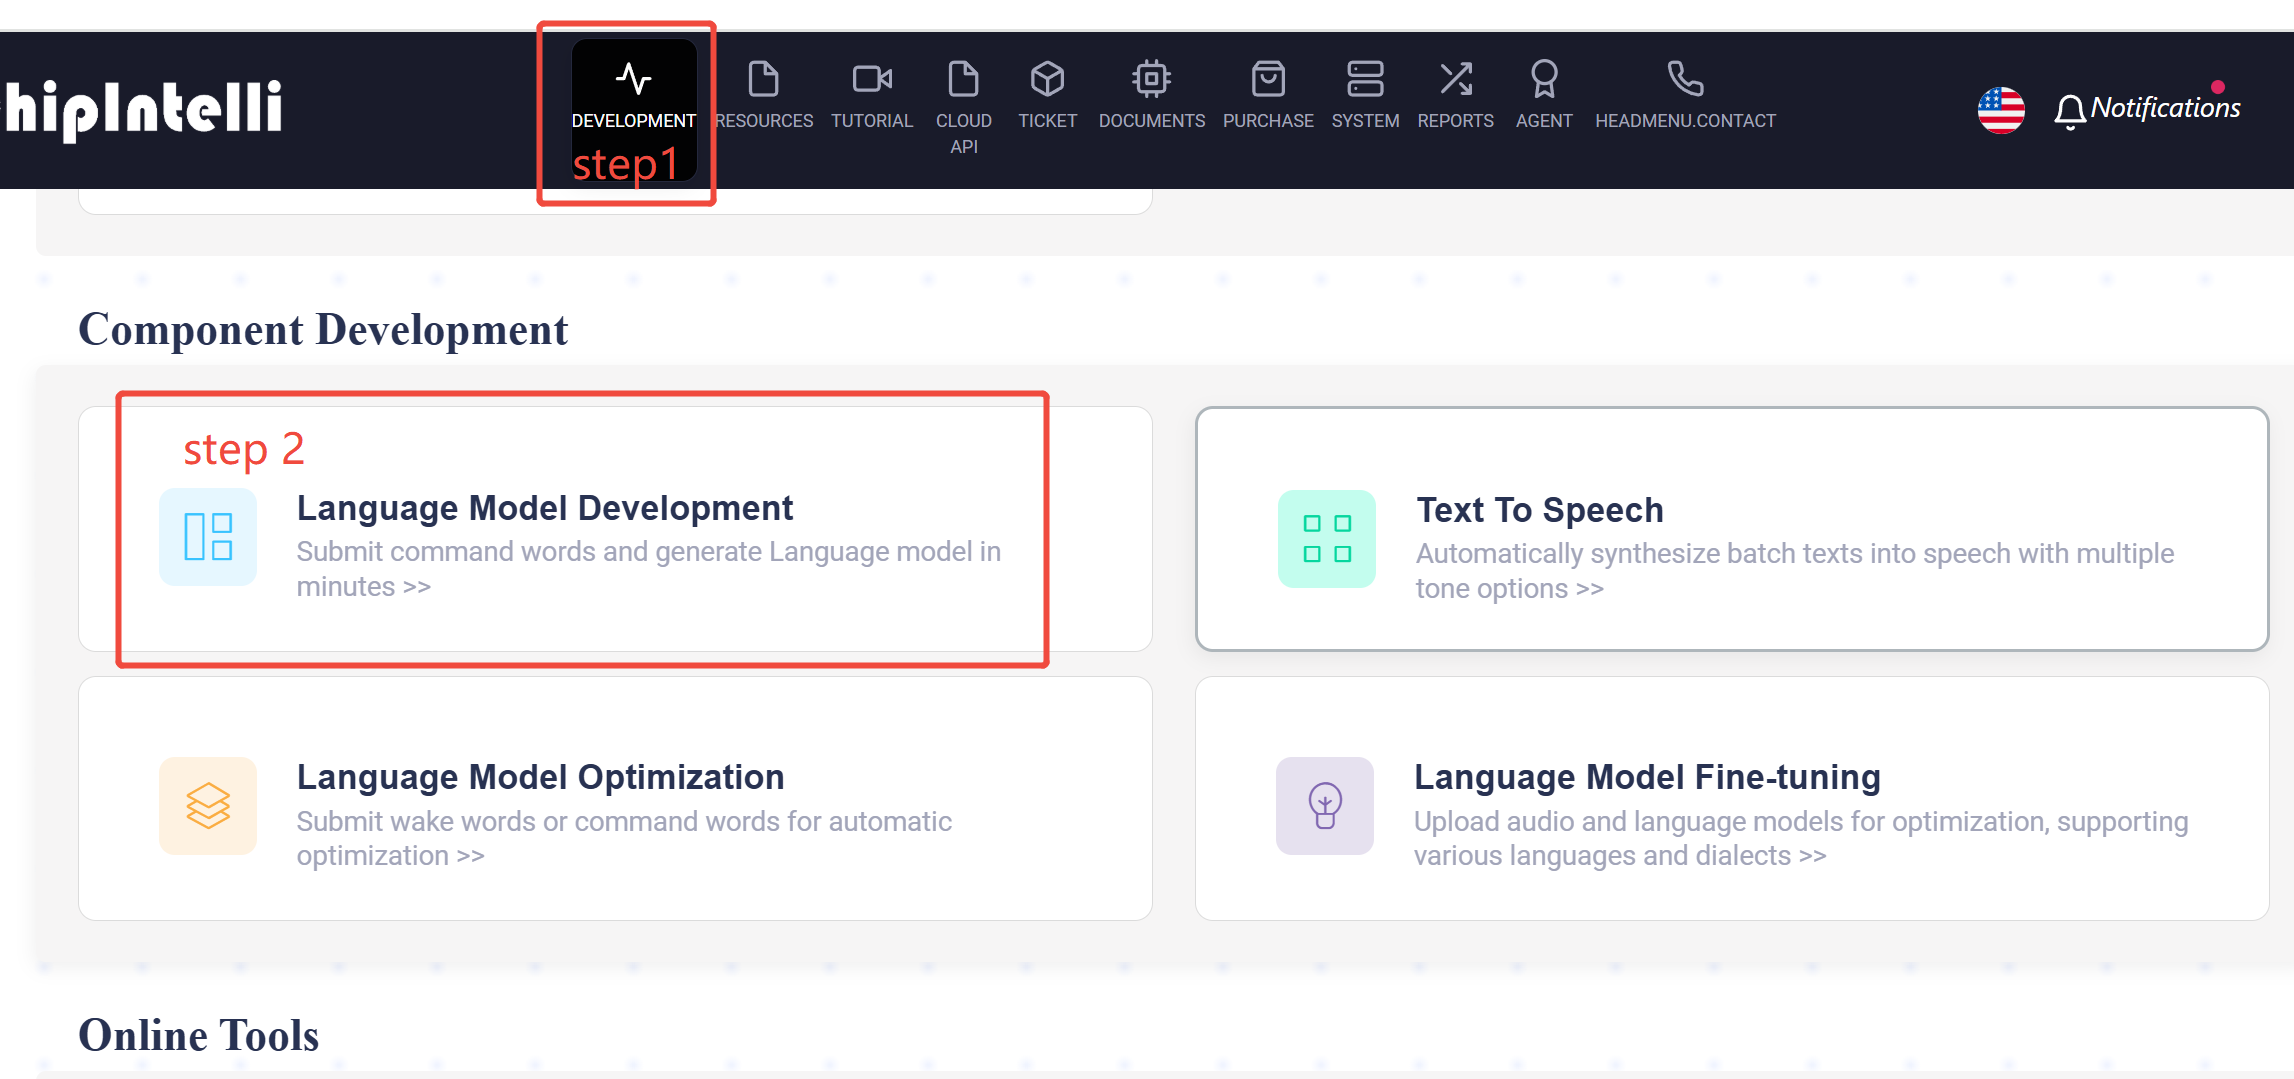
Enter the “Development” section of the AI Platform;
-
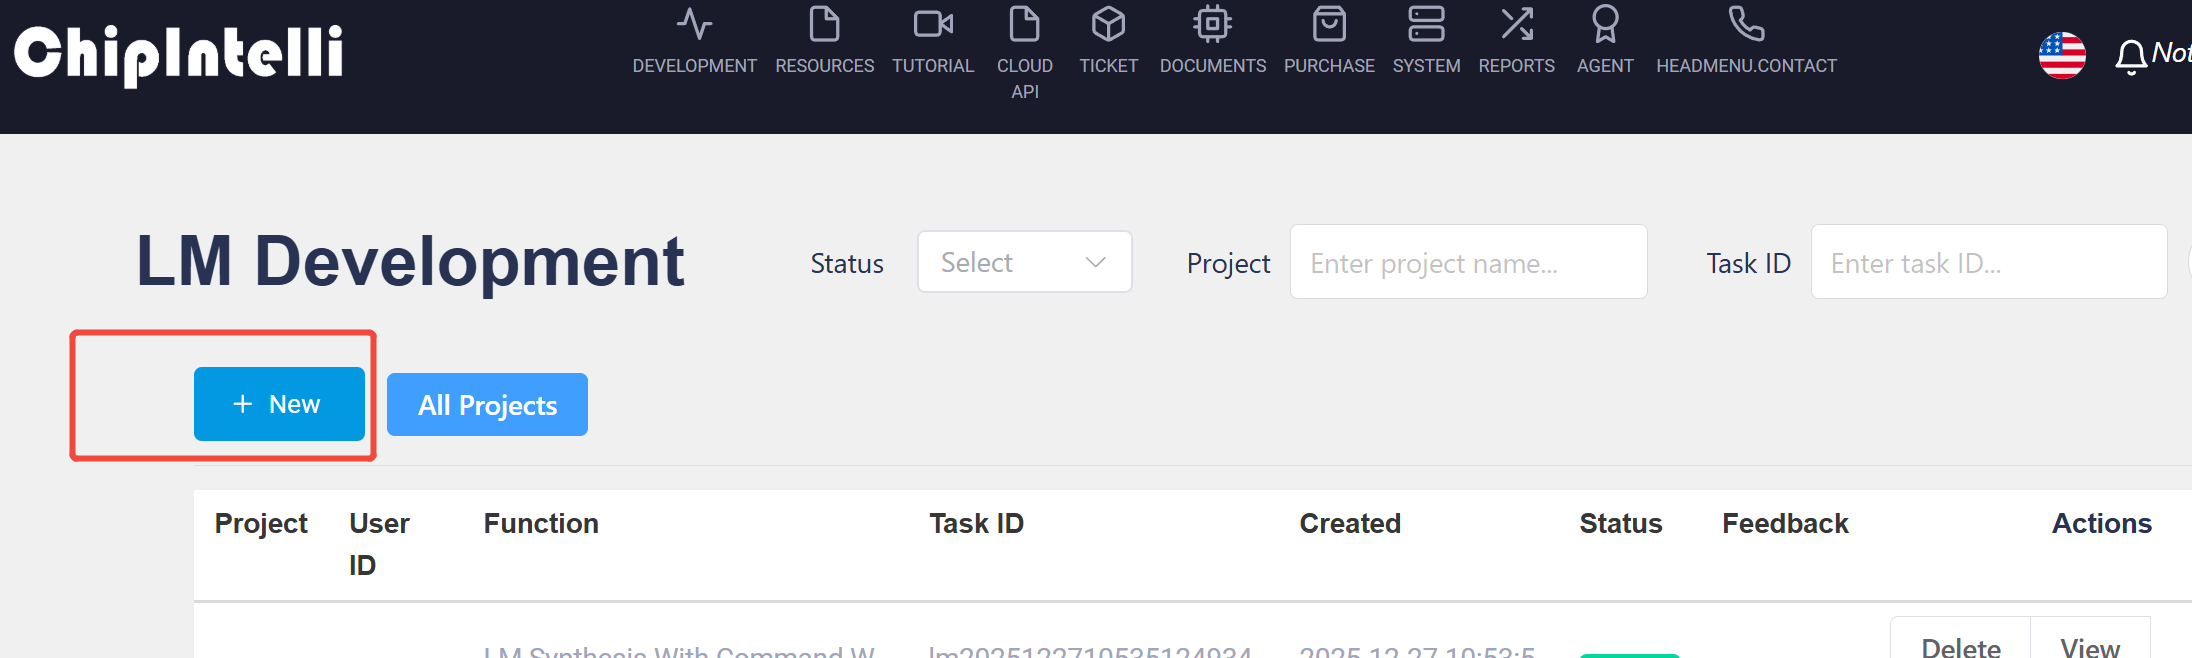
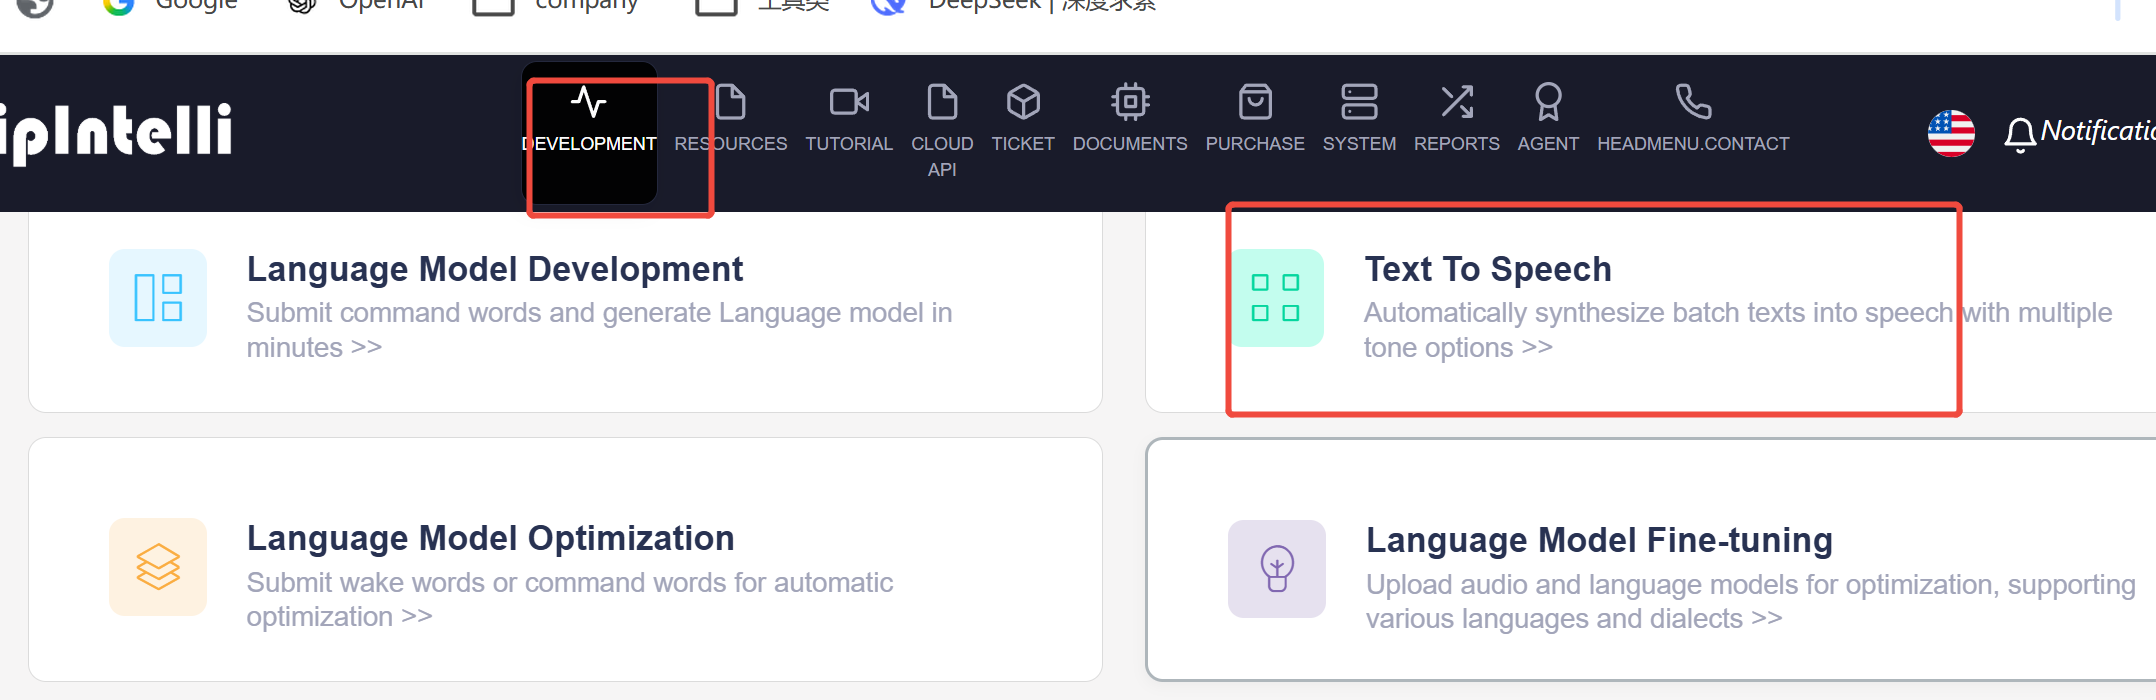
Click “Language Model Development” to enter the language model production process;
-
Click the “New Project” button;
-
After filling in relevant data on the page, click “Continue” button to go to the next step; (Note: Developers can also select
LM Synthesis with word segmentaionand uploadG.fst.txtfile; or chooseLM synthesis with command wordand clickoptimizationto automatic optimization of voice model), but these features are only open to ☞Enterprise Users Only) -
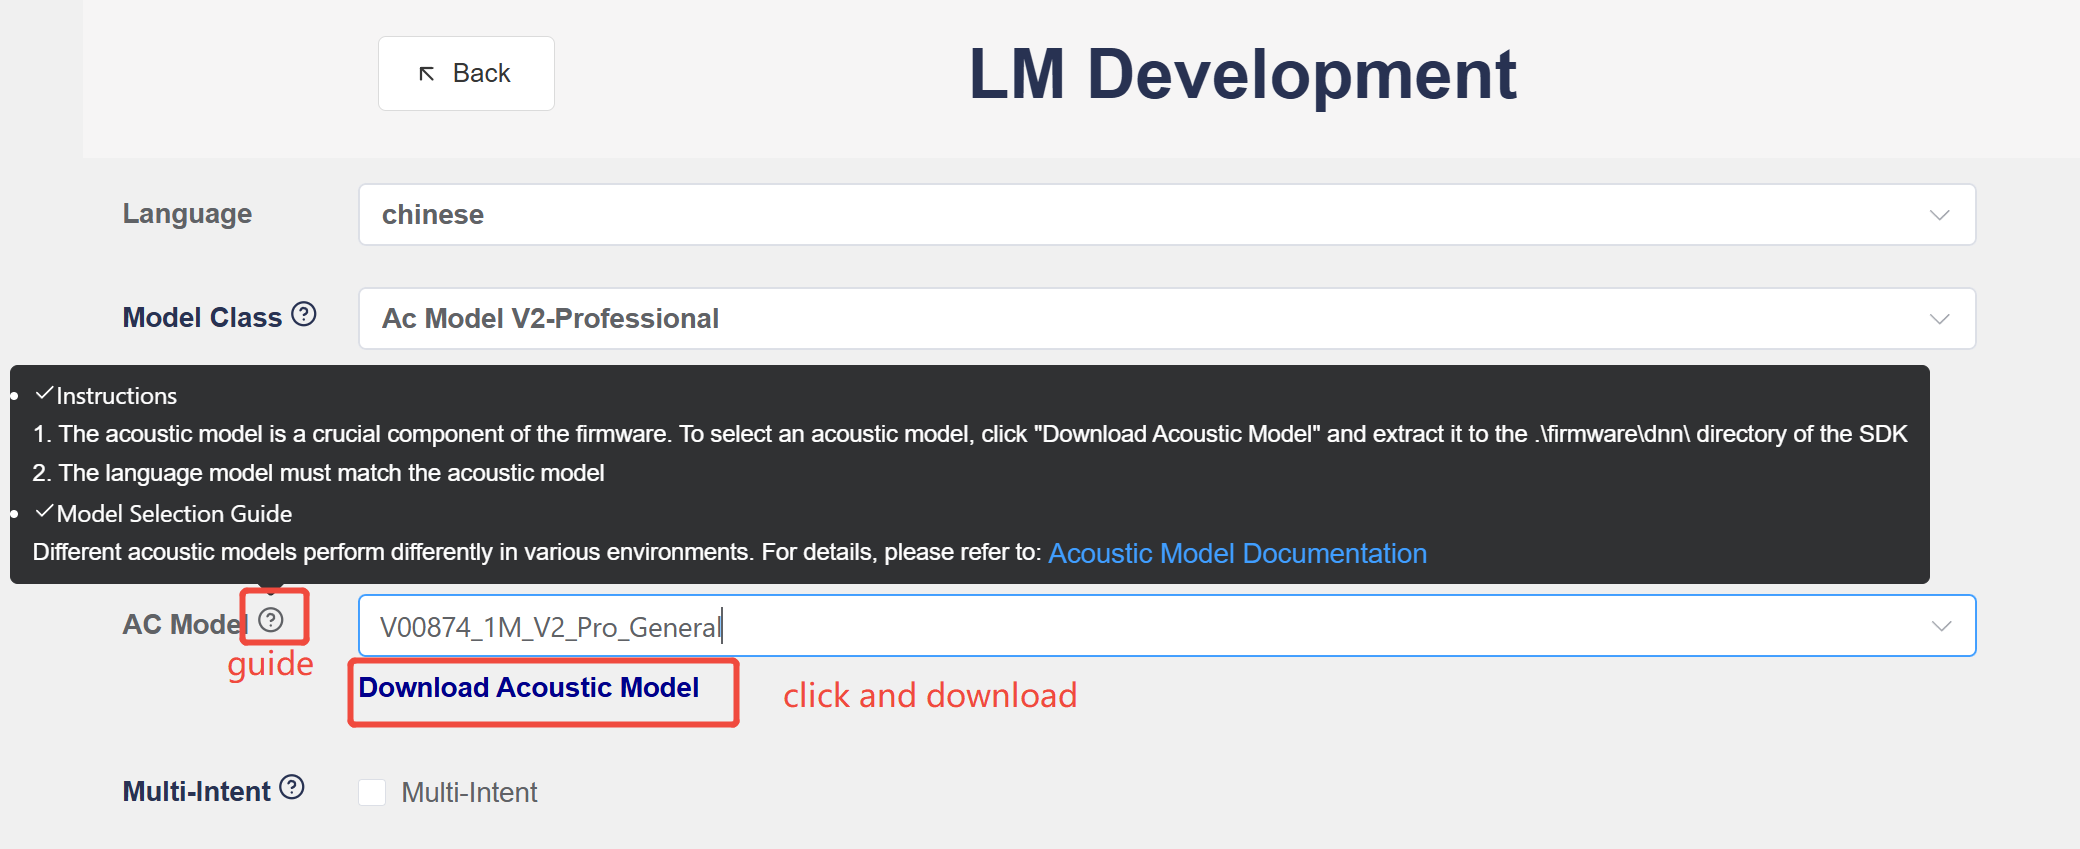
The acoustic model is an important component of the firmware. After selecting the acoustic model
AC modelreferencing to the instruction/guide, click “Acoustic Model Download” and unzip it into the directory/firmware/dnnin the local SDK software development kit of the PC.
- Click “Template” to download an Excel file;
-
Open the downloaded Excel table;
-
Fill in the
Command Wordaccording to theinstructionsin the table;
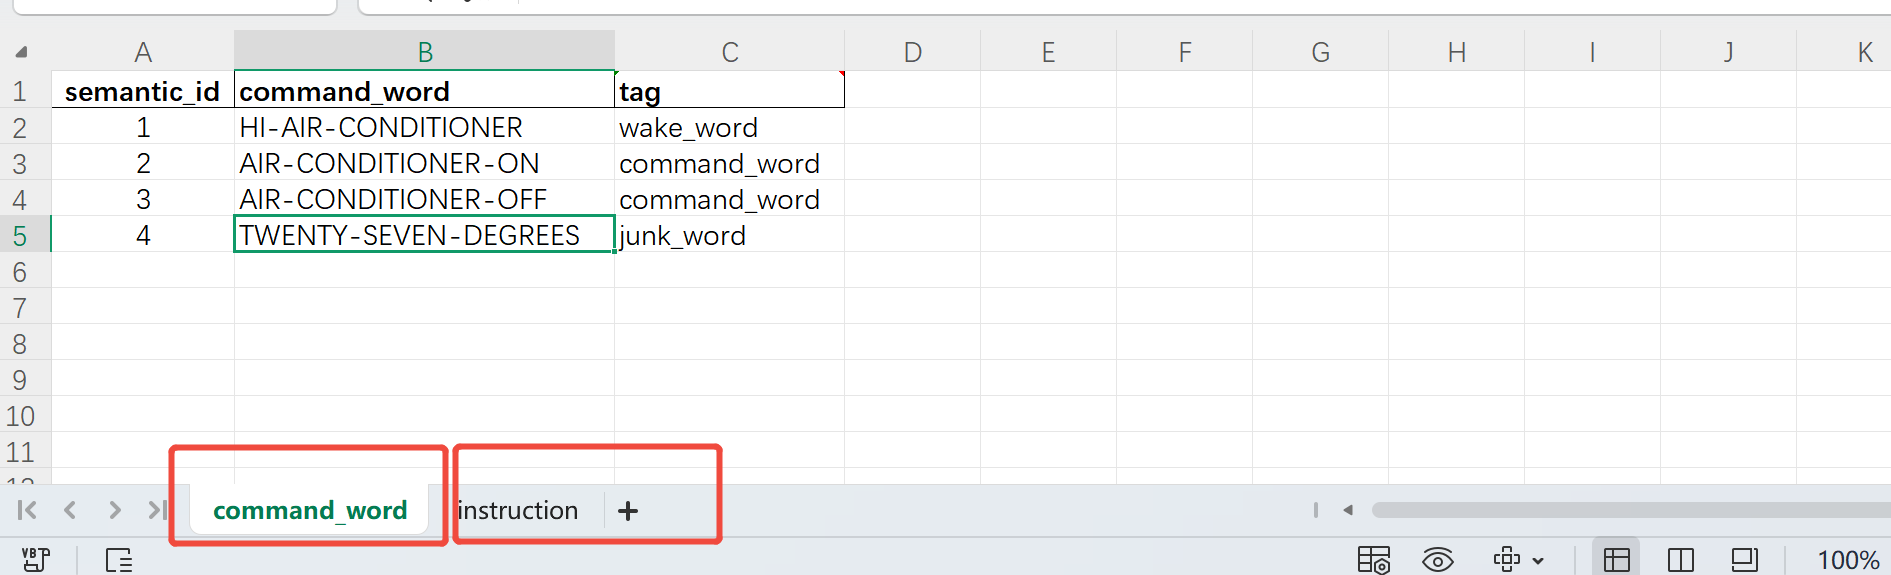
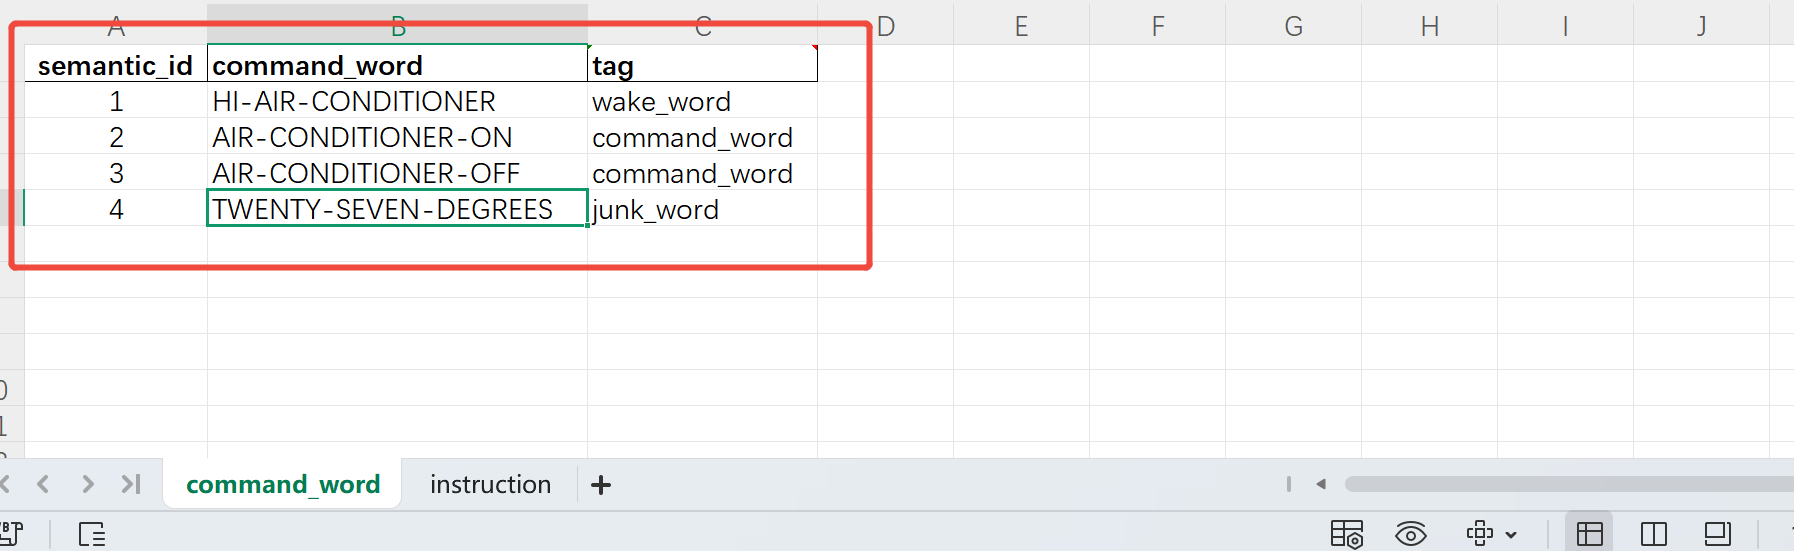
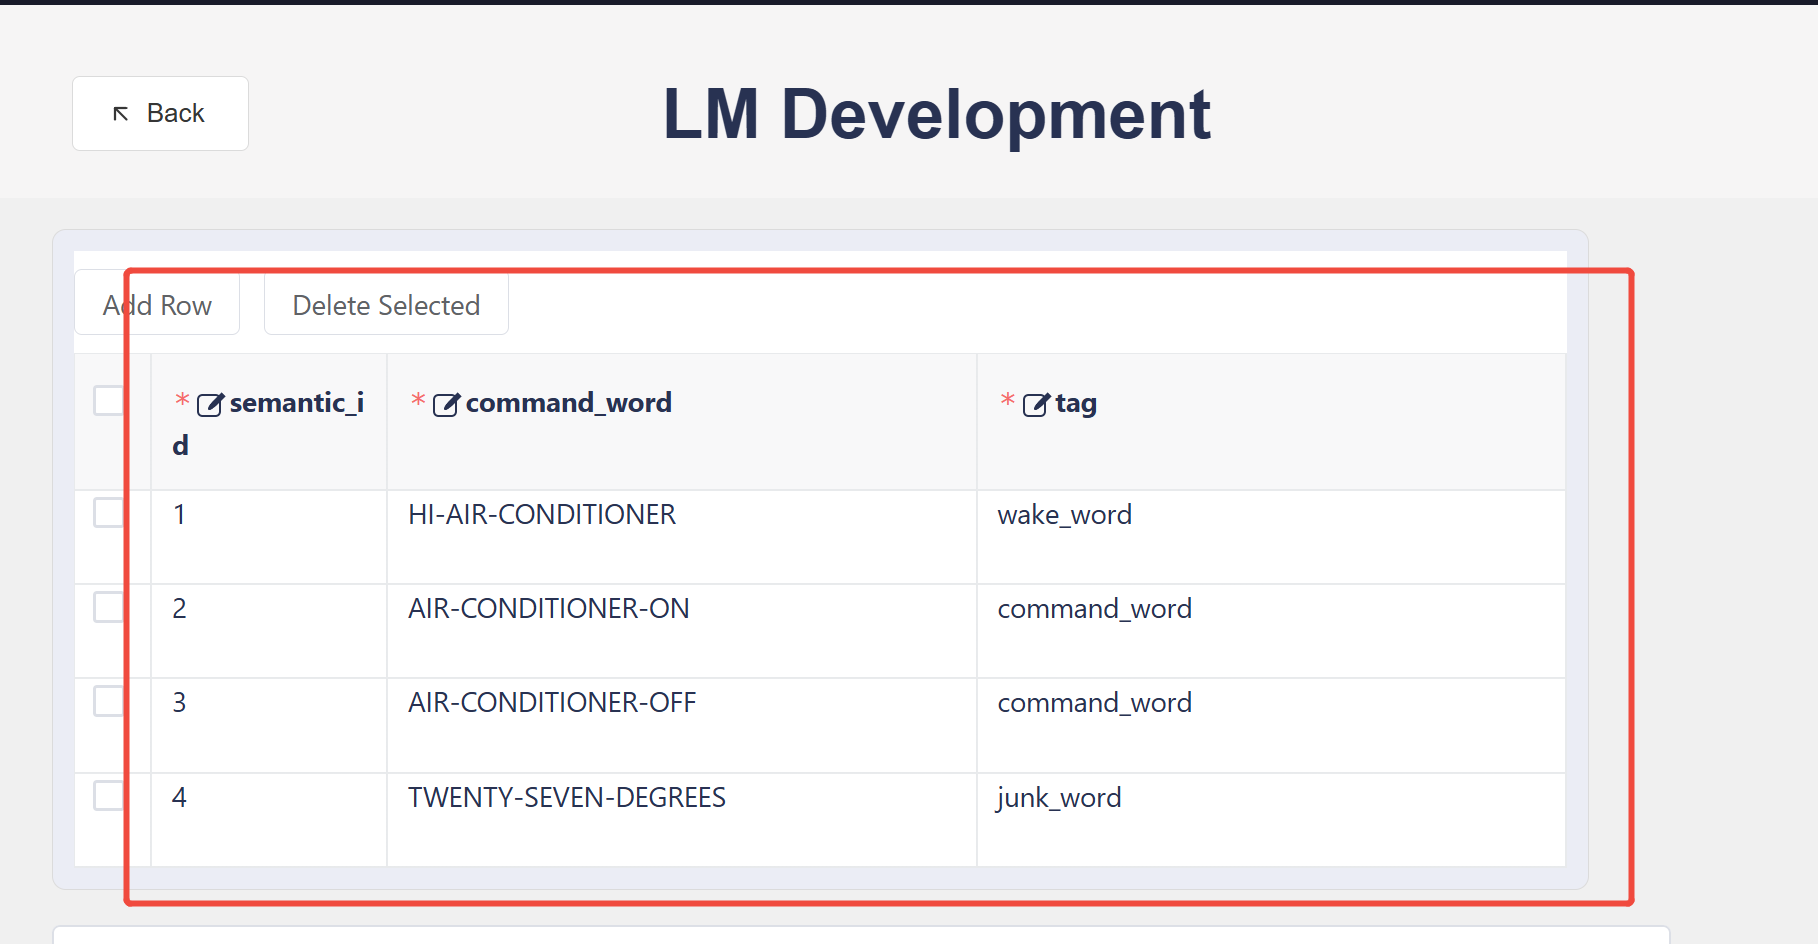
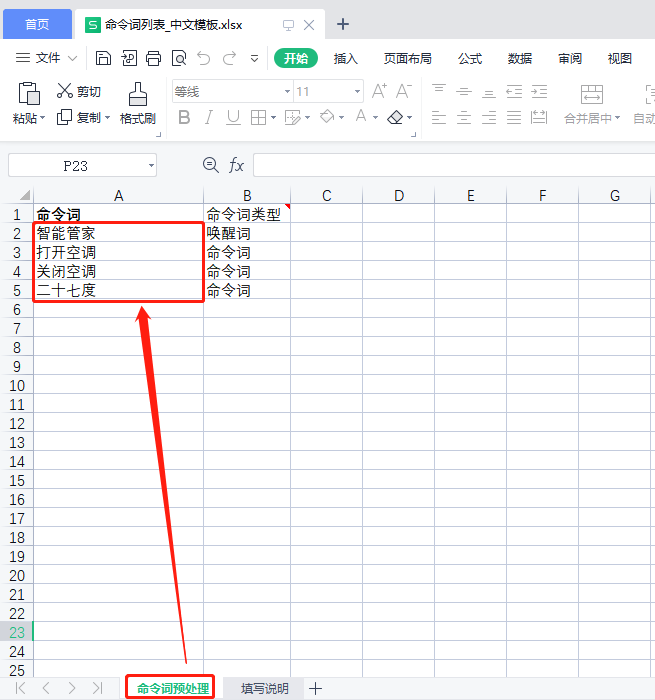
- The filled “command word” content is as follows (taking air conditioning products as an example):
-
Upload the Excel file on the webpage;
-
After the upload is successful, the preview of the command content will be displayed below, and modification and adjustment are supported;
-
Click “Submit”, and the platform will automatically jump to the project interface to view the progress of this language model in real time.
-
After a few minutes, when you see the
Current Processchanges fromSubmittedtoCompleted, you can clickDownload;
-
Decompress the downloaded package file;
-
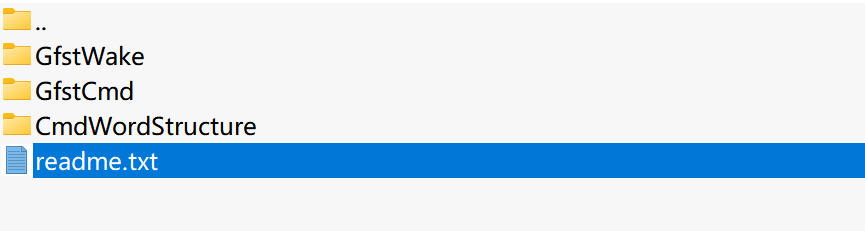
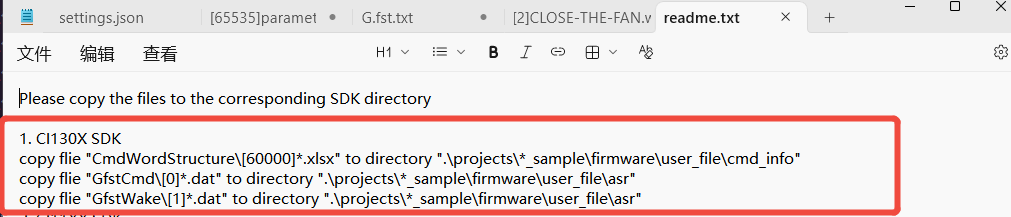
The unzipped file contains the language model and acoustic model, as shown in the figure below. Please open the
readme.txtfile; Copy the contents of each file to the corresponding path of the SDK according to the steps in the “readme.txt”.
3.2 Voice Prompt Synthesis/TTS
The purpose of synthesizing broadcast voice is to enable the device to broadcast response after recognizing the command word, so developers know the device is working; Now let’s make the voice prompts and make it correspond to the command word one by one.
-
Enter the “Development” page of the Chipintelli AI Speech Development Platform;
-
To synthesize the voice prompt, click the “Voice Prompt Synthesis” section;
-
First click the
New Projectbutton to select the language of the voice prompt, Chinese, English, Japanese, Korean and German are supported. -
Then, select the
toneunder the corresponding language. There are many tones for selection, such as adult female(multiple) and adult male(multiple).
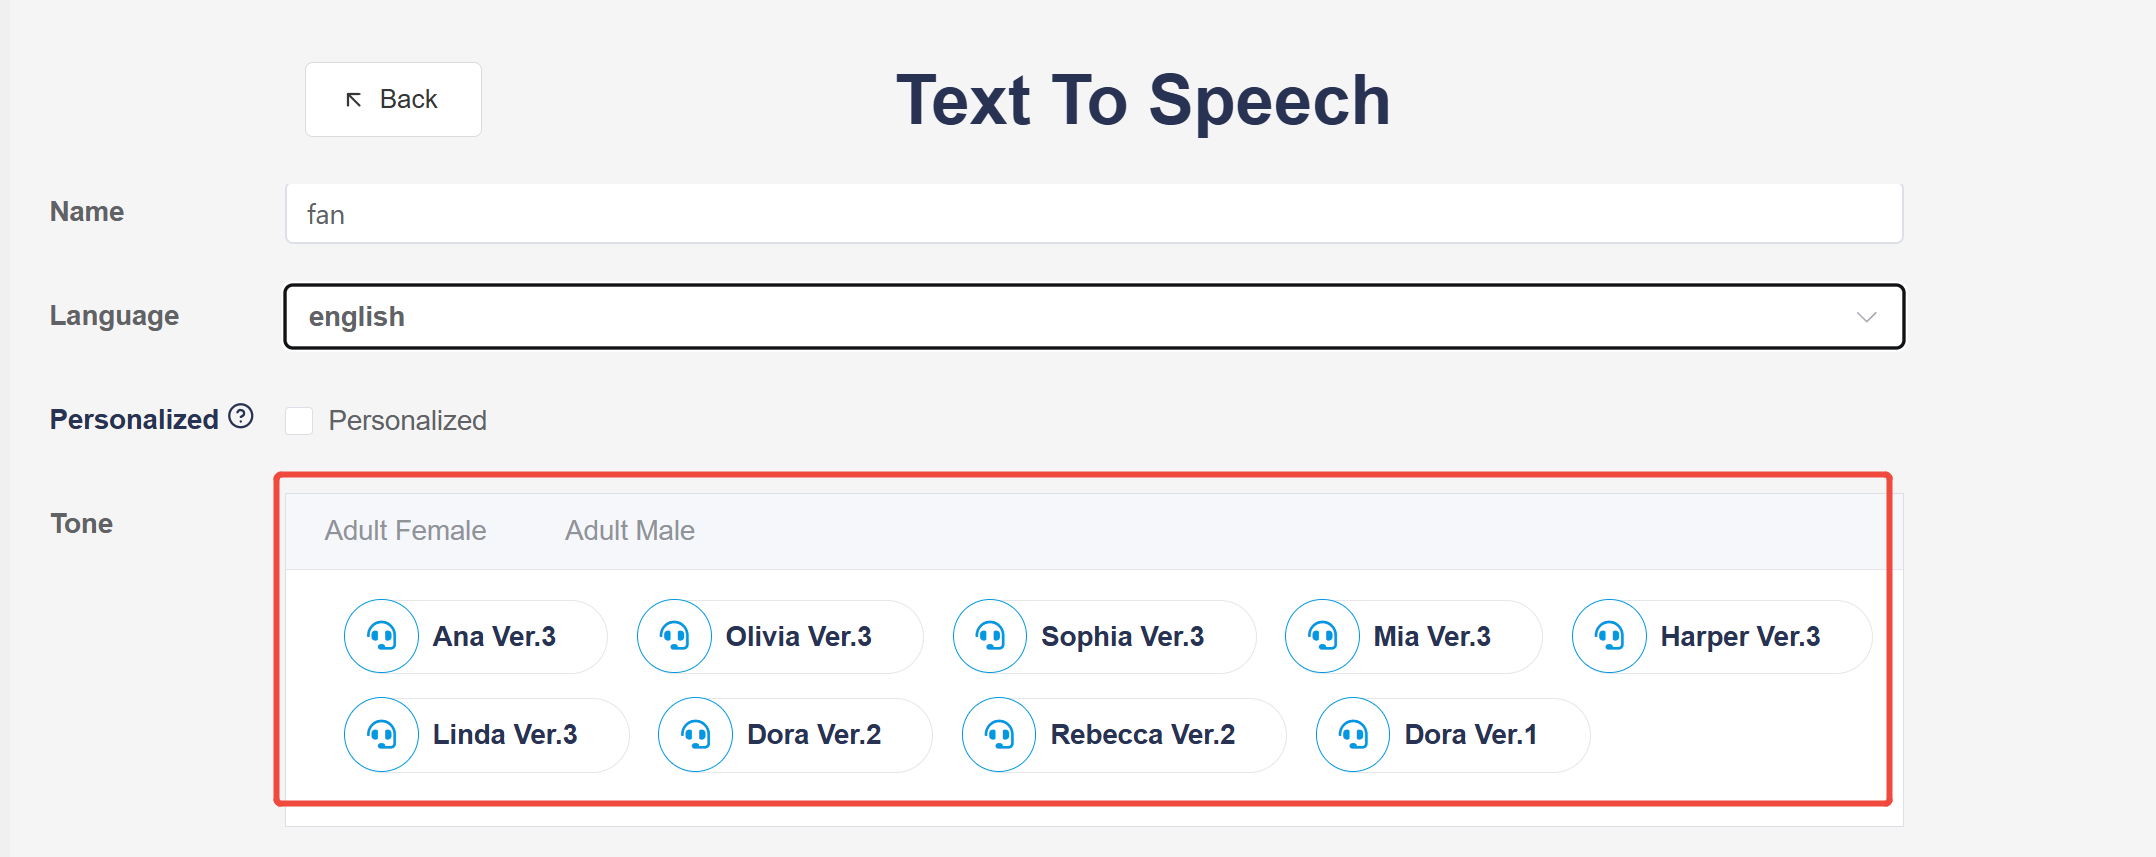
-
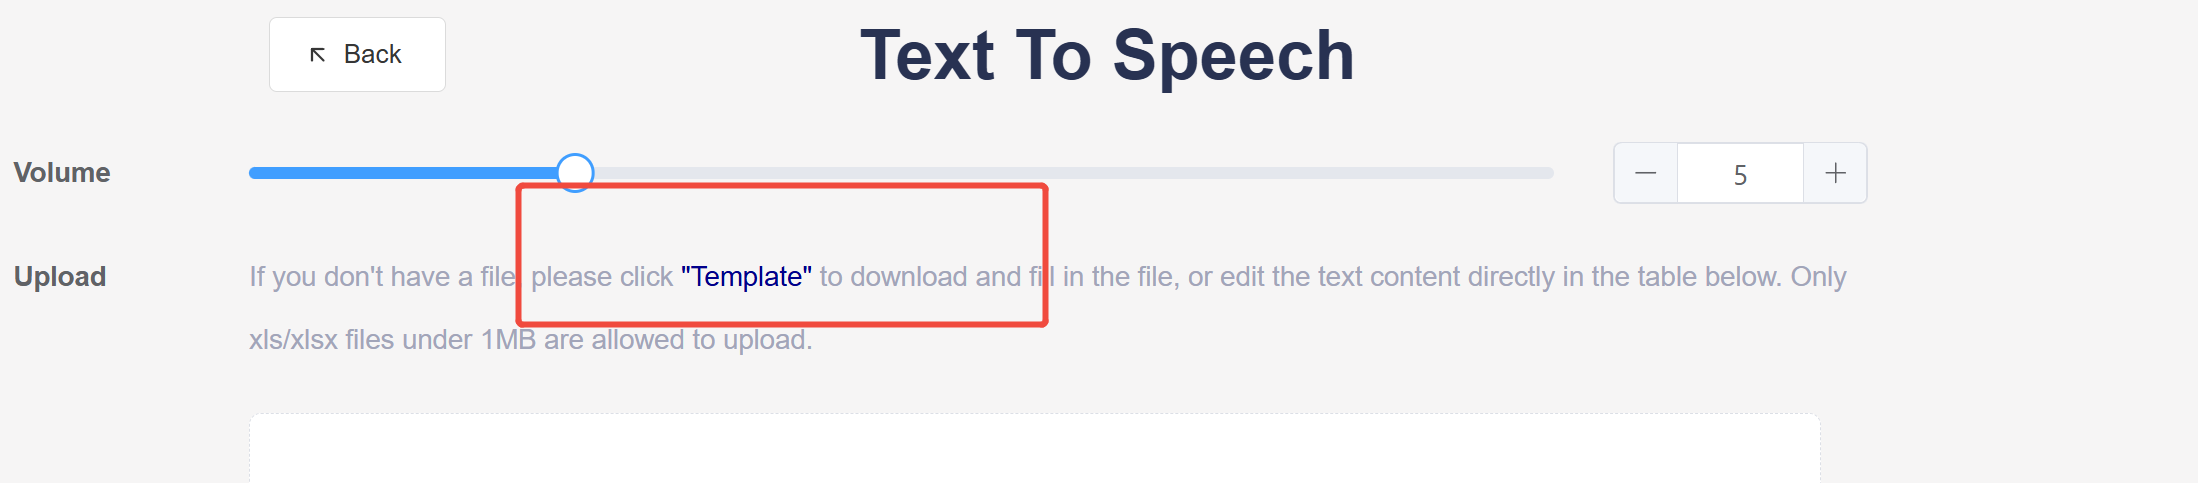
Then select the
speaking rateandvolumeof the voice prompt; -
Then click
Templateto download an Excel format attachment namedtemplate_english_prompts.xlsx;
-
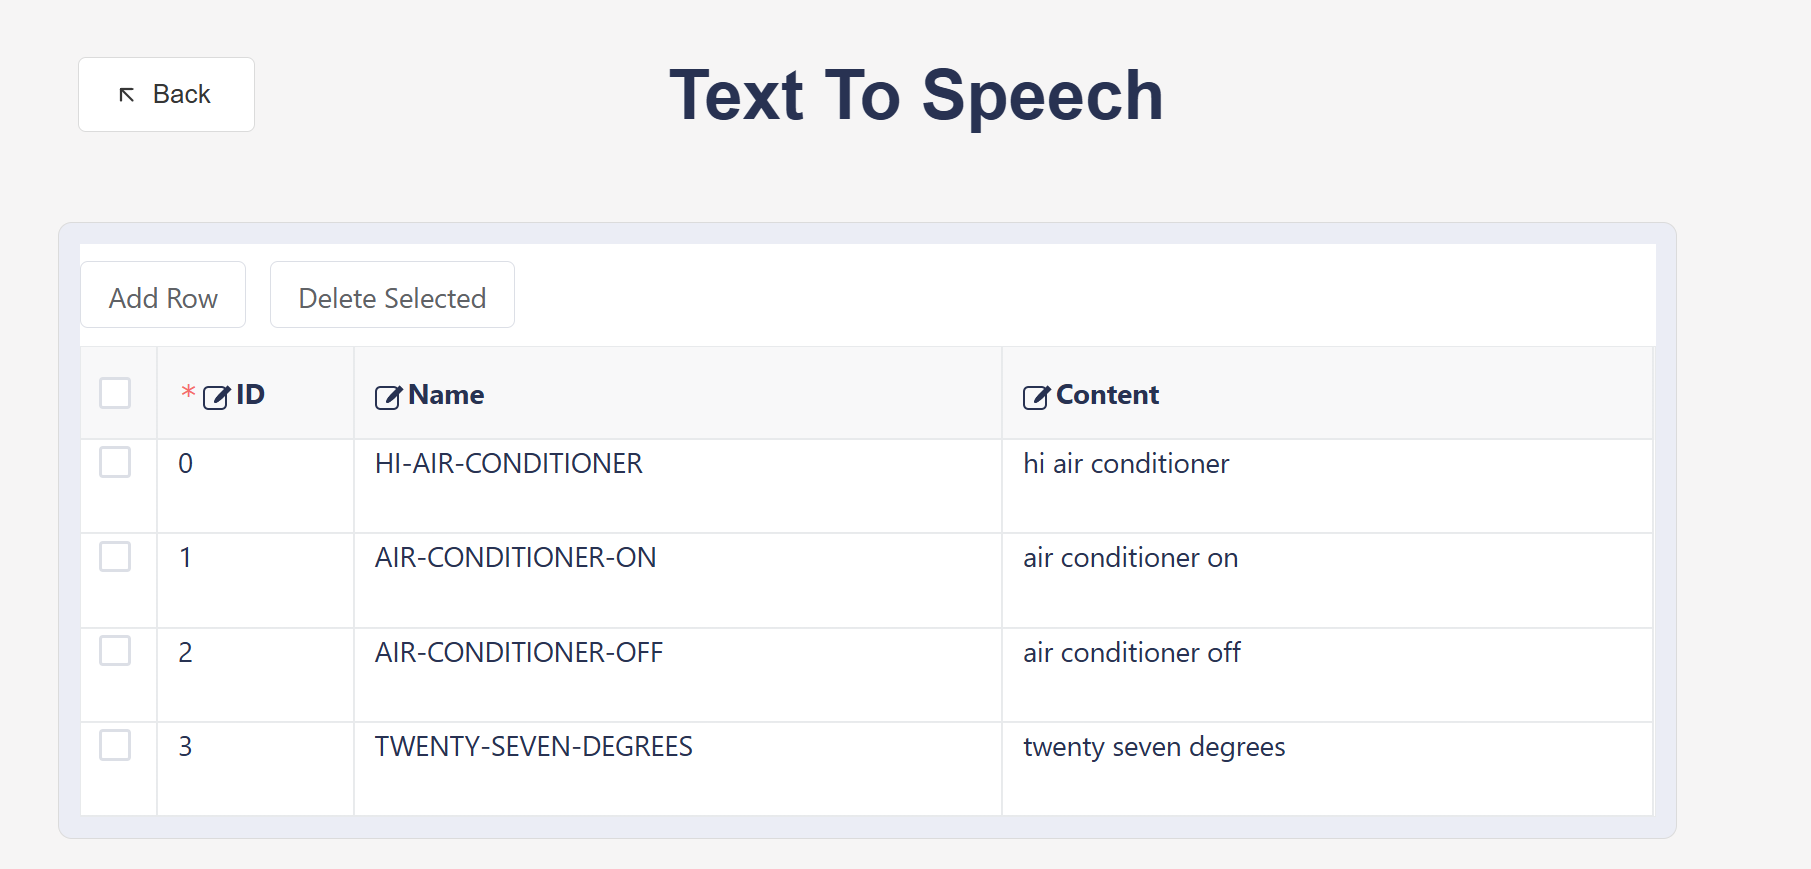
Open the
templateattachment, and fill in the text information such as voice prompt in the “Prompt_word” sheet according to the “Instructions” in the table; -
Back to the webpage, click and upload the corresponding Excel attachment;
-
After the upload is successful, the contents in Excel will be displayed in the table below, where developers can preview, modify and adjust, and click “Submit” after confirmation;
-
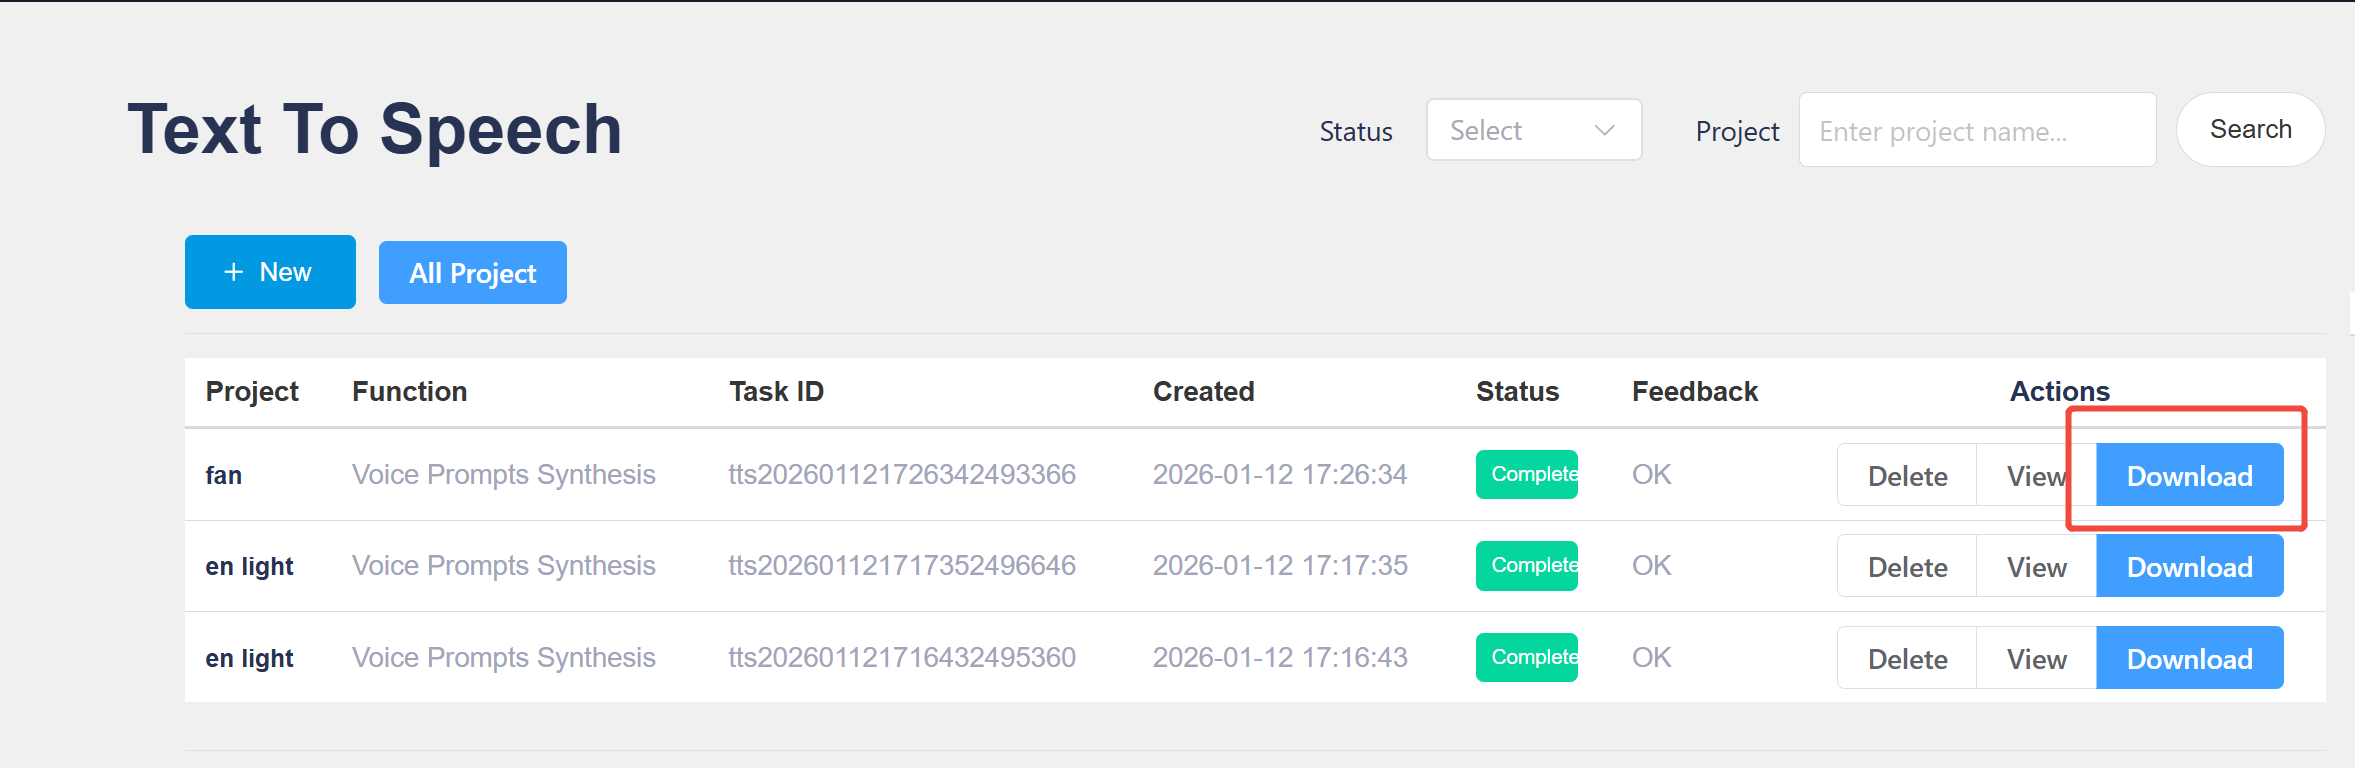
After successful submission, the page will automatically jump to the project page, and you can see that the current status of voice prompt synthesis is “In Progress”;
-
Please wait a few minutes for the voice prompt synthesis to complete, and the “current status” will be displayed as
complete. Click theDownloadbutton to save the compressed file;
- Decompress the downloaded compressed file to obtain the following multiple files:;
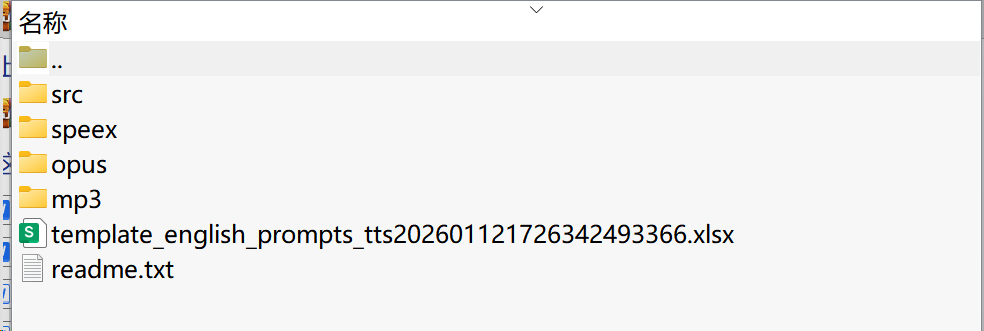
- Copy and paste the extracted audio files into the
.\firmware\voice\srcdirectory in the SDK, according to the steps described in thereadme.txt.
3.3 User Code Development
To develop custom code, developers need to install the matching development environment according to the chip model. Users who have not installed the development environment can do the following:
- Enter ☞Chipintelli AI Speech Development Platform, click on ☞Development materials;
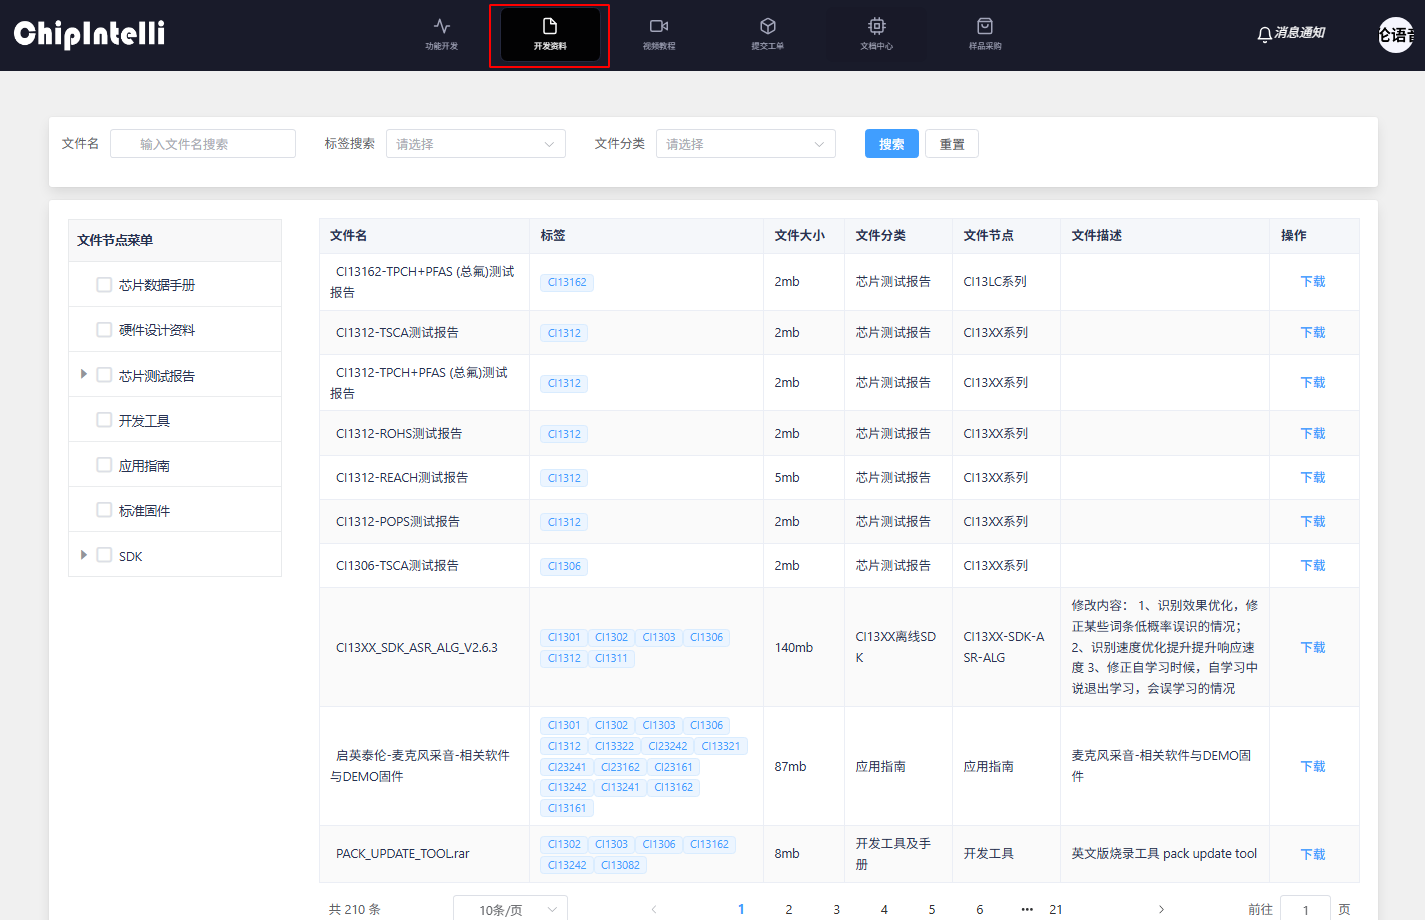
- Select “Development Tools and Manuals” by category;
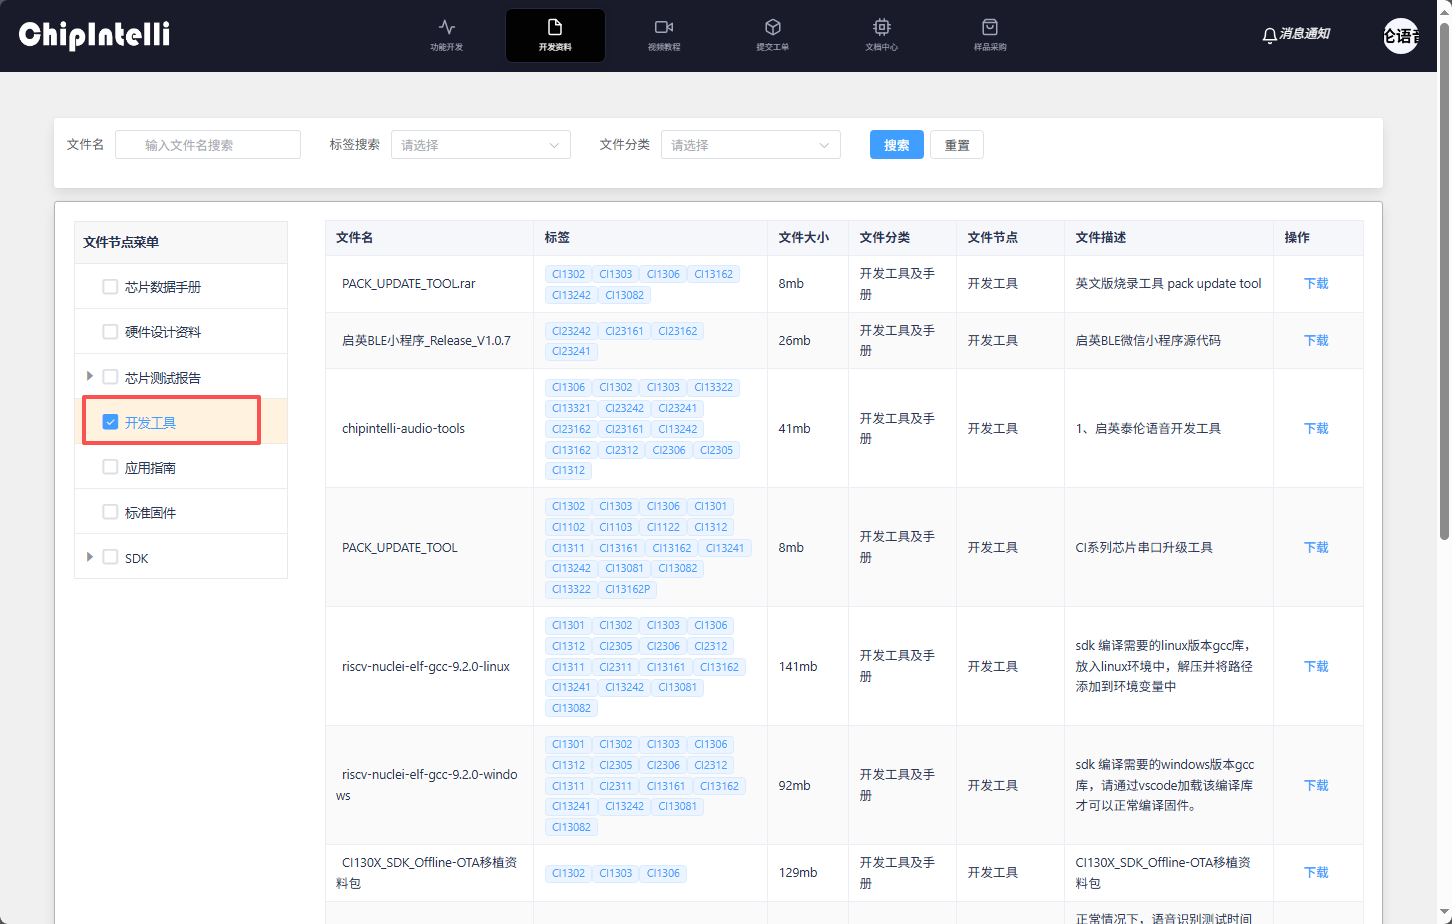
- Click “Query” to see the download links of IDE development tools corresponding to different chips;
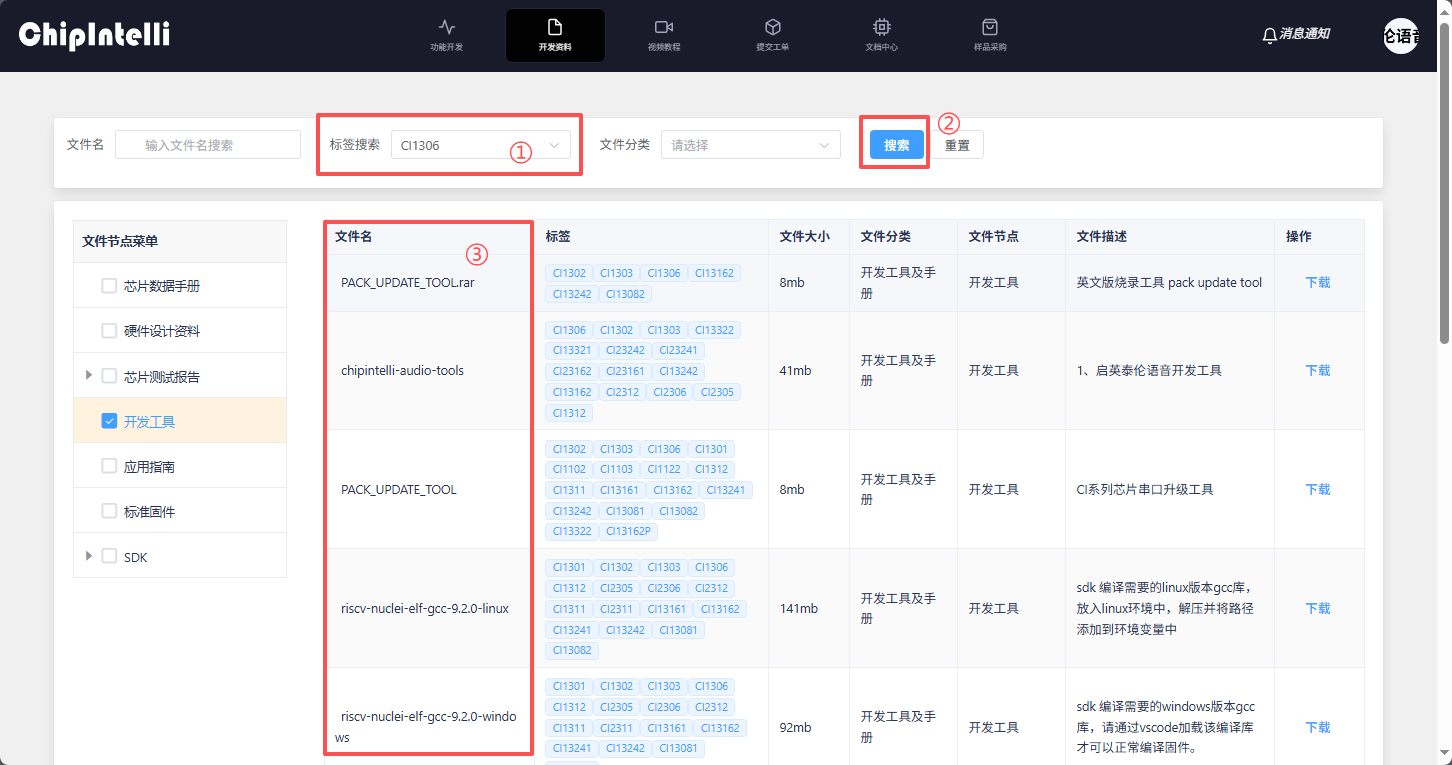
- The user finds the development tool and manual corresponding to the chip model in his hand and clicks “Download File” (here, take downloading the development tool corresponding to the CI130X chip as an example);
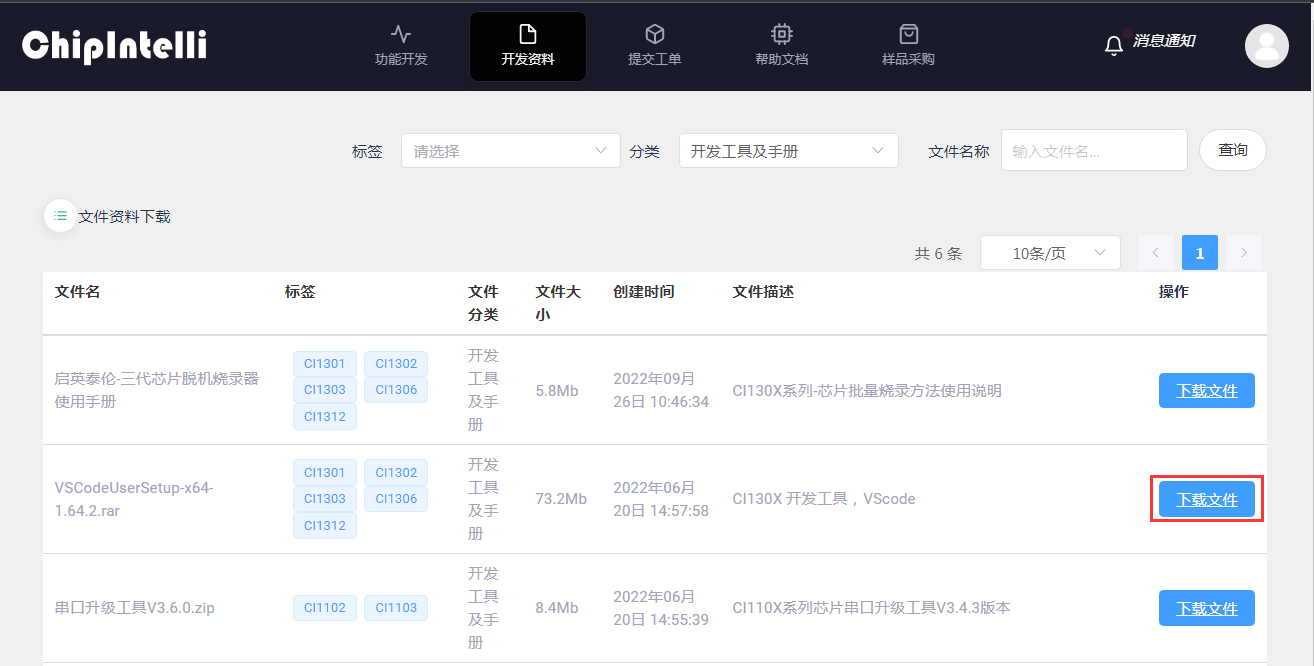
- Decompress the downloaded compressed file;
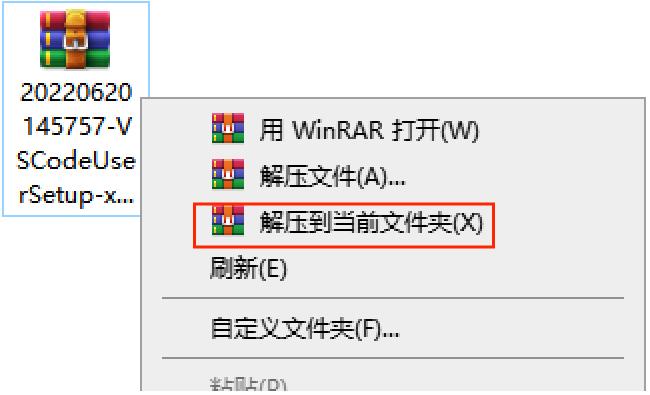
-
Open the unzipped IDE installation package, and open the document center 【Installation and Use of Compiler Software】, Install the IDE development environment according to the guidelines.
-
After installation, open the SDK package with language model, acoustic model, voice prompt and
[60000]cmd_info.xlsxtable with VScode. Users can develop its custom code refer to ☞《Software Development》in the document center; -
After finishing the custom code development, click the AI icon shown in the figure below in the VScode software. See the project name at the upper left corner. Click the
Cleanbutton (“XX”) first, and then click theBuildbutton (“X”) to compile the user code;
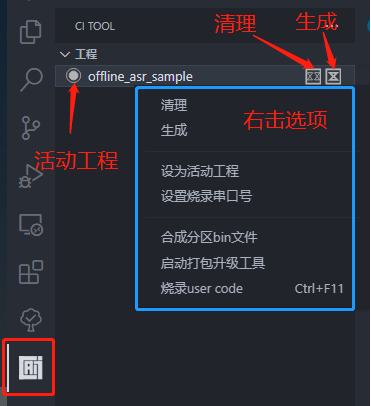
-
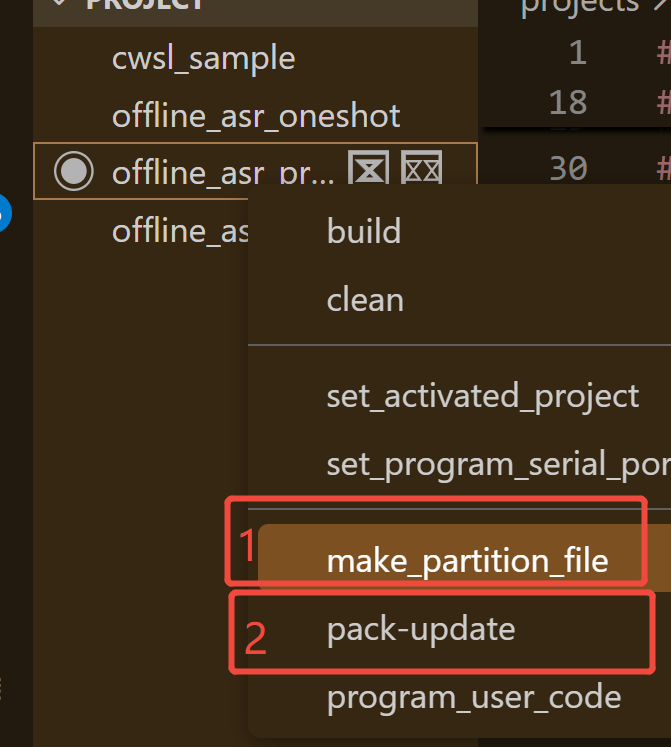
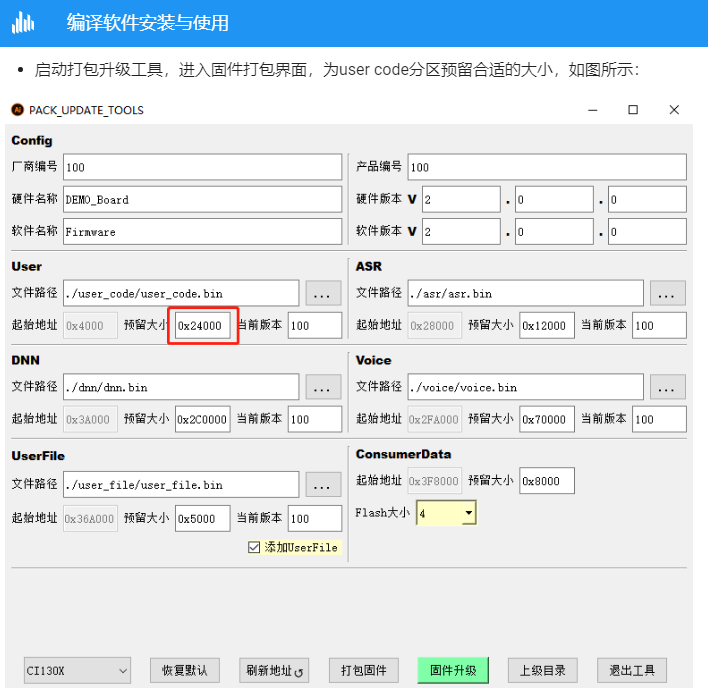
After the code is compiled, right click on the project name and left click on the
make_partition_binbutton to generate bin files of all partitions; -
After synthesizing bin files of all partitions, click to start the package upgrade tool;
-
When you open the
Pack_update_toolfor the first time, you need to select the chip model corresponding to the user’s development board; -
Then click the
Updatebutton, jump to the update interface, and you will see the serial port number, update progress, update rate, etc., In addition, please note that USB to serial port tool is used to communicate with the computer during firmware pack and update. Please install the USB to serial port tool driver in advance to ensure success development; -
Click “Select Firmware” to select the prepared firmware;
-
Check our development board after the serial port number;
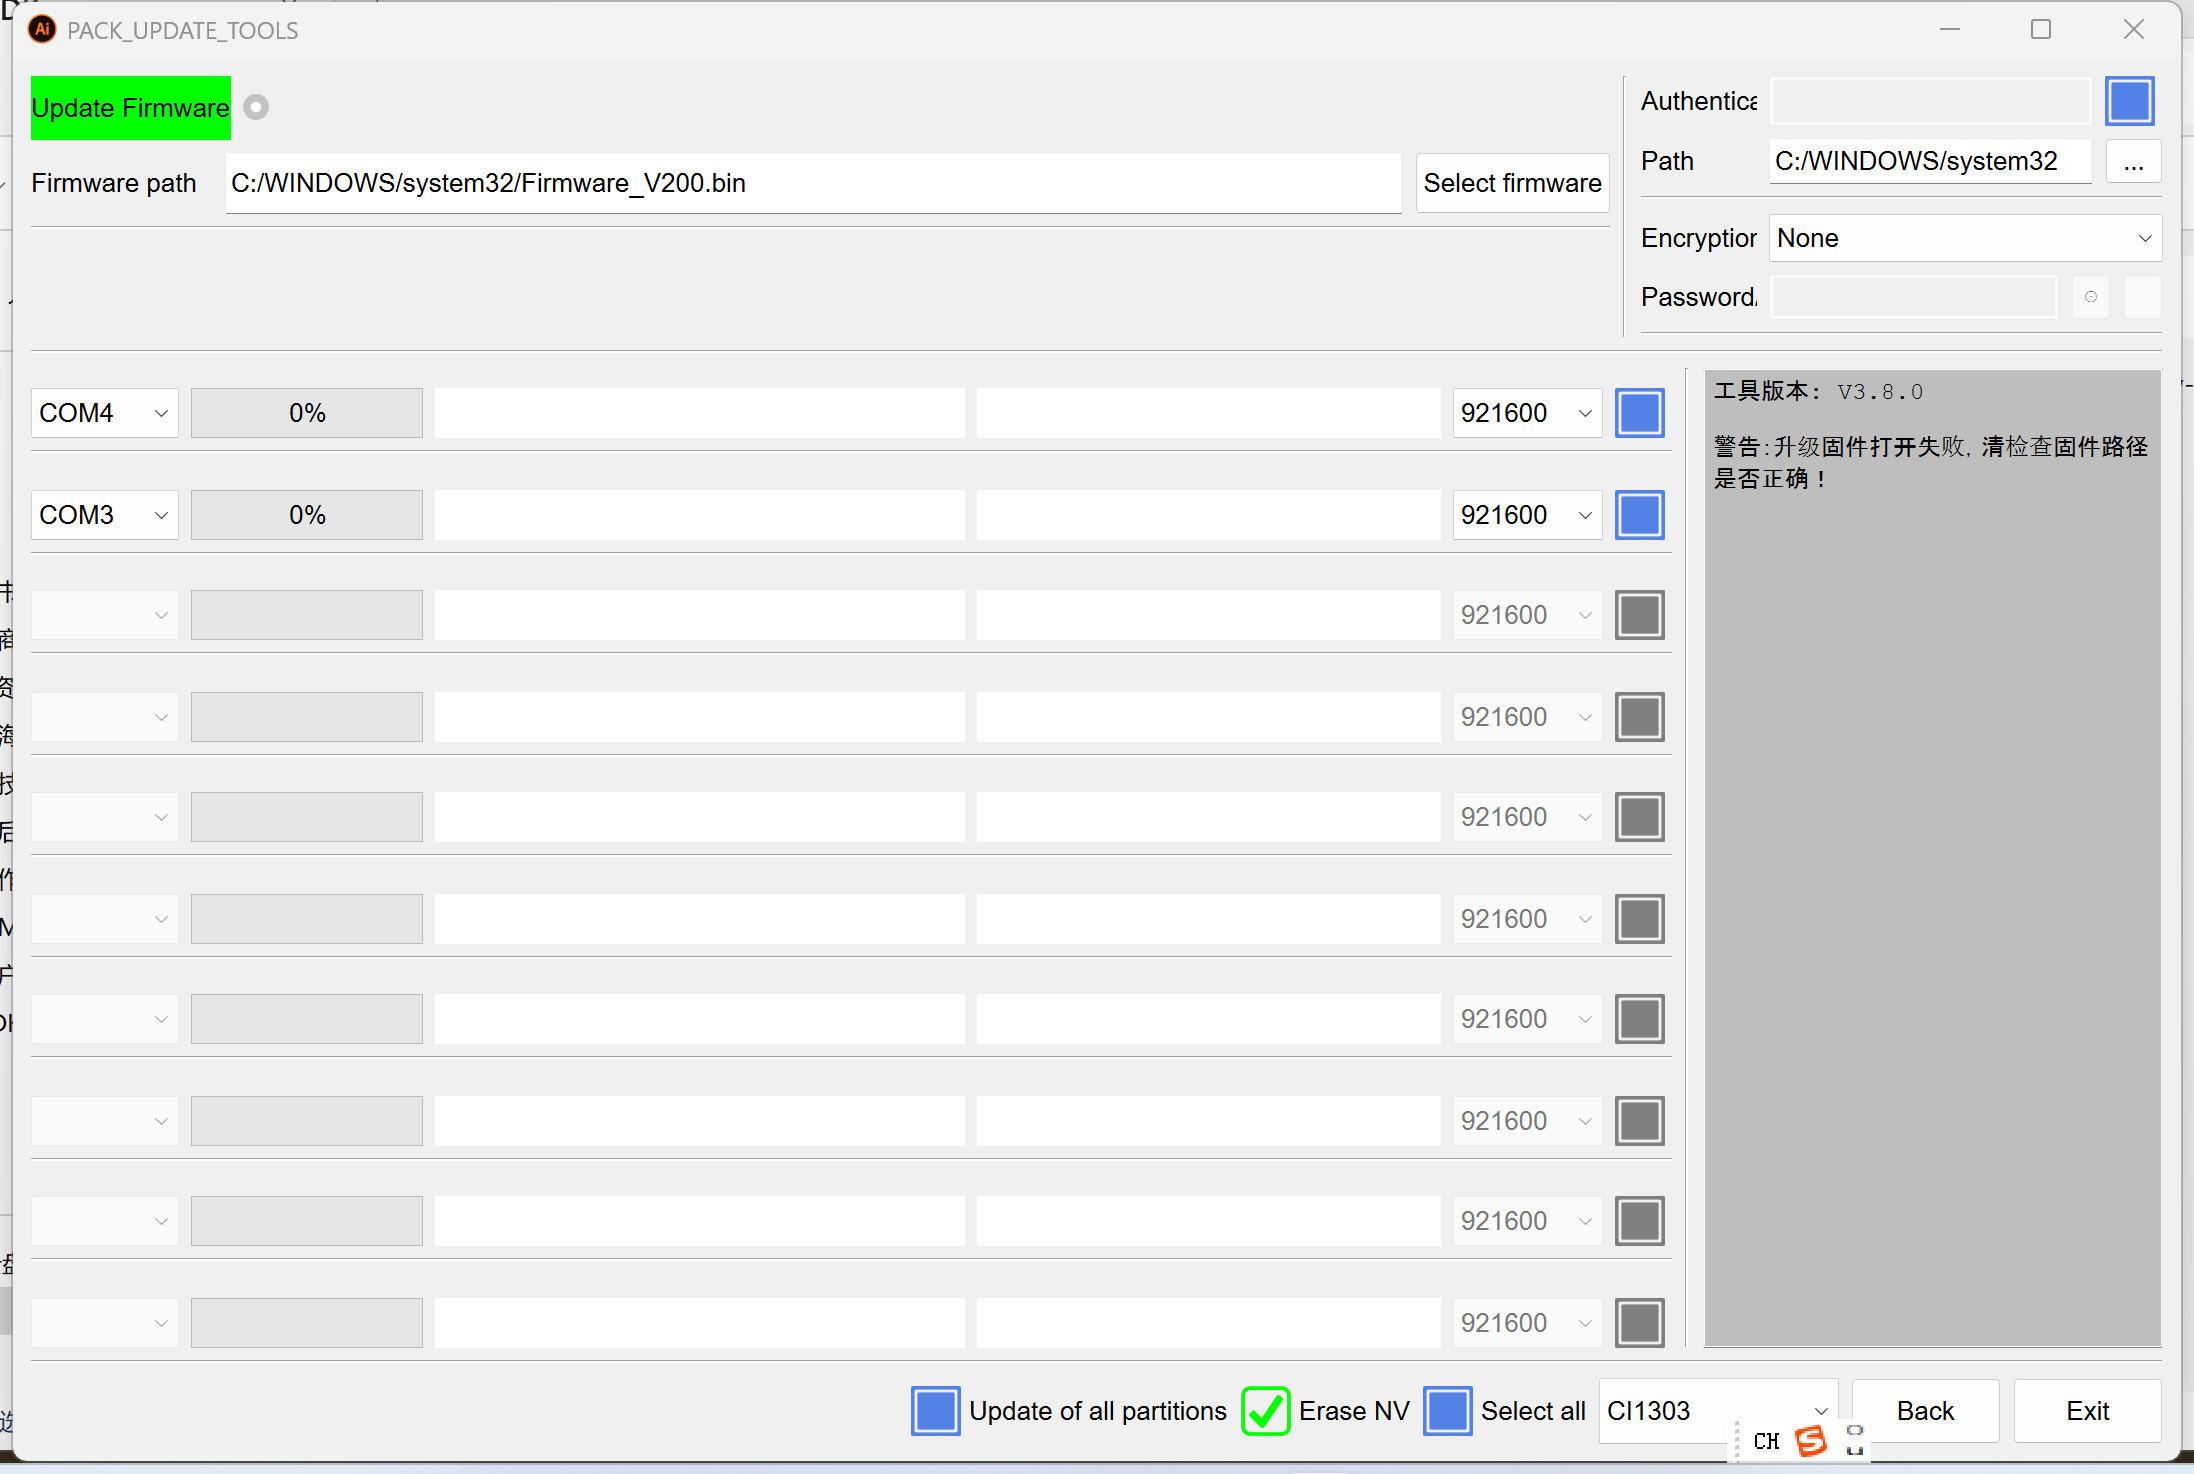
- When the development board is powered on or reset, the software will automatically start flashing the selected firmware.
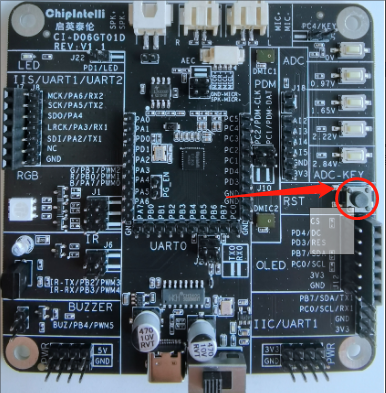
① When flashing the CI130X series CI-D06GT01D evaluation kit, you can use the reset button shown below:
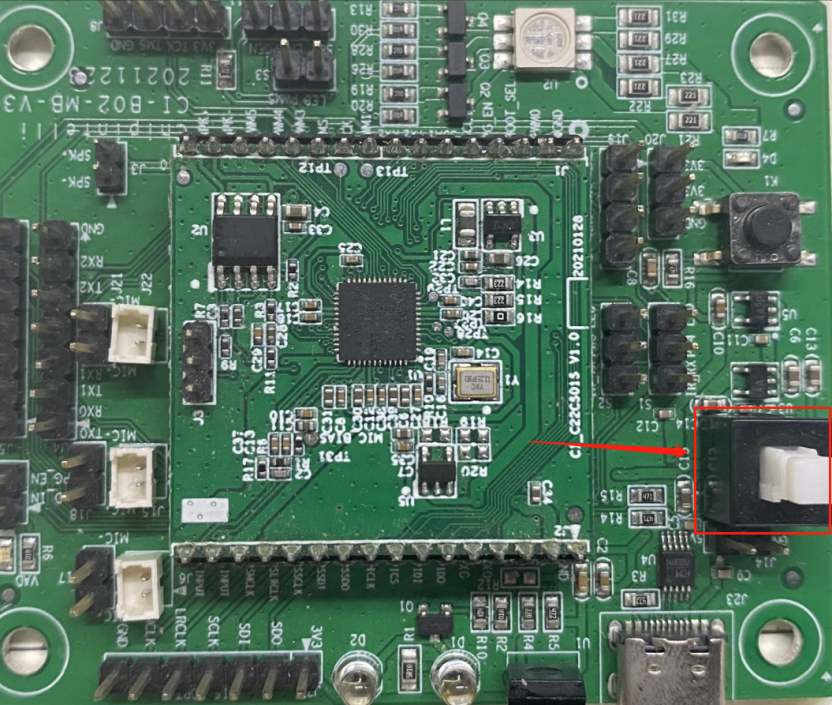
② When flashing the CI1122/CI110X series CI-B02-MB evaluation kit, power off the power switch shown in the figure below, and then power on the power switch:
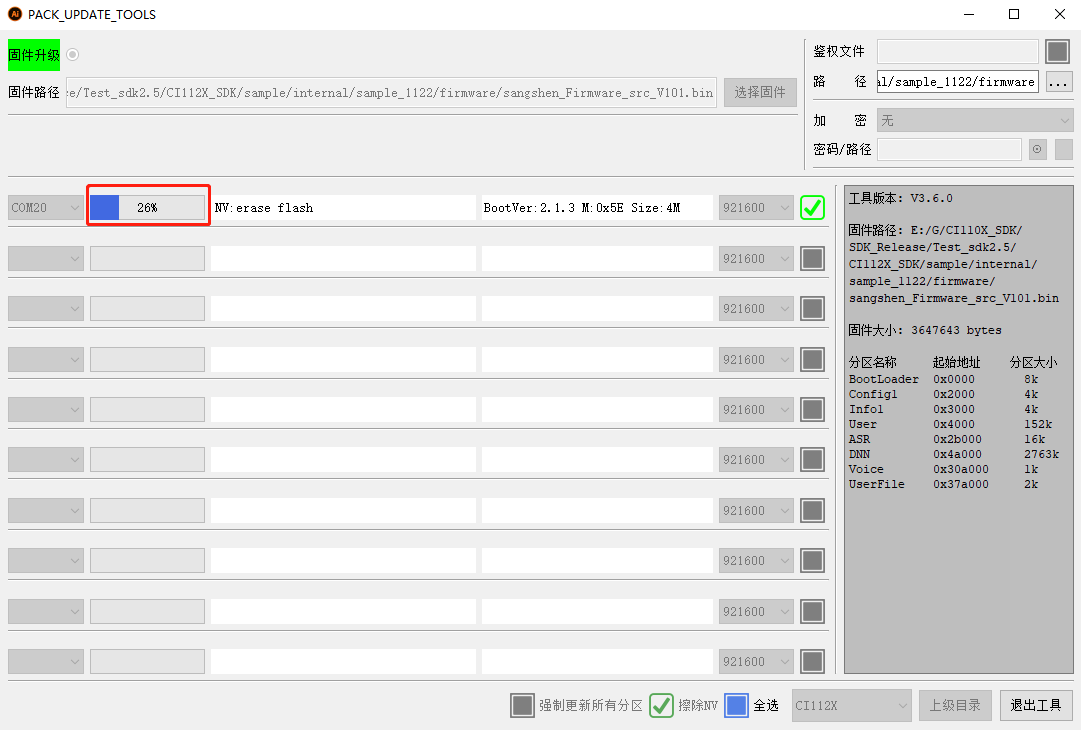
- When the Firmware Update tool is flashed, the download progress will be displayed in real time:
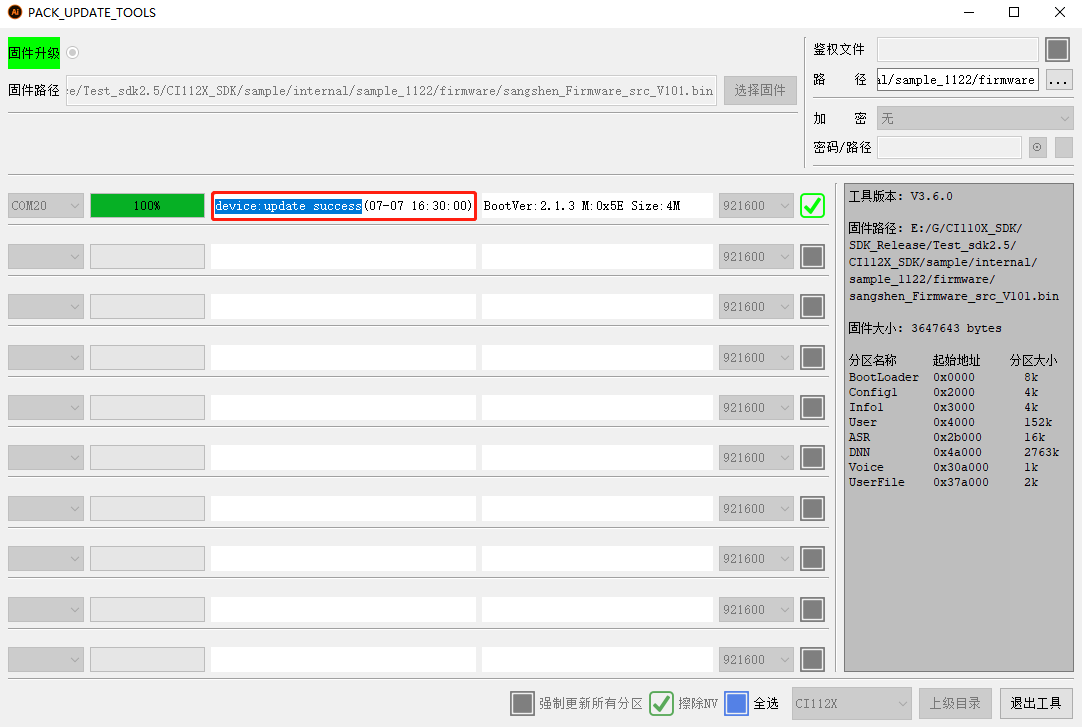
- The Firmware Update tool displays “device: update success....”, which indicates that the firmware download and update are successful; Remove the check and power on again to start the experience test.
Note: The flashing serial port defaults to UART0 of the chip, and the baud rate is 115,200 (CI110X series) or 921,600 (CI130X series)
3.4 Language Model Optimization
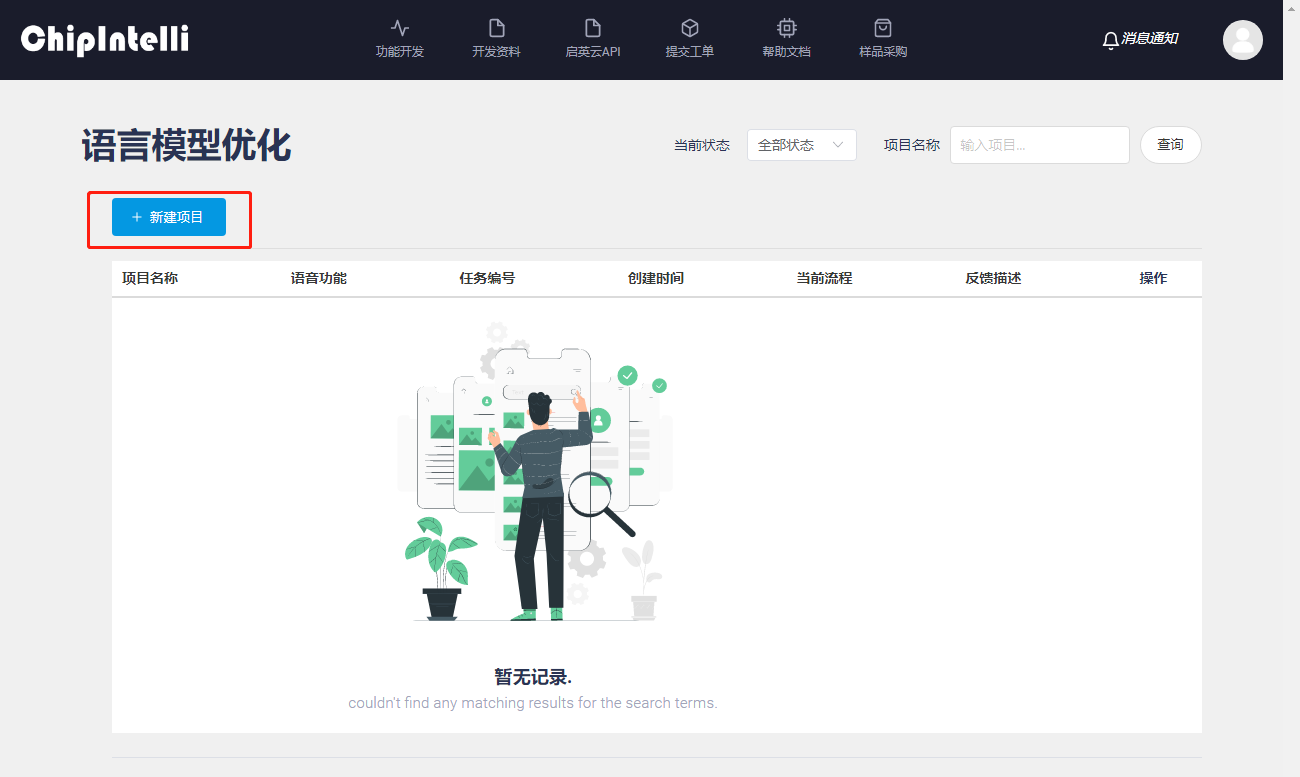
After completing the previous firmware development process, developers should now be familiar with the excellent recognition performance of the language product project. However, if you identify areas where “recognition rate” or “out-of-vocabulary (OOV) rejection” needs improvement during testing, you can utilize the “Language Model Optimization” feature in our Voice AI Platform to further enhance recognition performance. Simply submit your wake words or command words, and the platform will automatically handle the optimization.
Wake Word Optimization Steps
- First, prepare the SDK project package that requires optimization (available through the “Development Resources” section or “Product Development” feature of the Voice AI Platform);
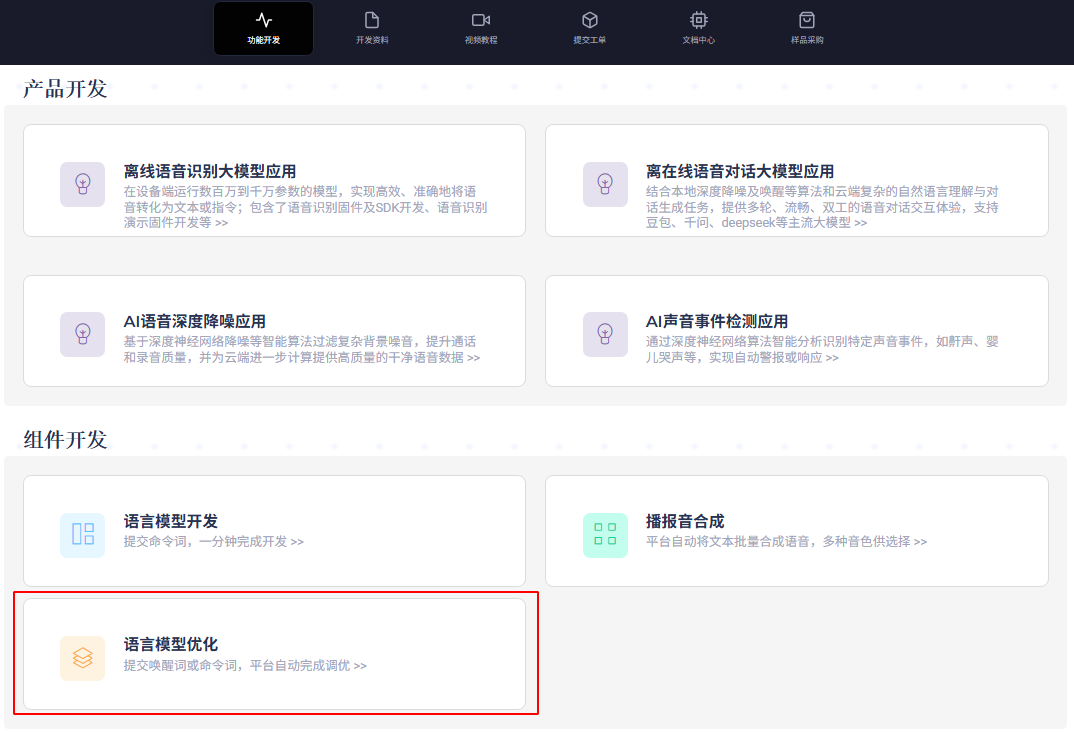
- Open the “ChipIntelli Voice AI Platform” and click on the “Language Model Optimization” feature in the functional development section;
- Click “New Project”;
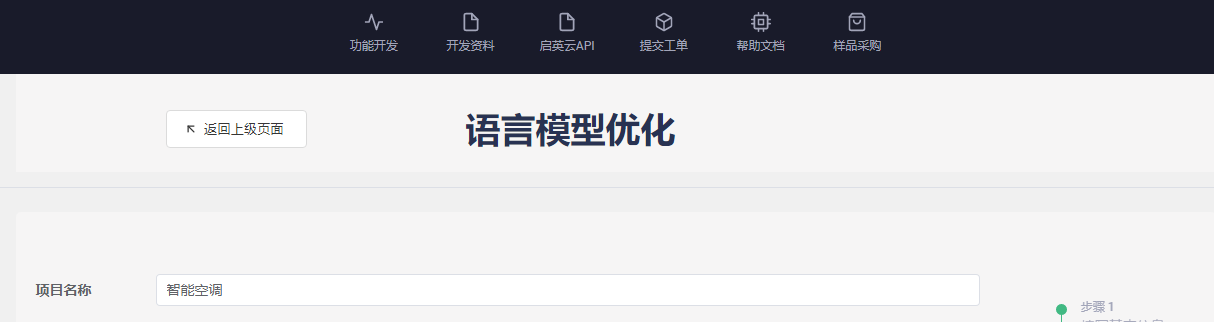
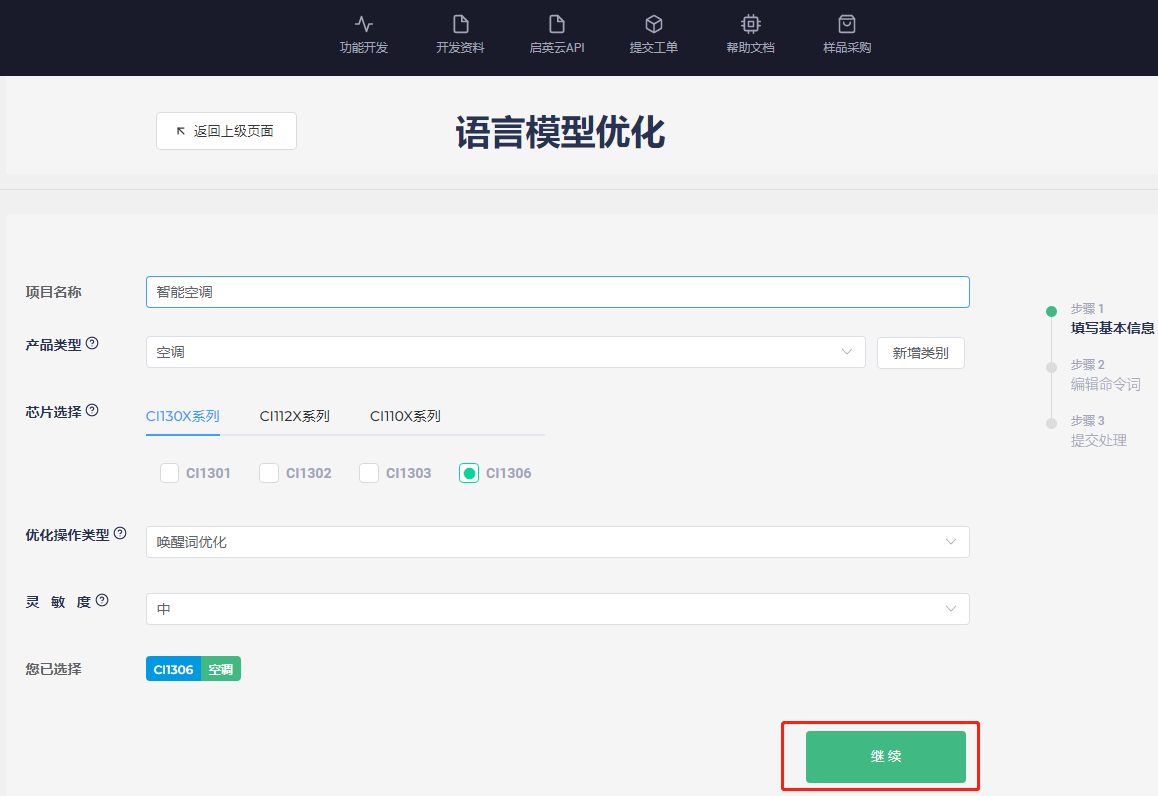
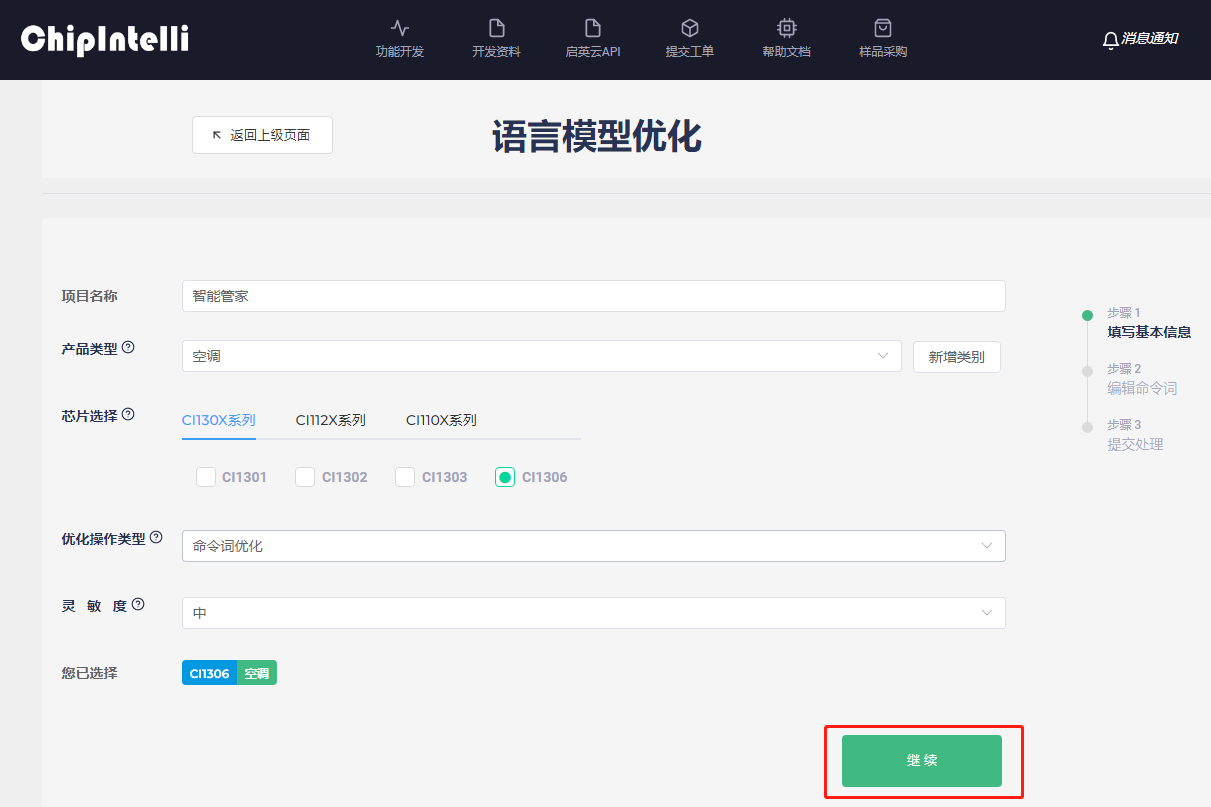
- Using a smart air conditioner project as an example, enter “Smart Air Conditioner” as the project name;
- Select “Air Conditioner” as the product type. If your product type is not listed, click “Add Category” to create a new one;

- Select the actual chip model number in use. For this example, we’ll use the CI1306 model;

- For optimizing the wake word, select “Wake Word Optimization” as the optimization type;

- For “Sensitivity” selection, refer to the tooltip (?) for guidance based on your specific usage scenario. We’ll use the default “Medium” sensitivity;

- After completing the above fields, click “Continue”;
- New optional fields will appear. Select the appropriate acoustic model based on your product type. Choose an acoustic model that matches your product type. If no matching model is found, select the latest version labeled as “Universal”.

- Enter the wake word to be optimized, for example, “Smart Butler”;

- After verifying the Pinyin transcription is accurate, click “Submit”;

- After submission, wait briefly for the optimized wake word language model to be generated;
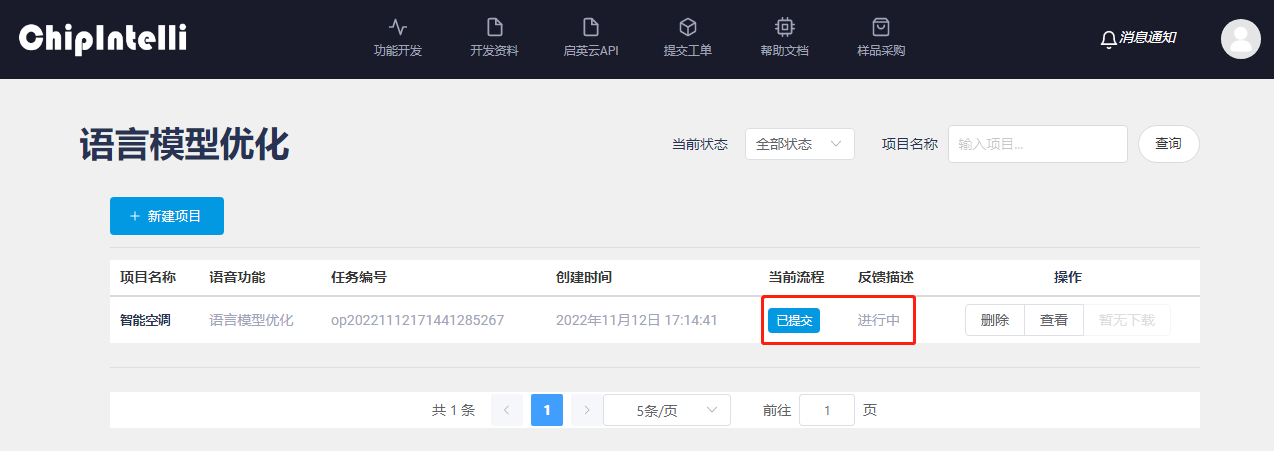
- After wake word optimization is complete, click “Download File” and save the compressed file to your desired directory, then extract it for use;
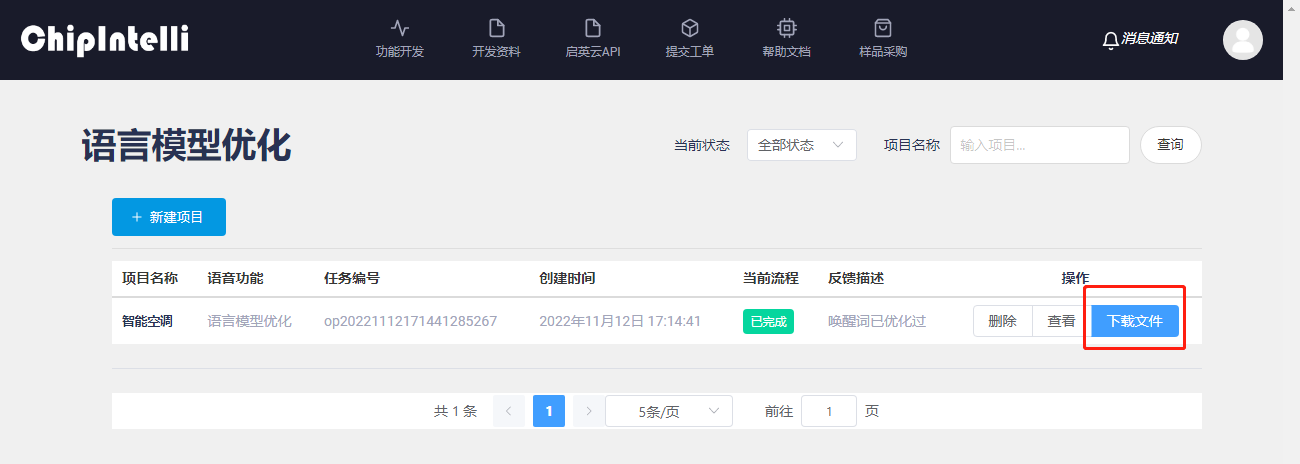
- Open the extracted folder and copy the optimized language model file “[0]asr_chinese_…optimize.dat” to overwrite the existing “[0]asr......dat” file in the CI130X_SDK......\projects\offline_asr_pro_sample\firmware\asr directory;

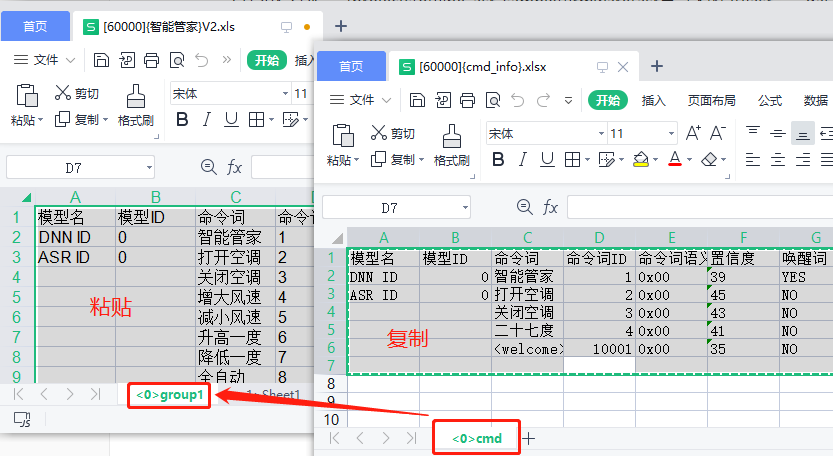
- Copy the content of the “<0>cmd” group from the “[60000]{cmd_info}.xlsx” spreadsheet and use it to replace the content of the corresponding group in the [60000]{......}.xls file located at CI130X_SDK......\projects\offline_asr_pro_sample\firmware\user_file\cmd_info;
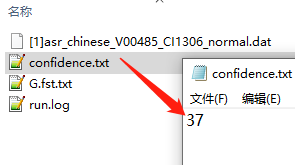
- Open the “confidence.txt” file to view the confidence score for the wake word;
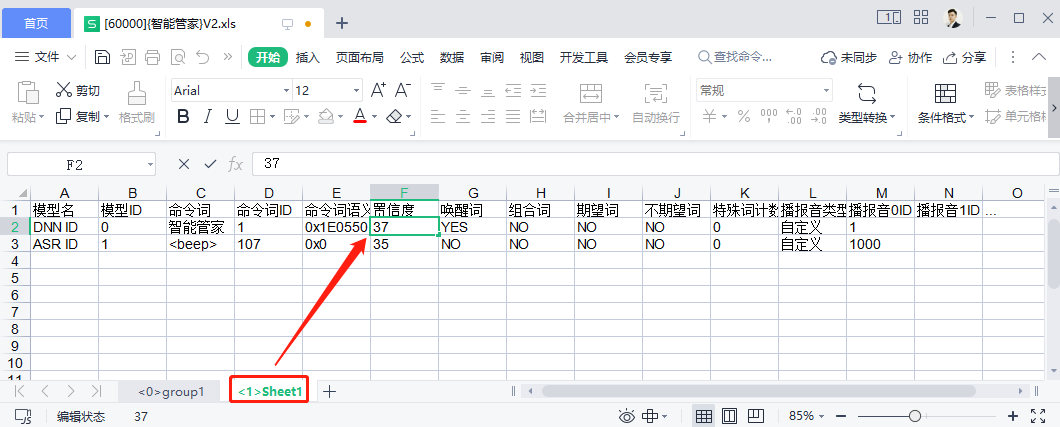
- Next, open the Excel file [60000]{......}.xls in the SDK project package at CI130X_SDK......\projects\offline_asr_pro_sample\firmware\user_file\cmd_info. Update the wake word confidence value in “<1>Sheet1” to match the value in the “confidence.txt” file (e.g., “37”);
- Finally, open the SDK project package using VScode. Refer to the Firmware Programming documentation to complete the final firmware programming process.
Command Word Optimization Steps
- First, prepare the SDK project that requires optimization (available through the “Development Resources” section or “Product Development” feature of the Voice AI Platform);
- Open the “ChipIntelli Voice AI Platform” and click on the “Language Model Optimization” feature in the functional development section;
- Click “New Project”;
- Using a smart air conditioner project as an example, enter “Smart Air Conditioner” as the project name;
- Select “Air Conditioner” as the product type. If your product type is not listed, click “Add Category” to create a new one;
- Select the actual chip model number in use. For this example, we’ll use the CI1306 model;
- For optimizing all command words, select “Command Word Optimization” as the optimization type;

- For “Sensitivity” selection, refer to the tooltip (?) for guidance based on your specific usage scenario. We’ll use the default “Medium” sensitivity;
- After completing the above fields, click “Continue”;
- New optional fields will appear. Select the appropriate acoustic model based on your product type. If no matching model is found, select the latest version labeled as “Universal”.
- For the attachment, you’ll need to upload an Excel list of command words. First, click “Attachment Example” to download the Chinese template for the command word Excel list.
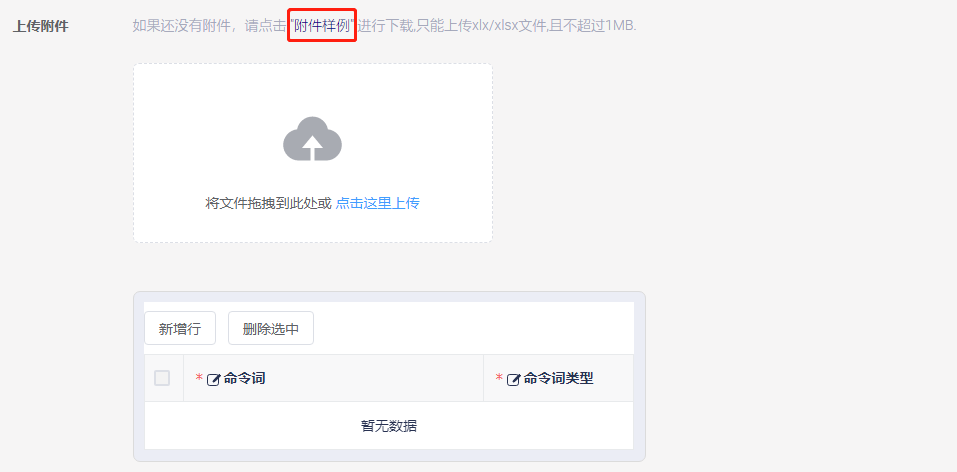
- Open the downloaded Excel template and enter all command words and wake words into the table, then save the file.
4. Hardware Development
The hardware development is mainly divided into two development methods: first, expand the development based on the official standard module of Chipintelli; Second: design its own product modules according to the officially recommended peripheral device layout on the basis of Chipintelli chips. Next, we will explain the two methods. Users can choose one based on the comprehensive comparison of development capability and development resources.
4.1 Hardware Module Selection
The official standard module is a module designed by our company according to the common functions of various product fields, using appropriate chips and high-quality peripheral materials. It has the characteristics of high cost performance and good reliability. Users can select a module suitable for their own needs in the module selection table of 【Hardware Selection Guide】 for specific product development.
4.2 Hardware Chip Selection
If developers need to directly use voice chips for hardware development, they need to first select the chip model suitable for their own products according to the recommendations. Users can select from the chip selection table in 【Hardware Selection Guide】 document.
4.3 Hardware Design
Users who need to design PCB by themselves can design according to the 【Hardware Design Reference】 provided by our company. Chipintelli provides a variety of Solution reference schematics, which can meet most common application scenarios.
Hardware developers can obtain the reference schematic files from the Chipintelli AI platform. The specific acquisition steps are as follows:
- Step 1: enter the “Development Materials” page of the Chipintelli AI Speech Development Platform;
- Step 2: Select “Hardware Design Data” for the “Classification” option;
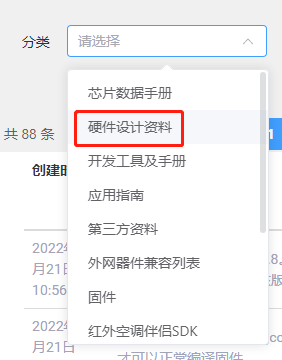
- Step 3: “File name” Enter the specific chip model and click “Query”, such as “CI1306”;
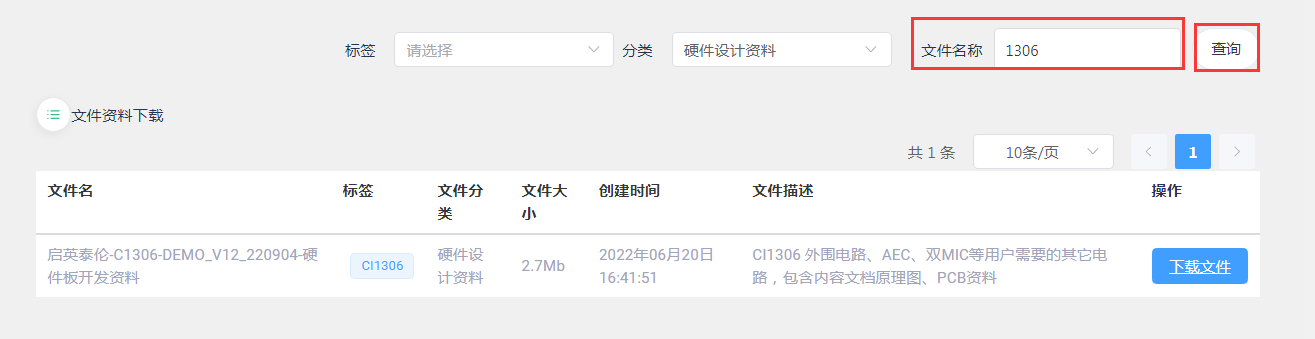
- Step 4: find the hardware development materials corresponding to the chip, and click the blue “Download File” to download the “Reference schematic” containing the corresponding chip.

4.4 Hardware Test
The test reports related to our chips and modules can be downloaded from 【Test Report】.
If the customer designs the module by himself, he can refer to the above test items for inspection.
5. Product Test
There is a complete set of testing methods for product Solutions developed based on Chipintelli chips or modules, including “the method for testing the recognition effect of voice Solutions”, “the method for building automatic voice recognition tests”, and “the method for functional testing during mass production of products”.
5.1 Recognition Performance Test Standard
The document center has a document introducing the standard of recognition performance test. Please go to 【Recognition Performance Test Standards】 to check.
5.2 Automated Speech Recognition Test
The Document Center has a document about the method of building an automated speech recognition test. Please go to 【Automated Speech Recognition Test】 to view.
5.3 Production Test
The document center has a method document that describes the function test of our products during mass production. Please go to 【Production Test】 to view it.
6. Product Solution Development
The Document Center has introduced some application cases of product solutions that our company has completed. Users can click 【Product Solution Development】 to view the corresponding documents and browse the relevant information for guiding development and product production.